Photos by Peter Beck
Holiday cooking is often elaborate. But sometimes it can, and should, be simple.
My friend Peter Beck recently won my heart (as he often does) by sharing a cake that is uncomplicated and relatively healthy … and tastes like spring. If you want something a little dressy but not too gloppy for an Easter dessert, I recommend trying it.
I was pleasantly surprised to learn that although this cake contains baking soda, it is still usable for Passover as well, although if you keep kosher you may have to seek out kosher-for-Passover baking soda.
I grew up thinking that leavening agents were forbidden during this eight-day holiday. When the Jews were finally allowed to leave Egypt, according to the Exodus story, they were in such a hurry that their bread didn’t have time to rise. Jews remember this by eating mainly matzo, unleavened bread, at Passover.
Nevertheless, the prohibition is not on leavening agents like baking soda, baking powder, and yeast but actually on the way in which they interact with certain grains, specifically wheat, barley, oats, rye, and spelt. Peter’s almond flour and baking soda are therefore allowable.
Peter didn’t actually design this cake for the spring holidays. He isn’t a baker in general, although I can testify that he is an amazing cook.
He loves to offer a dessert of some kind when he entertains, however. Like me, he lives in Hawley, Massachusetts, which abounds with lovely hills and wildlife but offers absolutely no bakeries. He didn’t want to have to go somewhere to purchase baked goods. He consequently decided to develop a relatively fool-proof cake.
He also liked the idea of a cake that doesn’t have icing. A number of his friends prefer cake to icing, he told me, and he wanted to make them happy. I like icing, but I must admit that I didn’t miss it in this recipe, particularly when Peter dolloped a tiny scoop of vanilla ice cream on the side of each slice of cake.
“I’m also considering a combination of cream and mascarpone,” he told me dreamily. “Just a dollop.”
“I wanted [the recipe] as simple as possible,” he said of the recipe’s development. I looked at almond-flour recipes. The egg holds the cake together and gives it some lift.”
He also liked the idea of having a small cake, he told me. This recipe fills an 8-inch cake pan and serves six with good-sized but not scary servings. The almond flour doesn’t make the final product taste like almond extract (not my favorite flavor), just like cake. And the citrus flavors sing of spring.
Peter told me that he first put the recipe together about a month ago and has made it at least 10 times. (He entertains often!)
“It’s just easy to have on hand,” he elaborated. “It’s nice for tea. One of the things that strikes me as kind of similar but I really think if you can nail it it’s great is a scone. Also, it’s such an easy thing, and people like that you’ve made a cake for them.”
I was flattered by Peter’s assertion that my own go-to desserts, fruit crumbles and cobblers, also inspired him to find a dessert recipe that didn’t entail a lot of fuss.
I firmly believe that every cook needs desserts in his or her repertoire that can be assembled quickly in the late afternoon if one learns that unexpected dinner guests are due. This cake is just such a dessert.
“After baking it one or two times, you’ve pretty much memorized it,” Peter said of his recipe. “You can put it together on the spur of the moment.”
He notes that a completely different tasting, but similar to make, cake may be constructed by substituting 1/2 cup cocoa powder for a third of the almond flour. I may try that for Easter. Or for another occasion.
When I ate it at Peter’s house, his cake was served in honor of the 40th wedding anniversary of other neighbors, Maggie Speier and Roy Lewis. Peter is camera shy so I don’t have a photo of him with his cake, but Maggie and Roy were happy to pose.
If you have no almond flour on hand, that ingredient may be purchased at many supermarkets. Peter tells me that Bob’s Red Mill makes an excellent version of this low-carb flour.
Happy Easter and Passover!
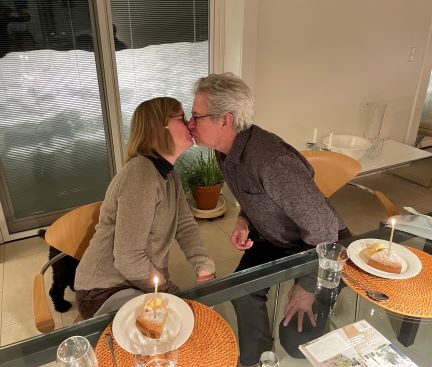
Maggie and Roy
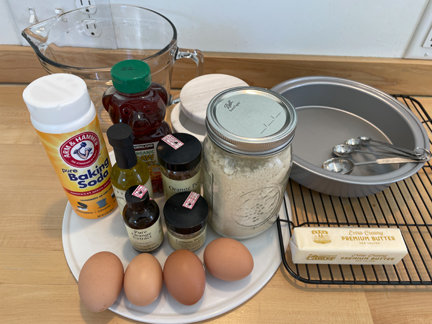
Peter’s Almond Cake
Ingredients:
about 1/2 tablespoon butter for greasing the pan
4 large eggs
1/2 cup local honey
1 tablespoon vanilla extract
1-1/2 cups finely ground blanched almond flour
1/4 teaspoon kosher salt
1/2 teaspoon baking soda
any flavor profile that appeals. Peter used 1 teaspoon dried orange peel and 1/2 teaspoon orange oil when he served the cake last week. He also likes to throw in a little Fiori di Sicilia, a lovely mixed-citrus extract.
Instructions:
Preheat the oven to 350 degrees. Generously grease an 8-inch, non-stick cake pan with butter.
In a large bowl, lightly whisk the eggs. One by one, gradually whisk in the honey, the vanilla, the almond flour, the salt, and the baking soda.
Use a spatula to transfer the batter into the prepared pan.
Bake until the cake is fragrant and set, and a toothpick inserted into the center comes out clean, 22 to 25 minutes.
Cool the cake in the pan on a cooling rack for 10 minutes; then invert it onto the cooling rack and let it cool for 20 more minutes before slicing and serving it.
Sprinkle a little confectioner’s sugar on top if you want to. Serves 6 to 8.