Archive for the ‘Appetizers’ Category

Waffling My Way to Hanukkah

Thursday, December 10th, 2020

At this time of year, as the days shorten and the sun dips lower in the sky, many cultures and religions help offset the weather with holidays that celebrate light. The Jewish holiday of Hanukkah, which begins at sunset this evening (Thursday, Dec. 10), is one such holiday.

In fact, Hanukkah takes place at what is arguably the very darkest time of the year. This lunar holiday takes place just as the moon joins the sun in getting closest to its darkest time. It lasts for eight days.

Also known as the festival of lights, Hanukkah recalls a time in the second century B.C.  when the Israelis book back their land from Syria and rededicated the temple in Jerusalem.

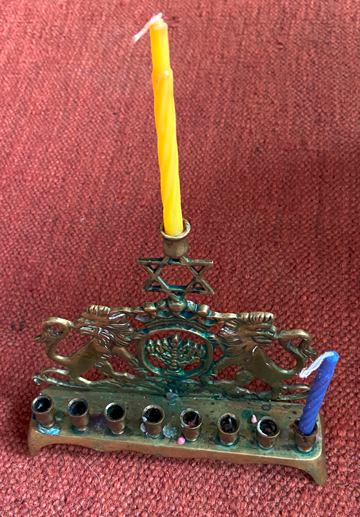
They lit an oil-powered menorah (candelabrum) that was supposed to burn continuously. Unfortunately, they had only enough oil to keep the flame burning for a single day. Miraculously, it lasted for eight days and nights, until more oil could be brought to the temple.

Hanukkah celebrates several things: a Jewish victory (not a common thing in world history), the strength of religious faith, and above all the power of light.

I love lighting my menorah each night of this holiday. AI was fortunate to have a Christian parent and a Jewish one. Consequently, our family celebrated both Christmas and Hanukkah.

When I was a child, I saw this as a plus mainly in terms of presents: the month of December was one long series of gifts. (My birthday falls in December, adding to the pile.)

I still enjoy giving and receiving gifts at this time of year. As I get older, however, lighting the menorah and trimming the Christmas tree help me to remember my parents and their families and to celebrate my rich dual heritage. Those activities also brighten my home at this darkening time of year.

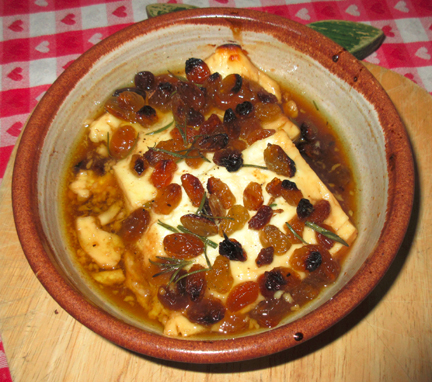
Naturally, as a food writer, I celebrate the season with food. The main food associated with Hanukkah is oil, in commemoration of the miraculous oil that burned for so long in the temple.

Olive oil, a mainstay of Middle-Eastern cuisine and life two millennia ago, was the oil used in the temple in Jerusalem, but one may use pretty much any oil one likes in cooking Hanukkah treats. For frying I often choose a neutral oil like canola oil.

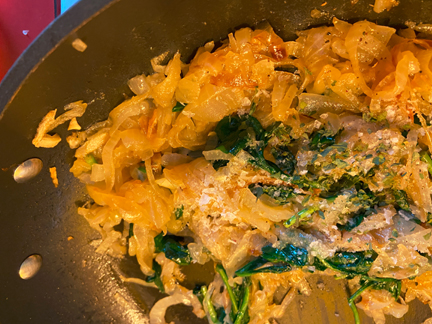
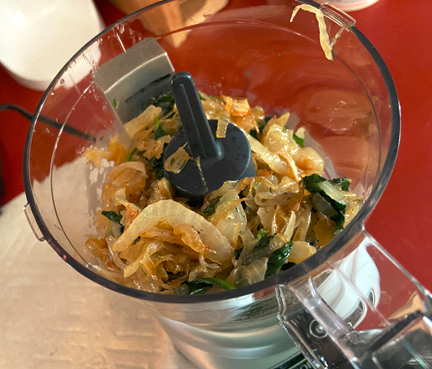
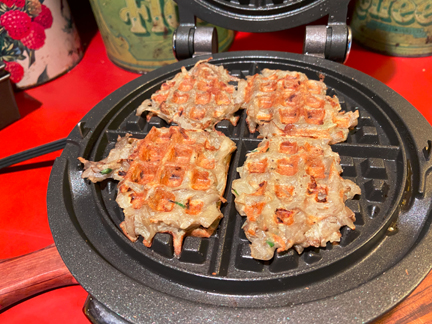
The most popular Hanukkah recipe is for latkes, potato pancakes. I’ve posted several latke recipes here over the years. This year I decided to make my latkes slightly differently—in the waffle iron.

I got the idea from Ina Garten, a.k.a. the Barefoot Contessa. Her most recent cookbook features hash browns prepared this way. I reasoned that hash browns and latkes aren’t really all that different.

I call my creations (drum roll, please) … WaffLatkes.

To be frank, the Wafflatkes can’t QUITE match the crispiness of the fried version of this dish. They are pretty tasty, however, and the waffle pattern is fun. They’re also exceptionally easy to make and lighter than traditional latkes.

Happy Hanukkah! Enjoy the light and the yumminess….

WaffLatkes

Ingredients:

2 large baking potatoes
1 large onion, finely chopped
1 egg, beaten (you may need another one!)
chopped fresh chives to taste (optional but tasty and colorful if you have them on hand)
2 to 4 tablespoons flour
1 teaspoon kosher salt or sea salt
lots of freshly ground pepper
1 tablespoon olive oil
canola or olive oil for greasing the waffle iron

Instructions:

Wash the potatoes well. Grate them with a box grater or with the grater attachment of a food processor. Wrap the potato shreds in a dish towel. Carry it to the sink, wring it out, and allow the potato pieces to drain while you get out the rest of the ingredients and maybe drink a cocktail or two.

In a medium bowl combine the egg, the chives (if you’re using them), 2 tablespoons of flour, the salt, and the pepper. Stir in the onion and potato pieces, followed by the olive oil.

If the batter doesn’t seem to hold together at all, stir in a little more flour and/or another egg. Don’t worry about making it perfect, however. Wafflatkes are allowed to be a little ragged.

Brush your waffle iron with oil. Preheat it to a medium-high setting. When it is ready plop small spoonsful of batter onto its quadrants. Flatten them a bit if you wish. (The waffle iron will do this for you, but I tend to become a little paranoid.)

Cook the little cakes just a little longer than you would normally cook waffles, making sure they are golden brown. Serve the waffles immediately as they come out of the iron—or pop the first ones into a 300-degree oven until you have finished cooking the rest. Serves 6 to 8 as a side dish.

And now the video, Tinky Makes WaffLatkes

A Memorial Spread

Monday, June 29th, 2020

I just realized that I haven’t posted anything here this month … so here is a quick recipe from my next cookbook, Pot Luck. The book will share essays and recipes I have created over many years, as well as a few new recipes (because I keep coming up with new ideas!).

This particular recipe is new to me, but it goes with an older story. It was inspired by my late neighbor Harrison Parker. Harry was a larger-then-life figure with a heart of gold and a wealth of arcane knowledge at his fingertips. He was the official historian of my town, Hawley, Massachusetts, and he was active in local politics. He died 20 years ago, but he was so famous in our county that people still ask me whether I knew him.

My book includes an essay I wrote after his death that highlights many of his contributions to our community and to our immediate neighborhood. It also mentions one of Harry’s less endearing habits (one to which all of his neighbors were accustomed!).

Harrison was inclined to show up at our houses just as we were sitting down to cocktails in the evening. He would happily sit down, request a drink, and share the news of the day. He almost always stayed through dinner.

Harry didn’t want to take complete advantage of his hosts so he frequently brought a small appetizer as an offering … either a chunk of cheese or a tin of smoked oysters. He loved to construct little cocktail sandwiches of crackers, cheese, and oysters.

His sandwiches aren’t really a recipe … so a couple of weeks ago I created a smoked oyster spread in his honor. I’m sure Harry would have loved this spread if he had had a chance to taste it!

I made this recipe for my friends at Mass Appeal. See video below!

Smoked Oyster Spread à la Harry

Ingredients:

1 8-ounce package of cream cheese at room temperature (leave it out for at least a couple of hours so it really softens)
1 can (3 ounces) smoked oysters, coarsely chopped
1 teaspoon lemon juice
1 teaspoon Worcestershire sauce
1 pinch cayenne pepper
a bit of the oil in which the oysters are packed
1 tablespoon chopped chives

Instructions:

Place the cream cheese in a bowl, and mash it well. Add the other ingredients in order. Serve with celery or buttery crackers. Makes about 1 cup.

Making a spread is serious business! Thanks to Peter Beck for taking the photos for this post.

Art Week at Home: A Divine Dip

Sunday, May 10th, 2020
I’m not really cross-eyed, but this was a selfie, and I was trying to keep both eyes on the camera. Sigh….

I was scheduled to teach a hands-on cooking workshop today for Art Week, a culture-filled annual event here in Massachusetts. Obviously, no one will be coming to my home to cook and tell stories this afternoon, but I’m sharing one of the recipes we were planning to make as part of Art Week at Home.

I wish I could do the cooking online, but the internet here is weak. So please just pretend that you’re with me, singing and cooking and telling stories around my great-grandmother’s old oval table. I’m going to walk you through one of the recipes I planned to make today.

In this crazy time, I am grateful every day for the natural beauty around me. Each time my dog Cocoa and I walk down the road, it seems to me that we observe a new sign of spring … another flower in bloom, another tree starting to bud, another tuft of grass springing up greener than the one before it.

We actually had a little snow yesterday, but it has fortunately departed, leaving everything even greener than before.

The color green is my theme these days. It’s a color of hope and renewal. It’s a theme indoors as well as out. Spinach is coming into season, bringing with it vitamins and minerals and that gorgeous deep color.

I eat spinach and cook with it a lot … in quiches, in quick sautés, in salads, in scrambled eggs. Like the cartoon character Popeye, I feel “strong to da finich ‘cause I eats me spinach.”

A few years back, I devised an onion-dip recipe loosely based on my mother’s formula for French onion soup. I love commercial dips and dip mixes, but I feel a little queasy when I read some of the ingredients on their labels. I don’t like to put foods in my body that I can’t pronounce.

My dip contained only normal foods. And caramelizing the onions for it made my house smell delicious.

With spinach on my mind, I recently decided to add a little spinach to the onion dip. The addition was a success. The spinach adds vitamins, a hint of flavor, and a lovely green color.

The recipe takes a while, between caramelizing the onions and letting the dip’s flavors meld in the refrigerator. Most of this time isn’t hands on, however, so you’ll have plenty of leisure to do other things while you’re cooking. Just make sure to keep your nose active while you’re caramelizing the onions.

Make the dip early in the day, and honor your mother with it by evening. My mother isn’t with me anymore, but I love to remember her on Mother’s Day. Making a dip inspired by one of her recipes gives my family a delicious way in which to enjoy the memories.

My Mother in 1968


Spinach and Sweet Onion Dip

If you happen to have fresh parsley and/or dill in the house, you may add sprigs of them before blending the dip at the end.

Ingredients:

2 teaspoons butter
1 tablespoon extra-virgin olive oil
2 large onions, cut into thin slices, with each slice cut in half (sweet onions are best, but any onion will do in a pinch)
1/2 teaspoon Dijon mustard
1 generous splash dry sherry
3 cups fresh spinach leaves
salt and pepper to taste (start with 1 teaspoon sea salt and three grinds of the pepper mill)
1-1/2 cups sour cream (half of this could be Greek yogurt if you want to be healthier, and if your onions are really huge you may increase the amount to 2 cups)

Instructions:

Combine the butter and olive oil in a nonstick skillet over medium-low heat. When the butter melts stir in the onion slices. Cook them slowly over low to medium-low heat, stirring every 5 to 10 minutes or so, until they are reduced and turn a lovely golden brown. This will take at least 1/2 hour and may take as long as an hour; they will be ready when they are ready. Add a little water from time to time if burning seems likely.

When the onions are almost ready stir in the mustard, and continue to cook, stirring, for at least 5 minutes. Add the sherry and the spinach and cook, stirring, until the liquid disappears and the spinach wilts.

Sprinkle salt and pepper over the vegetables and remove them from the heat. Allow them to cool to room temperature.

Place the vegetables in a food processor and combine them briskly; then add the sour cream and mix well. If you don’t have a food processor, an electric mixer will do, but you will have bigger chunks of onion and spinach. My food processor is broken so I used my mini-chopper. I had to chop the vegetables a little at a time, they were chopped.

Place the dip in the refrigerator, covered, and let the flavors meld for several hours. At least an hour before serving taste it on a neutral cracker to see whether you want to add any additional flavors (more salt and pepper perhaps?). Bring the dip to room temperature, and serve it with raw vegetable strips or chips. Makes 2 to 3 cups.

Cut into wedges or slices. Serves 6 to 8.

A Summer Spread

Wednesday, July 31st, 2019

Summertime … and the food is easy!

I’m busy getting ready for my annual summer concert. This coming Sunday, pianist Jerry Noble and I will celebrate the 100th birthday of George Gershwin’s first big hit, “Swanee,” with a concert of songs by the composer and his brother Ira.

So naturally I want to name everything I cook after a Gershwin song. I recently made a blueberry crisp I dubbed “Rhapsody in Blue.” (Really, just about anything with fresh local blueberries makes me feel rhapsodic.) I’m contemplating a pork dish called “Porky and Bess.”

And every simple appetizer can be called “Summertime.”

My most recent venture into appetizers is a chipotle pimento cheese spread. I lived for many years in the American South, where pimiento cheese is a staple. Last year in Virginia, I discovered chipotle pimiento cheese in a grocery store. I thought adding the smoky flavor of chipotles (which are basically smoked jalapeños) to pimiento cheese was a brilliant idea.

Unfortunately, the product from the grocery store suffered from the same problem that much pimiento cheese encounters: it had too much mayonnaise. I consequently concocted my own chipotle version, which is (in my humble opinion) pretty perfect.

The recipe below needs some mayonnaise in order to smooth out the spread, but you shouldn’t end up with more than 1/4 to 1/2 cup of the stuff. If you’re unfamiliar with chipotles in adobo, look for them in small cans in the Latin section of a supermarket. If you’d like to see me make it on TV, follow this link.

Enjoy the summer spiciness … and do come to our concert if you’re in the neighborhood!

Ingredients:

4 ounces roasted red peppers (a.k.a. pimientos), drained (reserve 1 tablespoon of the liquid) and roughly chopped
1 to 2 chipotles in adobo, seeded if you like them mild, coarsely chopped
several turns of the pepper grinder
1 tablespoon roasted-red-pepper brine
1 to 2 teaspoons adobo sauce from the chipotle can
1/2 pound sharp cheddar cheese, coarsely grated
mayonnaise to taste (start with 2 tablespoons)

Instructions:

Place the pimientos, the chipotles, the pepper, the brine, and the adobo sauce in a mini-food processor. Whir until combined. Toss in the cheese, and combine again. Add mayonnaise until the spread achieves a silky consistency.

If you don’t have a mini-food processor, beat the heck out of the mixture with an electric mixture.

Chill the cheese blend for at least 1/2 hour. Serve with crackers or vegetables. Makes about 1-1/2 cups.


Maple Everywhere!

Wednesday, March 13th, 2019
Courtesy of Paul Franz/ The Recorder

March is Massachusetts Maple Month. Farmers in my area are working more or less around the clock to turn the sap that flows from maple trees in spring into the sweet elixir that New Englanders prize year round.

This coming weekend, March 16-17, is Massachusetts Maple Weekend, and members of the Massachusetts Maple Producers Association have a number of celebrations planned.

Every time I drive to Greenfield these days, I pass a sign at Hager’s Farm Market luring me with the promise of fried dough topped with maple cream on Saturday. I am trying to resist temptation!

Fortunately, most of my own culinary uses for maple syrup do not involve the extreme sweetness of fried dough or even pancakes. I love to use maple to add a slight sweetness to foods like salad dressings, coleslaw, pork, and even (as you’ll see below) cheese.

I also love to contemplate maple’s place in American history. Colonists learned of its sweet bounty from Native Americans; in early colonial times, maple syrup and sugar were significantly less expensive than imported sugar from cane.

Benjamin Rush (1746-1813), a prominent Pennsylvania physician and scholar who was among the signers of the Declaration of Independence, promoted maple over cane sugar not because of maple’s price but because of its means of production. Cane sugar was made by slaves, and Rush was an abolitionist.

Other abolitionists took up the cause of maple. Thomas Jefferson, who despite his own slave holdings opposed slavery in principle, fell in love with the idea of maple as an alternative to cane sugar as well.

“What a blessing,” he wrote in 1790, “to substitute a sugar which requires only the labour of children, for that which it is said renders the slavery of the blacks unnecessary [sic].”

My local maple sugarers could have told Jefferson that successful sugar production requires labor from more than children, but his heart was in the right place. He believed that maple production was a perfect occupation for the “yeoman farmer” he saw as the American ideal.

The sugar maples Jefferson planted at Monticello died; the climate of southern states proved dicey for producing maple syrup.

As sugar became less and less expensive over the decades, even hardy New Englanders (unless they were strict abolitionists) changed over to cane sugar as their primary sweetener. Maple was increasingly viewed as it is today: as an expensive and highly prized specialty food.

Maple played a part again in American history in the early 20th century in the campaign that led to the Pure Food and Drug Act of 1906. Maple syrup was among the products for which many false claims were made before manufacturers were held accountable by that law.

C.C. Regier noted in a 1933 article, “More than ten times the amount of Vermont maple syrup was sold every year than that state could produce.” Happily, if something is labeled “pure maple syrup” today, the labeling is accurate.

I am are lucky to live in an area where I can purchase pure maple syrup from neighbors and visit working sugarhouses. The photo above shows me getting ready for Saint Patrick’s Day with my beloved maple vinaigrette. (Thanks to Paul Franz at the Recorder for the festive picture!)

One of my current favorite maple recipes comes from the Massachusetts Maple Producer Association. I would never have thought of pairing feta cheese with maple, but the combination is wonderful!

I made it recently on Mass Appeal, along with my Irish Cottage Soda Bread. Here is the feta recipe—and of course the videos are below.

Happy Saint Patrick’s Day to all, and happy maple season!


Maple-Baked Feta

I like to serve this sweet-and-savory cheese dish with homemade crostini I make with small, store-bought baguettes.

To prepare the crostini, I slice the bread thinly, rub it with a minimal amount of olive oil on each side, and sprinkle salt on one side. I then bake the crackers for 10 to 15 minutes in a preheated 350-degree oven, turning them once.

Ingredients:

2 tablespoons extra-virgin olive oil
1 6-ounce block feta cheese (it’s hard to find a 6-ounce block; use part of a larger block if necessary)
1/4 cup golden raisins
a generous helping of fresh rosemary
freshly ground pepper
1/4 cup maple syrup

Instructions:

Preheat the oven to 425 degrees. Drizzle half of the olive oil in the bottom of a small baking dish. (I use a brie baker from the potter Jeanne Douillard of Greenfield, Massachusetts.)

Cut the feta so that it is relatively thin and covers most of the surface of the baker. Sprinkle the raisins, rosemary leaves, and pepper over all; then top with the maple syrup and the remaining oil.

Bake until everything is bubbly and one or two raisins are starting to burn. This process can be tricky; you don’t want your dish to blacken, but you do want the cheese to soften.

Let the mixture cool slightly before serving it with crackers or crostini. Serve it with a spoon, and make sure that each little helping gets a bit of everything: cheese, raisins, rosemary, and juice. This cheese dish may also be served on the side of a green salad. Serves 4 to 6.

And now the videos!

Tinky Makes Maple-Baked Feta

Tinky Makes Irish Cottage Soda Bread