Posts Tagged ‘Valentine’s Day Recipes’

My Forever Female Moment

Wednesday, February 14th, 2024

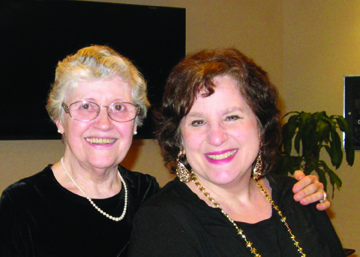
Ginger Rogers and Paul Douglas

I recently found myself feeling like Ginger Rogers for the first (and probably last) time.

My friend Peter shot a video of me making focaccia recently. I hadn’t cooked on camera in several months. I was planning to make a heart-shaped loaf of this simple bread for Valentine’s Day, and I thought we might as well put it on video. We sent it to my friends at Mass Appeal, who aired it the very next day. I guess they had missed me!

When I watched the video, I had my Ginger Rogers moment.

It has been years since I saw the 1953 film Forever Female, but I remember its ending well.

The film is a gentler version of Sunset Boulevard. (No dead bodies!) Rogers plays Beatrice Page, a stage actress who falls in love with a script from a novice playwright (Holden) about a 19-year-old girl and her strong willed mother. Beatrice doesn’t want to play the mother. She has always played ingenues.

The playwright is smitten, and she persuades him to try rewriting the play to make the young woman just a bit older—say, 29. (I can relate. I was 29 for many, many years before jumping to my current official age of 39.)

A true ingenue played by Patricia Crowley wants both the part and the playwright. Holden’s character, Stanley, resists Crowley’s youth until he goes to visit Beatrice at her country home during her summer break from Broadway.

On vacation she lets herself be her age. She doesn’t get her hair styled, she gains a bit of weight, she eschews makeup, and she wears comfortable rather than glamorous clothes. Stanley is appalled to see his beloved looking so … old. (Rogers was in her early 40s when the film was made.)

All’s well that ends well, of course. Crowley is cast in the ingenue role, but thanks to Beatrice’s wise producer (also her ex-husband, played by the ever watchable character actor Paul Douglas) Beatrice shines in the role of the mother and gets rave reviews.

She soon realizes that growing older is not so bad—and that her middle-aged ex is a much more comfortable romantic partner than the younger Stanley.

The film has its flaws. The main one to me is that, true to Hollywood custom at the time, Holden is considered too young for Rogers (he was seven years her junior) but a perfectly appropriate match for Crowley, who was 15 years HIS junior.

Still, the film is kinder to the aging process than Sunset Boulevard. In the end, Beatrice is a heroine to be emulated.

Unfortunately, I felt that I emulated her a bit too much in my focaccia video. Over the past few months, as I tend to do as the weather cools, I have put on weight and let my hair go. So I was a bit appalled when I saw the video. I usually look pretty good on video, particularly when the camera remains above my waist, as I make sure it always does.

I am trying to reconcile myself to the winter me, reminding myself that if Ginger Rogers could let herself grow old, so can I. Nevertheless, the video has made me watch my food intake much more carefully. And I called my hairdresser to arrange to have my hair done soon.

Fortunately, the focaccia was delicious. I recommend this bread highly. Focaccia’s biggest selling point for a busy baker like me is that it is a no-knead bread. It does most of the work all by itself. After one proofs the yeast (which doesn’t take more than five minutes), one throws the dough together and then lets it rise for a couple of hours on its own, partly covered. The dough is a little messy looking at first, but it works out in the end.

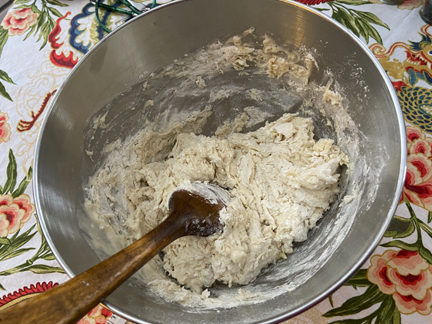
After those two hours, one can either bake the bread right away or cover it completely and refrigerate it for several hours or overnight. I prefer the latter method; if you want to bake the bread right away, you’ll need to flour your hands well to keep the dough from being too sticky.

Focaccia’s other major virtue is its mixed consistency. The relatively large amount of water in the recipe helps the bread develop lots of holes, resulting in a chewy, airy loaf. The olive oil used to grease the pan and drizzle on top of the bread helps the top and bottom crisp up, contrasting nicely with the interior.

I bake my focaccia in a cast-iron skillet. If you don’t have a cast-iron skillet, I heartily recommend that you go out and purchase one, The Lodge manufacturing company even pre-seasons its cast-iron products to make them easier to use.

If you don’t have the time or financial resources to get a cast-iron pan, you may of course use a well oiled cake pan or rimmed cookie sheet. Don’t forget to oil the sides as well as the bottom. Your focaccia may lose a little of its crispiness, but any homemade bread is better than none!

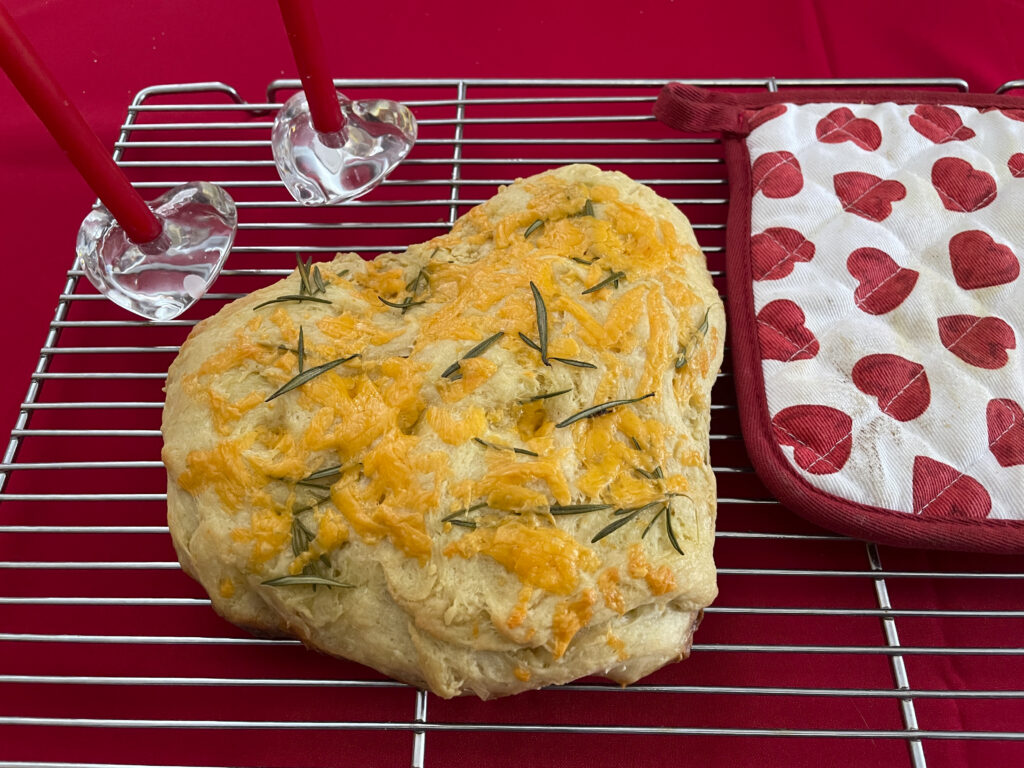
Like pizza crust, its thinner cousin, focaccia can be covered with a variety of toppings. My most recent loaf used only two (plus olive oil), aromatic rosemary and colorful Cheddar cheese. It was delicious.

Feel free to experiment with different herbs and cheeses, as well as vegetables and olives. My friend Vicky, who is more artistic than I, likes to use veggies to draw a colorful picture on her loaves. Extra salt crystals on top add zing.

This recipe makes a small loaf (heart shaped for Valentine’s Day, although that’s not obligatory), perfect for four people. The recipe may certainly be doubled. Just be sure to use a big enough pan to accommodate your dough.

Valentine Focaccia

Ingredients:
1 cup plus 1 tablespoon lukewarm water
1 teaspoon sugar
1 teaspoon active dry yeast (about 1/2 packet of yeast)
2 cups flour
3/4 teaspoon salt
extra-virgin olive oil as needed
fresh or dried rosemary to taste (fresh is better)
1/2 to 3/4 cup shredded Cheddar cheese (or the cheese of your choice)

Instructions:

Combine the water and the sugar. Pour the yeast into that mixture. Allow the liquid to sit for 5 to 10 minutes, until the yeast proofs (starts to look fuzzy). This means it is ready to go to work making bread.

In a bowl, whisk together the flour and the salt. Pour in the yeast mixture, along with 1 tablespoon oil. Stir the mixture together.

Partly cover the mixture. Let it sit at room temperature for 2 hours. At the end of the 2 hours, place the dough in a covered container with a tight lid. Refrigerate it for several hours, even overnight. This makes the dough less sticky and easier to handle.

About 1/2 hour before you want to bake your bread, take the dough out of the refrigerator. Generously oil the bottom and sides of a good-size (at least 12 inches wide) cast-iron skillet. If you don’t have a cast-iron skillet, use a round cake pan or rimmed baking sheet, again well oiled.

Place the focaccia in the skillet, shaping it according to your preference. (I used a heart for Valentine’s Day.) It can be relatively thick (say, 2 inches) or thin (around 1 inch), as you desire. Turn it quickly so that the side that was originally down is up and oiled. (You may add a little more oil to the top if you like.)

Decorate the top with rosemary and cheese, pressing them into the dough with your fingers to make sure they won’t fall off the bread. Making little holes in the top with your fingers as you do this also helps the focaccia aerate while baking.

Preheat the oven to 400 degrees. When it is hot, bake the bread until it begins to brown and is firm to the touch, about 25 minutes. Remove it carefully from the oven (your skillet will be HOT), let it cool briefly, and then enjoy your bread.

Store uneaten focaccia at room temperature. Serves 4.

Here’s the video. Happy Valentine’s Day……….

A Quick Valentine Treat

Tuesday, February 10th, 2015

shoe enoughweb

If I were a truly famous food writer (as my nephew Michael, bless his heart, believes I am), I would probably meet people who read my blog all the time. I’m not and I don’t.

Monday evening, however, I ran into a reader.

I was walking to the music rehearsal for my local singing group. On Sunday, I did my solo concert, “What the World Needs Now,” and now I am rehearsing with the rest of the gang for our annual Saint Patrick’s Day extravaganza.

A woman stopped me and said, “You’re Tinky, aren’t you?”

I admitted that I was indeed Tinky.

“I have been enjoying reading your blog,” she informed me. “But you know, the blog still thinks it’s Christmas.”

She had a point. I have cooked over the past month or so. I have not posted here, however. Some months are just a bit frantic.

To give you (and the woman, whose name I should really have asked for) something to read until my life settles down, I’m sharing a recipe I made recently at my seasonal job at Williams-Sonoma.

I was teaching a kids’ class on no-bake Valentine desserts. The store had a recipe we HAD to use—and it was actually very good. We started by making the Chocolate Rocket, from Jennifer Tyler Lee’s cookbook The 52 New Foods Challenge.

This pudding used avocado for the majority of its fat. It was lovely and dark and chocolaty. (If you’d like to try that recipe, you may find it here. Lee didn’t say whether one should pack the brown sugar so I packed it lightly, and the result was delightful. Even the kids who didn’t think they liked avocado enjoyed it.)

Next, we made a little chocolate bark. (I had some made up in advance so the kids didn’t have to wait for theirs to cool.)

For our last creation, the chef in charge of classes at Williams-Sonoma suggested that the kids and I make a chocolate mousse. There was just one problem. Chocolate mousse usually takes at least a couple of hours to chill—and the class only lasted for an hour.

So I cheated and made chocolate chantilly. Chantilly, for those of you not in the know, is what the French call whipped cream. The chocolate rocket was definitely healthier—but this was decadent and delicious. And I did explain that a little of it goes a long way.

Here’s the recipe in case you’d like a quick faux mousse of your own for Valentine’s Day.

chantillyweb

Chocolate Chantilly with Raspberries

Ingredients:

2 cups heavy cream
6 ounces 70-percent dark chocolate, finely chopped
1/2 cup sugar
1 teaspoon vanilla
raspberries as needed (1 to 2 pints)
plain whipped cream for garnish (optional)

Instructions:

Place ice and water (more ice than water) in a large bowl. Set them aside.

Heat 1 cup of the cream in a saucepan until it JUST starts to boil. Remove it from the heat, and stir in the chopped chocolate. Continue stirring until the chocolate melts and dissolves.

Pour the cream/chocolate mixture into a mixing bowl, and place the mixing bowl in the bowl of ice water. Make sure that none of the water leaks into the mixing bowl. Let the chocolate cream rest in the ice water for a few minutes while you do something else.

Stir in the rest of the cream, and make sure the mixture feels cool. If it doesn’t feel cool, let it sit in the ice water for a minute or two longer. When the chocolate cream is cool beat it with an electric mixer until soft peaks form. Gently add the sugar and vanilla.

Using a spatula fold in the raspberries—or just arrange them artistically on top of the chocolate cream in bowls. Top with a little additional whipped cream for extra decadence. Serves 8.

Here I am after my Valentine concert, with pianist Patty Pulju.

Here I am after my Valentine concert, with pianist Patty Pulju.

Heart-y Cookies

Sunday, February 14th, 2010

heart cookiesweb

 
Happy Valentine’s Day!
 
Naturally, I have something chocolaty for this month’s installment in my Twelve Cookies of Christmas series.
 
Today’s chocolate sugar cookies were cut into hearts (although they could certainly be trees or stars or reindeer in December) and iced with a basic butter icing.
 
They tasted wonderful.
 
Royal icing would have been prettier and easier to transport than the butter version we used on the cookies—but royal is harder to make and harder to keep. It has to be used right away or it dries out.
 
I wanted my icing simple and foolproof to use because I had a vision of a bunch of children happily decorating and eating cookies—a vision that came true.
 
cookie joyweb
 
My nephew Michael and his friends in Virginia have been snow crazy this week. No one has been to school. Sleds and snowballs have replaced electronic games (well, almost).
 
We called around the neighborhood a couple of days ago and asked whether anyone would like to take a break from the snow and come decorate cookies.
 
We ended up with eleven joyful children gathered around the kitchen table slathering icing and tossing sprinkles around.
 
The resulting cookies were heavily decorated. (We actually ended up making a double batch of icing to make sure there was enough.)
 
And they were VERY popular. The pictures above and below were taken with a cell phone (my battery ran out of steam at the critical moment) so they’re a little fuzzy, but you can see that our gang had a really good time. One of them was camera shy so we have only ten in the group photo.
 
If you enjoy these cookies half as much as the kids did, you’ll be happy indeed………
 
kidswithcookiesweb
 
Chocolate Sugar Cookies
 
Ingredients:
 
for the cookies:
 
1 cup (2 sticks) sweet butter at room temperature
1-3/4 cups sugar
2 eggs at room temperature
1 teaspoon baking powder
1/2 teaspoon salt
2/3 cup Dutch-process cocoa
2 teaspoons vanilla
3 cups flour
 
for decoration:
 
1 recipe (2 if you MUST) butter icing (see below)
lots of festive sprinkles
 
Instructions:
 
Cream together the butter and the sugar. Beat in the eggs, 1 at a time, beating well after each addition. Blend in the baking powder, salt, and cocoa, followed by the vanilla. Stir in the flour.
 
Chill the resulting dough, covered, for 1 hour. Preheat the oven to 350 degrees.
 
On a nonstick surface (a silicone mat or a marble board) pat the dough out to a thickness of 1/4 inch. Cut it into the desired shapes.
 
Bake the cookies on parchment- or silicone-lined cookie sheets for 10 to 12 minutes. They should be solid but not rock hard.
 
Let the cookies cool on the sheets for a couple of minutes before removing them to a rack to cool. Let them cool completely before frosting them with butter frosting (see below) and sprinkling the heck out of them.
 
Makes about 2 dozen cookies.
 
Butter Icing
 
Ingredients:
 
1 cup (2 sticks) sweet butter at room temperature
confectioner’s sugar to taste (probably between 1 and 2 cups)
2 teaspoons vanilla
milk if necessary to stir
a couple of drops of food coloring (optional—I used my sister-in-law’s Wilton food coloring, which was excellent; I’ll have to get some!)
 
Instructions:
 
Beat the butter until it is fluffy; then add confectioner’s sugar. Beat in the vanilla. Add milk and/or more confectioner’s sugar until the icing is spreadable.
 
Truffle wasn't allowed to eat any cookies, but she loved being with the kids anyway. They are all her Valentines.

Truffle wasn't allowed to eat any cookies, but she loved being with the kids anyway. They are all her Valentines.


If you enjoyed this post, please consider taking out an email subscription to my blog. Just click on the link below!

Subscribe to In Our Grandmothers’ Kitchens by Email.

Wacky Cake

Wednesday, February 10th, 2010

Michael with cake web


February may be the shortest month of the year, but it hosts a disproportionate number of holidays.
 
This month we are celebrating Groundhog Day, Valentine’s Day, President’s Day, Mardi Gras/Shrove Tuesday, the Chinese New Year, and Purim. (I’ve probably left out a few!)
 
We commemorate the birthdays of quite a few historical figures, from Charles Dickens on February 7 to Handel on February 23, not to mention Gypsy Rose Lee on February 9 and Susan B. Anthony on February 15.
 
And as a food writer I always love the nutty food holidays to be found in this month. These include National Indian Pudding Day on February 17, Cream-Cheese Brownie Day on February 10, National Tortilla Chip Day on February 24, and Surf & Turf Day on February 29.
 
(I guess most of us can afford that last holiday only once every four years.)
 
Clearly, despite the chill in the air there is much to celebrate this month.
 
In today’s post, looking forward to Valentine’s Day, I offer an amazingly simple chocolate-cake recipe sent in by Mattenylou, the blogger responsible for the charming On Larch Lane.
 
This “Wacky Cake” dates back to the early 20th century. It’s considered wacky because it includes a little vinegar and because all of the ingredients get dumped together in one bowl and mixed simply with a wooden spoon.
 
It includes neither eggs nor butter so you don’t have to wait for any ingredients to come to room temperature. (It’s dairy free, too—until you frost it!)
 
Reference librarian Lynne Olver, who runs the wonderful Food Timeline web site, suggests that Wacky Cake (a close relative of Dump Cake and Crazy Cake) first saw the light of day in its present form in the 1940s.
 
Olver adds that similar cakes first appeared during World War I, when (as in the Depression and during World War II) fresh ingredients were scarce.
 
Mattenylou originally sent the recipe to my nephew Michael to make for my birthday in December. She told him that she used to bake it every year for her mother, whose birthday was December 23 like mine, using Christmas-tree shaped pans.
 
Things got a little frantic this past December, as they so often do at that time of year, so Michael and I decided to save the recipe for February.
 
We tossed a little pink icing on top and threw a bunch of red and pink sprinkles on the cake (Michael is a whiz with sprinkles!)–and a Valentine cake was born.
 
Mattenylou points out that her recipe can be halved to put in a 9-by-9-inch pan (or a round single-layer pan). She adds that if one mixes up the dry ingredients and stores them in a bag one has a quick, easy cake mix to use when needed.
 
My family loved the cake, which was terrifically moist and rose beautifully. We certainly couldn’t taste the vinegar! NOTE: You may halve this recipe and bake it in an 8-by-8-inch-square pan for 25 to 35 minutes.
 
spinklingweb 
 
Wacky Cake
 
Ingredients:
 
3 cups flour
2 cups sugar
1/2 cup cocoa
1 tsp salt
2 tsp baking soda
2 tsp vanilla
2 tablespoons vinegar (I used cider vinegar, but white distilled would do as well)
2/3 cup canola oil
2 cups water
 
Instructions:
 
Preheat the oven to 350 degrees. Grease and flour 2 9-inch cake pans.
 
In a bowl combine the flour, sugar, cocoa, salt, and baking soda.
 
Make three wells in the combined dry ingredients. Pour the vanilla into one, the vinegar into the second, and the oil into the third. Pour the water over everything and stir with a wooden spoon until the dry ingredients are wet and everything is thoroughly combined.
 
Pour the batter into the prepared cake pans. Bake the layers until a toothpick inserted into the center comes out clean (about 30 to 35 minutes).
 
Frost as desired and decorate with festive sprinkles. Serves 12 to 16.
 
Mattenylou’s Cooked Frosting
 
Here is the recipe for the fluffy frosting Mattenylou puts on her Crazy Cake. We liked it but would probably use a standard buttercream or cream-cheese frosting another time; this one takes a LONG time to mix!
 
Ingredients:
 
1 cup milk
1/4 cup flour
1/2 cup shortening
1/2 cup butter
1 cup sugar
2 teaspoons vanilla
 
Instructions:
 
Cook the milk and flour until the milk bubbles and is thick and smooth, stirring constantly with wooden spoon or whisk. Set the mixture aside and let it cool.
 
Beat the shortening, butter, sugar, and vanilla until they are blended.
 
Add the cooled milk/flour mixture and beat well, for 10 minutes.
 
Add a few drops of green (for Christmas) or red (for Valentine’s Day) food coloring and beat until fluffy. This may take up to 15 minutes, depending on your mixer. The frosting should be fluffy and hold peaks.
 
Ices 1 layer cake.
 
wackyweb
 
Don’t forget: You have until Friday night to enter the drawing for a tin of gourmet hamentaschen from Kosher.com.
 
Just leave a comment on this post (or post a tweet on Twitter) that mentions YOUR favorite food holiday and provides a link to the Kosher.com web site.
 
Good luck….

If you enjoyed this post, please consider taking out an email subscription to my blog. Just click on the link below!

Subscribe to In Our Grandmothers’ Kitchens by Email.