Archive for the ‘Holiday Foods’ Category

Memories of Mousse

Monday, February 9th, 2026

Left to right: Dagny’s secretary Agnes, Dagny, Tinky, and Eric in Paris

With Valentine’s Day on the horizon, I am thinking of chocolate .. and specifically  of my mother’s recipe for Chocolate Mousse.

“Mousse” means “frothy” or “foamy,” apt words for this airy dessert. Many sources credit the artist Henri de Toulouse-Lautrec with inventing it. Alas, according to “Food Republic,” recipes for Chocolate Mousse were published long before he whipped it up for his Bohemian friends in Paris. Still, he did make it.

My own association with Chocolate Mousse relates to another artist who lived in France, the Dutch painter Vincent Van Gogh (1853-1890).

I have consumed (and even prepared) many amazing meals over the years. Among the most memorable of these was a luncheon in Auvers-sur-Oise in France when I was 19.

Auvers is about an hour outside of Paris, the city in which I was helping my godmother Dagny, her nephew Eric, and a host of colorful characters mount a summer film festival. Dagny, who was a paraplegic, lived in Florida but spent several months each year in Paris. She wanted to make sure she could get wherever she needed to go; the metro was far from accessible to someone on crutches. She consequently shipped her red Ford to France each time she visited.

One day she decided to drive Eric and me to Auvers. Our destination was the Auberge Ravoux, the inn in which Van Gogh spent the last two months of his life. When we visited it was known as la Maison de van Gogh (the House of van Gogh).

© Institut Van Gogh and Erik Hesmerg

The dining room was small but inviting. We sat at a corner table and ordered. My main course was Steak au Poivre (Pepper Steak). This is a classic French dish: a small steak, crusted in freshly cracked peppercorns and pan fried.

The same pan is used to make the sauce. This consists of stock, brandy or cognac (which the French warm and then light dramatically), and cream. Heaven on a plate.

The restaurant served it with Pomme Frites (French Fries), which I can usually do without. These crispy pieces of potato I adored. I then had a salad glistening with a simple vinaigrette of oil, red wine vinegar, and mustard. I can almost taste this perfect combination of foods in my mouth today.

When the waiter asked about dessert, I intended to say “non” … until I saw it. He returned to the table with a large bowl—the word “vat” comes to mind—of fluffy, chocolaty Mousse. It melted on the tongue.

After lunch, Eric and I climbed the shabby, curved wooden stairs at the Maison to see the room in which van Gogh spent the weeks before he killed himself. The room was unfurnished, illuminated by a skylight.

The publicists at the Auberge write on its website that the room has “rien à voir… mais tout à ressentir” (“nothing to see … but everything to feel”). Legend has it that the owners of the Auberge never rented it out again after the artist’s death, reluctant to have others stay in “la chambre de suicide” (the suicide room).

© Institut Van Gogh by Erik and Petra Hesmerg

In fact, Van Gogh didn’t shoot himself in the room. He pulled the trigger outdoors and made his way back to the auberge. Still, he died in his bedroom a day and a half later so I guess one could call it “la chambre de suicide.”

The room was tiny, a little more than 75 square feet in area. Apparently, van Gogh used another room at the inn to paint.

Paint he did. He averaged more than a painting a day during his time in Auvers.

Despite his productivity there, he continued to be plagued by the physical and mental ill health that had followed him for much of his life.

I often wonder why many people who are intensely artistic—painters, musicians, actors, even some writers—are mentally ill and/or engage in self-destructive behavior.

Does their artistic talent stem from their off-kilter way of seeing and feeling the world? Or does their genius render them incapable of moderation and common sense?

I will never know. Although I have some creative gifts, I am no genius. I can be sadly pedestrian.

Vincent van Gogh painted full time for only about a decade. As a young man he dabbled in a variety of professions until his younger brother Theo convinced him that he should devote his life to art … and provided the funds to keep Vincent housed and fed while he painted.

Despite the relative brevity of his artistic career, van Gogh produced an astounding body of work, one with which even most non-art students are familiar.

According to the Van Gogh Museum in Amsterdam, his last painting was a vivid, gnarly study called “Tree Roots.” In “Smithsonian,” Meilan Sooley writes, “In some ways, the painting appears to function as a goodbye.”

Tree Roots, 1890

Sooley quotes art historian Louis van Tilborgh as suggesting that “it’s van Gogh’s way of saying: ‘I have lived, just like those tree roots. I’ve done my best, I’ve struggled with life, I’ve grown, had setbacks and now is the time it ends. I am falling.’”

Van Gogh’s brother Theo arrived before the artist died and recorded Vincent’s last words: “La tristesse durera toujours.” (“The sadness will last forever.”)

For me, the flavor of Chocolate Mousse will last forever. (I told you I was pedestrian!)

Mousse at the Auberge © Institut Van Gogh/Erik Hesmerg

Mousse au Chocolat

Ingredients:

6 ounces good-quality semisweet chocolate
4 tablespoons (1/2 stick) sweet butter
2 teaspoons vanilla
5 tablespoons coffee, divided (you may use water instead or use a bit of each)
4 eggs at room temperature, separated
1/2 cup superfine sugar, divided
1 pinch salt

Instructions:

In the top of a double boiler (or in a heatproof bowl over warm water) combine the chocolate, the butter, the vanilla, and 2 tablespoons of coffee. Cook the mixture over hot water, stirring, until the chocolate melts. Remove the pan from the top of the hot water, and set it aside to cool.

In another heatproof bowl combine the egg yolks, 3 tablespoons of coffee, and 1/4 cup of the sugar. Place them over the hot water and cook, whisking vigorously, until the mixture becomes uniformly frothy and lighter in color.

Remove the yolk mixture from the top of the hot water, and whisk it for another minute or so. Whisk in the chocolate mixture. Allow the resulting concoction to cool for a few minutes so that it is lukewarm to the touch. (You may begin beating the egg whites while the chocolate/yolk mixture is cooling.)

Combine the egg whites and salt in the bowl of an electric mixer. Beat them until the egg whites are foamy. Sprinkle on the remaining sugar and beat the egg whites and sugar until stiff peaks form. Gently fold the whites into the chocolate mixture. (It helps to add a little bit of the whites at first, followed by the rest.)

Spoon the mousse into a serving bowl or bowls. Cover and refrigerate for several hours or overnight; then serve with a little whipped cream. Serves 8.

Comfort Food at Its Best

Tuesday, December 30th, 2025

I love New Year’s celebrations—lunar, Jewish, Christian, whatever. In a sense, of course, the divisions cultures establish between years are arbitrary. Still, they give us a chance to look back on where we have been and make wishes for the future. A wish is always a pleasure to make, even if it doesn’t come true … or doesn’t come true in quite the way we envisioned it would.

On New Year’s Eve, I like to entertain friends with warm, comforting dishes that offer a contrast to the chilly weather. One of my favorite New Year’s Eve dishes is my friend Cherie’s “Mom’s Meat Lasagna,” which I made for this holiday about 10 years ago. It was delicious. But it involved A LOT of steps. Sometimes I’m in the mood for something much simpler.

Luckily, I have in my repertoire something that replicates the flavors of lasagna but takes a lot less work … particularly if one cheats (as I usually do) by using jarred marinara sauce instead of the homemade version: Baked Ziti.

When I say “Baked Ziti,” I really mean “Baked Tubular Pasta.” I often make it with rigatoni or penne. Even when I stray from actual ziti, I like to call the dish Baked Ziti. That name reflects the celebratory nature of the origins of this dish in Sicily. In that island’s language, “zita” means bride, and “zitu” means groom. Put together, they become “ziti,” the wedding couple. In fact, the ancestor of this dish was served at Sicilian and Southern Italian weddings for centuries.

Sicilian-American food expert Peter Giuliano writes:

I remember reading about ‘lasagna’ in Garfield comics as a kid and not knowing what it was. That’s because we didn’t really eat it [in] my Sicilian-American family—we much preferred the dish we called ‘baked pasta’ or pasta al forno, a dish of tubular pasta like ziti or rigatoni baked with meaty tomato sauce, ricotta, and other cheeses.

We made it at home, of course, but it was really a dish for weddings: basically 100% of the wedding receptions I attended as a kid featured huge pans of baked pasta and trays of charcuterie, which we called “cold cuts.”

I gather that the Pasta al Forno served at Sicilian weddings for centuries was a bit different from what we Americans make. Our dish is a lot more goopy and cheesy … probably because many Americans are a lot more goopy and cheesy than traditional Italians and Sicilians. Nevertheless, it is at heart a classic Southern-Italian-American dish and would have reminded Giuliano’s forebears of their homeland.

I love tubular pasta because it has so much surface to catch the sauce and other yummy ingredients in this dish. And I love Baked Ziti because it’s a snap to mix the pasta with the other ingredients to construct it, in contrast to the careful layering for which lasagna calls. (Okay, technically, there ARE layers in Baked Ziti—but they are easy-peasy layers as you will see in the recipe below.)

I learned from Giuliano another reason to love tubular pasta. The first time I tried making pasta, I didn’t roll the dough out thinly enough. The substance that resulted was a gummy mess. The outside cooked just fine, but the inside was decidedly underdone. When Italian grandmothers (and other relatives) learned to create tubular pasta, Giuliano explains, they avoided my mistake and produced a hollow shape that could cook uniformly.

I encourage you to try this recipe for New Year’s Eve or any other occasion. I wish I could tell you where I got it. I have been making it for years and can’t really remember when and how I started. I may just have tasted a friend’s version and reconstructed it as well as I could. In any case, it’s simple and celebratory.

You may assemble it a little before baking it for guests. This frees you up to chat with your company … and to ponder those all-important New Year’s wishes.

If you do not plan to serve vegetarians, I highly recommend including the optional sausage, which adds a lot of culinary personality to the dish. This version of the dish is a bit wet—but I like wet! Nothing is worse than dried out pasta.

And if you feel that you absolutely have to add a little extra mozzarella, you have my blessing.

Happy (almost) New Year from my kitchen to yours.

Baked Ziti

Ingredients:

1/2 pound ziti or another tubular pasta
1/2 pound sweet or hot Italian sausage—or a mixture of the two, preferably not in casing (if it’s in casing, do your best to get it out), optional
1 cup ricotta cheese (the best brand you can find)
1 cup shredded or cut up mozzarella cheese (again, the best you can manage), divided
1/2 cup Parmesan or Romano cheese, divided
1 tablespoon minced fresh parsley (use 1 teaspoon dried if you absolutely must)
1/4 teaspoon salt
1 egg
1 24-ounce jar prepared Marinara sauce or 3 cups homemade tomato sauce

Instructions:

Preheat the oven to 350 degrees. Cook the pasta al dente according to the manufacturer’s directions. Drain it and pour cold water over it to keep it from cooking any longer. Place it in a bowl.

If you are using the sausage, pan fry it in small pieces while the pasta boils and drain it on paper towels.

In a bowl combine the ricotta, half of the mozzarella, half of the Parmesan, the parsley, the salt, and the egg. Set aside.

Spread a small amount of the tomato sauce on the bottom of a 1-1/2-quart casserole dish. Ladle a bit more of the sauce into the pasta, and blend.

Layer half of the pasta mixture into the casserole dish, followed by half of the ricotta. Note that the ricotta will be applied in dabs; you can’t really spread it.

Place the sausage in the next layer; then make another layer each with the remaining pasta and ricotta. Pour the remaining sauce over the top, followed by the reserved cheeses.

Bake until the dish is heated through and the cheese on top has melted, about 20 to 30 minutes. Serves 4 generously.

Say Cheese!

Tuesday, December 31st, 2024

On New Year’s Eve and New Year’s Day, we celebrate both the old and the new. We are looking—like the Roman god Janus, for whom January was named—in two directions. To me, this means that the transition to a new year often involves making new-to-me recipes that are nonetheless traditional.

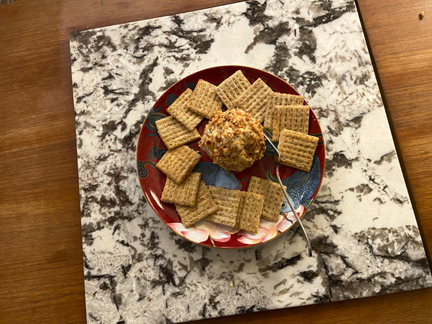
For my New Year’s gathering, I’m making a cheese ball recipe given to me by Sarah Riley of Greenfield, Massachusetts. I had never made a cheese ball before trying this one. For Sarah, it is a tradition started by her mother. To her family it represents home and holidays literally wrapped up in a ball.

Cheese balls were a beloved American appetizer from the late 19th century into the mid-20th century. They combine convenience and creativity; they are shaped using pre-constituted ingredients, but those ingredients vary according to the cook.

By the 1980s, they began to fade from popularity. Amanda Hesser of The New York Times eventually wrote that the balls “tend to be associated with shag rugs and tinsel, symbols of the middle-class middlebrow.”

I guess I’m a middle-class middlebrow.

Fortunately for my self-respect, cheese balls have re-emerged to some extent. Even Hesser accepted them … if they were homemade.

Satirists Amy and David Sedaris centered their 2001 play The Book of Liz around a cheese-ball maker. And in 2012, Michelle Buffardi published the popular book Great Balls of Cheese.

The Food Timeline conducted a survey of cheese balls in cookbooks. “Much to our surprise,” reported the editors, “cheese balls can be deep fried, baked, or refrigerated. They can be served hot or cold. They can accompany salads, be served as appetizers or pop up as desserts.”

The first recorded American cheese ball dates to 1801 and came from the town of Cheshire, not far from me in Western Massachusetts. Cheshire was founded by Baptists, many of whom were dairy farmers.

Elder John Leland was elated when Thomas Jefferson was elected president. Like many in our area of the state, Leland supported the Jeffersonian concept of the yeoman farmer as the ideal citizen of the newly formed United States.

Leland had become acquainted with Jefferson earlier while living in Virginia and had campaigned for the new president. He and his fellow Baptists, a definite minority in mostly Congregational Massachusetts at the time, were grateful for Jefferson’s espousal of religious liberty for all Americans.

Leland dreamed of devising a fitting tribute to President Jefferson. He asked all the farmers in Cheshire to contribute the curds from one day’s milking to the creation of a giant cheese ball, which came to be known as the Mammoth Cheese.

(It wasn’t actually a cheese ball, just an enormous chunk of cheese, but it is commonly referred to as a cheese ball so I’m alluding to it as such.)

A concrete recreation of the large press that created the Mammoth Cheese may be viewed in Cheshire. The town also houses a life-size replica of the actual cheese, created by Adams sculptor Brent Whitney.

Courtesy of “Listening to America”

The Mammoth Cheese was the product of about 900 cows. It weighed 1235 pounds.

It wasn’t easy to transport the cheese to the White House, but John Leland managed to do it.

In Mississippi Sideboard, Jesse Yancy wrote, “Preaching all the way to Washington (some things never change), [Leland] transported the ball by wagon and then rolled it across the White House lawn to serve it to President Jefferson.”

According to the National Portrait Gallery’s website, “The Mammoth Cheese was so awe-inspiring, that it marks the first use of the word ‘mammoth’ as an adjective spurred by a nationwide fascination with mammoths following the discovery of large prehistoric bones in the new world.”

John Leland presented his Mammoth Cheese to Jefferson on January 1, 1802. A fervent Abolitionist, Leland proudly proclaimed to the president that the cheese had been fashioned without the help of slave labor.

The cheese became an instant media sensation. Poet Thomas Kennedy even composed an “Ode to the Mammoth Cheese.” One stanza read:

God bless the cheese—and kindly bless the makers,
The givers—generous—good and sweet and fair,
And the receiver—great beyond compare,
All those who shall be happy as partakers;
O! May no traitor to his country’s cause
E’er have a bit of thee between his jaws.

How was the cheese consumed? In Culture, Dakota Mackey wrote, “Though stories vary about what happened to the cheese, the most popular tale is that it was displayed at the White House for two years and served at various Republican party functions before being tossed into the Potomac River.”

Luckily for the nearest body of water to me, Hawley’s Mill Brook, the balls I made using Sarah Riley’s recipe were small and tasty enough to be devoured by my family and guests before any tossing was called for.

To make sure we could eat our cheese quickly, I prepared a half recipe. It made two small balls. I love cheese, but I feel for the residents of Thomas Jefferson’s White House as they lived with the smell of the Mammoth Cheese for two years.

Here is Sarah’s more modest recipe. Consider serving it to ring in the new year. I wish you good health, peace, and lots of yummy food in 2025.

Sarah Riley’s Not-So-Mammoth Cheese Ball

Ingredients:

8 to 12 ounces Cabot sharp Cheddar cheese
8 ounces (1 brick) cream cheese, at room temperature
4 ounces blue cheese (more or less to taste; I used a little more)
1/3 cup finely chopped red onion.
Blue Diamond smoked almonds, finely chopped
(Start with 3 ounces, and then chop more if needed.)

Instructions:

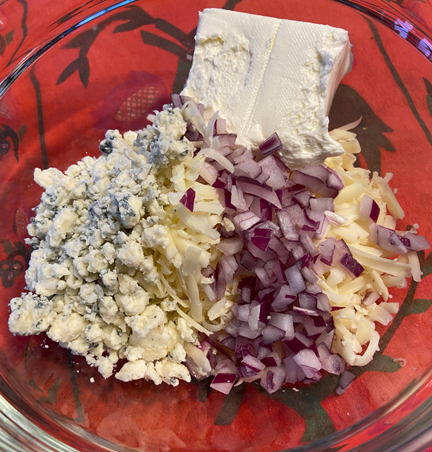
Grate the cheddar into a bowl. Add the cream cheese, the blue cheese, and the red onion pieces. Sarah recommends mixing these ingredients together with one’ s hands. She says sometimes she wears gloves. I didn’t use gloves but made sure that my hands were immaculately clean.

Shape the mixture into 2 to 4 balls. Roll the balls in the chopped almonds.

Cover the balls and refrigerate them for a couple of hours. Makes 2 large (but not mammoth) or 4 small balls.

My Forever Female Moment

Wednesday, February 14th, 2024

Ginger Rogers and Paul Douglas

I recently found myself feeling like Ginger Rogers for the first (and probably last) time.

My friend Peter shot a video of me making focaccia recently. I hadn’t cooked on camera in several months. I was planning to make a heart-shaped loaf of this simple bread for Valentine’s Day, and I thought we might as well put it on video. We sent it to my friends at Mass Appeal, who aired it the very next day. I guess they had missed me!

When I watched the video, I had my Ginger Rogers moment.

It has been years since I saw the 1953 film Forever Female, but I remember its ending well.

The film is a gentler version of Sunset Boulevard. (No dead bodies!) Rogers plays Beatrice Page, a stage actress who falls in love with a script from a novice playwright (Holden) about a 19-year-old girl and her strong willed mother. Beatrice doesn’t want to play the mother. She has always played ingenues.

The playwright is smitten, and she persuades him to try rewriting the play to make the young woman just a bit older—say, 29. (I can relate. I was 29 for many, many years before jumping to my current official age of 39.)

A true ingenue played by Patricia Crowley wants both the part and the playwright. Holden’s character, Stanley, resists Crowley’s youth until he goes to visit Beatrice at her country home during her summer break from Broadway.

On vacation she lets herself be her age. She doesn’t get her hair styled, she gains a bit of weight, she eschews makeup, and she wears comfortable rather than glamorous clothes. Stanley is appalled to see his beloved looking so … old. (Rogers was in her early 40s when the film was made.)

All’s well that ends well, of course. Crowley is cast in the ingenue role, but thanks to Beatrice’s wise producer (also her ex-husband, played by the ever watchable character actor Paul Douglas) Beatrice shines in the role of the mother and gets rave reviews.

She soon realizes that growing older is not so bad—and that her middle-aged ex is a much more comfortable romantic partner than the younger Stanley.

The film has its flaws. The main one to me is that, true to Hollywood custom at the time, Holden is considered too young for Rogers (he was seven years her junior) but a perfectly appropriate match for Crowley, who was 15 years HIS junior.

Still, the film is kinder to the aging process than Sunset Boulevard. In the end, Beatrice is a heroine to be emulated.

Unfortunately, I felt that I emulated her a bit too much in my focaccia video. Over the past few months, as I tend to do as the weather cools, I have put on weight and let my hair go. So I was a bit appalled when I saw the video. I usually look pretty good on video, particularly when the camera remains above my waist, as I make sure it always does.

I am trying to reconcile myself to the winter me, reminding myself that if Ginger Rogers could let herself grow old, so can I. Nevertheless, the video has made me watch my food intake much more carefully. And I called my hairdresser to arrange to have my hair done soon.

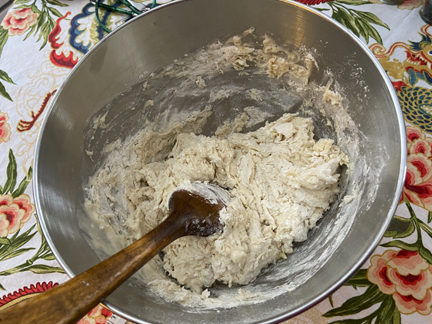
Fortunately, the focaccia was delicious. I recommend this bread highly. Focaccia’s biggest selling point for a busy baker like me is that it is a no-knead bread. It does most of the work all by itself. After one proofs the yeast (which doesn’t take more than five minutes), one throws the dough together and then lets it rise for a couple of hours on its own, partly covered. The dough is a little messy looking at first, but it works out in the end.

After those two hours, one can either bake the bread right away or cover it completely and refrigerate it for several hours or overnight. I prefer the latter method; if you want to bake the bread right away, you’ll need to flour your hands well to keep the dough from being too sticky.

Focaccia’s other major virtue is its mixed consistency. The relatively large amount of water in the recipe helps the bread develop lots of holes, resulting in a chewy, airy loaf. The olive oil used to grease the pan and drizzle on top of the bread helps the top and bottom crisp up, contrasting nicely with the interior.

I bake my focaccia in a cast-iron skillet. If you don’t have a cast-iron skillet, I heartily recommend that you go out and purchase one, The Lodge manufacturing company even pre-seasons its cast-iron products to make them easier to use.

If you don’t have the time or financial resources to get a cast-iron pan, you may of course use a well oiled cake pan or rimmed cookie sheet. Don’t forget to oil the sides as well as the bottom. Your focaccia may lose a little of its crispiness, but any homemade bread is better than none!

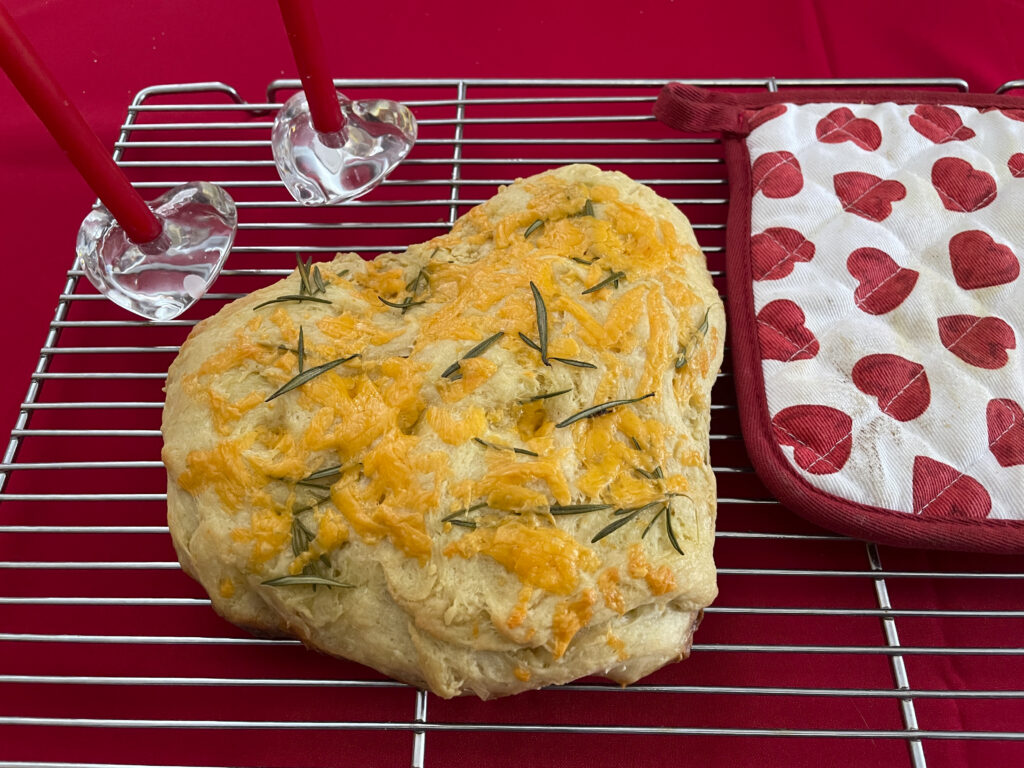
Like pizza crust, its thinner cousin, focaccia can be covered with a variety of toppings. My most recent loaf used only two (plus olive oil), aromatic rosemary and colorful Cheddar cheese. It was delicious.

Feel free to experiment with different herbs and cheeses, as well as vegetables and olives. My friend Vicky, who is more artistic than I, likes to use veggies to draw a colorful picture on her loaves. Extra salt crystals on top add zing.

This recipe makes a small loaf (heart shaped for Valentine’s Day, although that’s not obligatory), perfect for four people. The recipe may certainly be doubled. Just be sure to use a big enough pan to accommodate your dough.

Valentine Focaccia

Ingredients:
1 cup plus 1 tablespoon lukewarm water
1 teaspoon sugar
1 teaspoon active dry yeast (about 1/2 packet of yeast)
2 cups flour
3/4 teaspoon salt
extra-virgin olive oil as needed
fresh or dried rosemary to taste (fresh is better)
1/2 to 3/4 cup shredded Cheddar cheese (or the cheese of your choice)

Instructions:

Combine the water and the sugar. Pour the yeast into that mixture. Allow the liquid to sit for 5 to 10 minutes, until the yeast proofs (starts to look fuzzy). This means it is ready to go to work making bread.

In a bowl, whisk together the flour and the salt. Pour in the yeast mixture, along with 1 tablespoon oil. Stir the mixture together.

Partly cover the mixture. Let it sit at room temperature for 2 hours. At the end of the 2 hours, place the dough in a covered container with a tight lid. Refrigerate it for several hours, even overnight. This makes the dough less sticky and easier to handle.

About 1/2 hour before you want to bake your bread, take the dough out of the refrigerator. Generously oil the bottom and sides of a good-size (at least 12 inches wide) cast-iron skillet. If you don’t have a cast-iron skillet, use a round cake pan or rimmed baking sheet, again well oiled.

Place the focaccia in the skillet, shaping it according to your preference. (I used a heart for Valentine’s Day.) It can be relatively thick (say, 2 inches) or thin (around 1 inch), as you desire. Turn it quickly so that the side that was originally down is up and oiled. (You may add a little more oil to the top if you like.)

Decorate the top with rosemary and cheese, pressing them into the dough with your fingers to make sure they won’t fall off the bread. Making little holes in the top with your fingers as you do this also helps the focaccia aerate while baking.

Preheat the oven to 400 degrees. When it is hot, bake the bread until it begins to brown and is firm to the touch, about 25 minutes. Remove it carefully from the oven (your skillet will be HOT), let it cool briefly, and then enjoy your bread.

Store uneaten focaccia at room temperature. Serves 4.

Here’s the video. Happy Valentine’s Day……….

The Way the Cookie ALMOST Crumbles

Wednesday, December 27th, 2023

It may seem odd to provide a cookie recipe after Christmas, which is the day of days for cookies. If you’re like me, however, you’ll entertain friends and give gifts all the way until New Year’s Day and perhaps until Epiphany. I hope this recipe sweetens the extended season for you and your companions.

I was first served Peppermint Meltaways long ago by a friend. Since then, I have thought about making them—but I never actually got around to it until last week, when I found myself with a huge number of mini-candy canes.

I had ordered them to share at the office but had accidentally ordered two containers of candy canes instead of the one the office needed. I thus faced a surfeit of peppermint.

I recalled that the Meltaways featured crushed candy canes as a topping. I must admit that the recipe didn’t use as many candy canes as I had hoped—but it used some, and the people to whom I served the cookies were very happy indeed. I’m consequently sharing the recipe with you.

I have always adored peppermint, particularly at this time of year. I tried recently to find out why peppermint is so popular at Christmas, but no one (at least no one who inhabited that arcane source of information, the World Wide Web) seemed to know.

I did discover that the first candy canes, in the 19th century, were apparently a solid white confection not flavored with peppermint; the addition of stripes and that special flavoring came in the 20th century.

I also learned that peppermint is an ancient medicinal herb. Its name comes from Greek mythology. According to lore, the god Hades fell in love with a nymph named Minthe.

His wife, Persephone, discovered their affair and in a fit of rage turned poor Minthe into a plant that would grow wild and get trampled underfoot. (Personally, I think Persephone should have taken her wrath out on Hades instead, but I imagine he was a more formidable foe than the poor nymph.)

Hades altered Persephone’s spell slightly. He couldn’t return Minthe to her former form, but he made the plant she had become smell sweet so that people would think well of her.

The best explanation I could find for the popularity of peppermint at this time of year comes from the digital media company known as Tasting Table. An article posted there reminds readers that at this time of year we tend to indulge in an awful lot of food.

Mint aids digestion. Consequently, Tasting Table dubs it “the Official Digestif of the Holiday Season.”

Whether I love peppermint for its digestive properties or just for the way it perks up my palate, it definitely appeals to me. I am despondent if I can’t find peppermint-stick ice cream during the holiday season.

Luckily, in the area in which I live, it is manufactured by a number of ice-cream makers, but I purchase it early in December just in case stores run out later.

I should warn you that these cookies are a bit challenging, so much so that I almost decided to post a completely different recipe this week. As I noted earlier, however, the people who ate them adored them so I went with the original recipe.

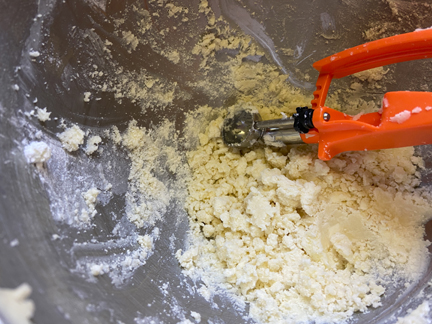
The problem, as you can see from the list of ingredients below and the photo above, is that a lot of the Peppermint Meltaway cookie dough is made up of two very crumbly substances, confectioner’s sugar and cornstarch.

In addition, the cookies have no egg to bind them. Even after one chills the dough for an hour, it can be difficult to shape into balls. They really DO need to be shaped into firm balls, however.

I tried just forming a few very delicately, thinking they would be okay once they went into the oven. Unfortunately, those few cookies spread all over the place. If you persist and create firm balls, however, you will be rewarded with delicate cookies that live up to their name by melting in your mouth.

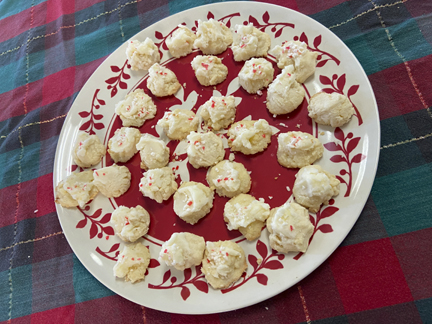
I should think they would be even prettier if one were to tint the icing on top a pretty pink. In the absence of food coloring (mine is hiding somewhere in my pantry), the white icing does just fine. After all, the crushed candy canes provide a welcome hint of color.

Please note that the peppermint flavor in the cookies and the icing comes from peppermint extract, not peppermint oil. If you have only peppermint oil, be aware that it is much more concentrated than the extract so you’ll need only a few drops.

Peppermint Meltaways
(adapted from Land O Lakes)

Ingredients:

for the cookies:
1-1/4 cups flour
1/2 cup cornstarch
1 cup (2 sticks) sweet butter at room temperature
1/2 cup confectioner’s sugar
1/2 teaspoon peppermint extract

for the icing:
1/4 cup (1/2 stick) softened sweet butter
3/4 cup confectioner’s sugar, plus more if needed
1 teaspoon peppermint extract
milk if necessary to stir

for finishing:
crushed candy canes as needed

Instructions:

Begin by making the cookies. In a small bowl, whisk together the flour and the cornstarch. Set them aside.

In another mixing bowl, cream together the butter and the confectioner’s sugar. Beat in the extract. Slowly add the flour/cornstarch mixture and blend well. Push down on the dough with your hands to help it hold together. Cover the bowl, and refrigerate the dough for an hour.

Preheat the oven to 350 degrees. Line 2 baking sheets with parchment. Form the dough into 1-inch (or slightly larger) balls, pressing each ball gently but firmly to help it stick together. Place the balls 2 inches apart on the baking sheets.

Bake the cookies for 10 to 12 minutes, until the edges just start to turn brown. Remove the cookie sheets from the oven, and allow the cookies to cool completely.

When the cookies are cool, beat together the frosting ingredients. Adjust the consistency by adding a little more softened butter, a little more confectioner’s sugar, and/or a little milk to make sure you have a spreadable frosting. Gently spread a little frosting on each cooled cookie.

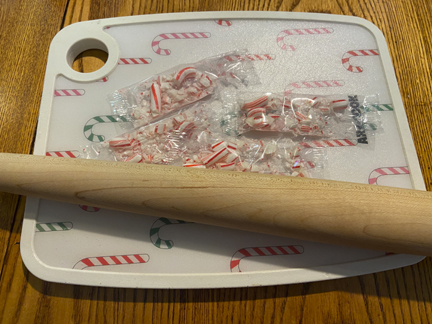
Top the cookies with a little crushed peppermint. This can be messy because the crushed candy wants to go everywhere except on top of the cookies, but persist. You’ll end up with very pretty cookies. Makes about 30 festive cookies.