Archive for the ‘Cooking with Kids’ Category

First Try at Sushi

Wednesday, February 28th, 2018


One of my favorite things to do during my holiday shift at Williams-Sonoma (which ends in February) is teaching cooking classes, particularly children’s classes. I love the enthusiasm and appetite young people bring to the experience.

Last month I was asked to teach a class in conjunction with the store’s American Girl Around the World Cookbook. The class covered an odd but intriguing duo of recipes: vegetable sushi and Black Forest cake.

I have worked with the American Girl books before, and in general I’m not crazy about them. The recipes tend to be bland and sometimes don’t quite work.

The Black Forest cake recipe lived up to that experience. I actually baked the basic cake twice. (It had to be made before the class so that it had time to cool before my students decorated it.) In neither case did I care for the consistency. My students didn’t really mind because the whipped cream and cherries they slathered all over the final product literally and figuratively covered up the cake’s defects.

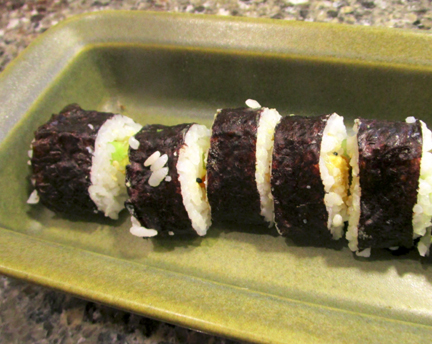
The sushi was a different story. I love seafood but I have had it in a best sushi restaurant nearby. But I never made sushi before, so I enlisted my family’s aid in pre-testing the recipe. We did change it a little bit. The cookbook wanted the sushi rolled by hand into little cornets. I couldn’t for the life of me make that work. Instead, we rolled it by hand into the classic cylinders and rounds. Soon my sister-in-law, who adores sushi, purchased a little sushi mat to simplify the rolling procedure. It definitely helped—but if you want to try the recipe, you don’t have to have the mat.

Here is the cookbook’s recipe, amended by my family.  Our sushi is a work in progress, but it will improve over time. Meanwhile, I’m happy to report that my students had a grand time making the sushi. Their rolls weren’t entirely neat (neither are mine!), but they tasted great.

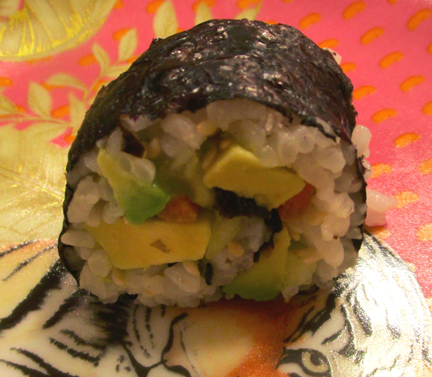
Of course, the fillings for the sushi can be varied. One of these days I plan to try making classic sushi with fish. For the moment, I’m happy.

Vegetable Sushi

Ingredients:

for the rice:

2 tablespoons rice vinegar
1-1/2 tablespoons sugar
1-1/2 teaspoons salt
2 cups cooked short-grain sushi rice (we have been using Nishiki brand, but others are available), still hot

for assembly:

1 teaspoon rice vinegar
2 tablespoons water
2 to 3 sheets of nori (seaweed), cut in half
2 tablespoons toasted sesame seeds (white or black or some of each)
2 baby cucumbers, peeled (or not!) and cut into thin pieces
several baby carrots, cut into thin pieces
1 ripe avocado, peeled, pitted, and thinly sliced

for serving:

soy sauce or tamari
wasabi (optional: some people, like me, love it, while others find it too spicy)

Instructions:

Begin by making the seasoning for the rice. In a small saucepan combine the vinegar, sugar, and salt over low heat. Stir and heat until the sugar and salt dissolve (a minute or 2). Set aside to cool completely.

Cook the rice according to package directions. (I usually cook it for a little less time than the recipe suggests and then let it sit off the heat for 10 minutes to finish cooking on its own.)

Place the hot rice in a baking dish, using a spatula or paddle to spread it out evenly. Slowly pour in the vinegar mixture while slicing the spatula through the rice to make sure that it goes all the way through. Flip the rice so that all of it gets some of the liquid. Cover the rice with a clean, damp cloth while you get ready to make your sushi. (The seasoned rice is essential to really good sushi so don’t try to skip this step.)

Combine the vinegar and water for assembly in a small bowl. Place 1 piece of nori, shiny side down, on a clean, dry work surface or sushi-rolling mat. The long side should be closest to you. Slice the nori in half so that you have two long sheets.

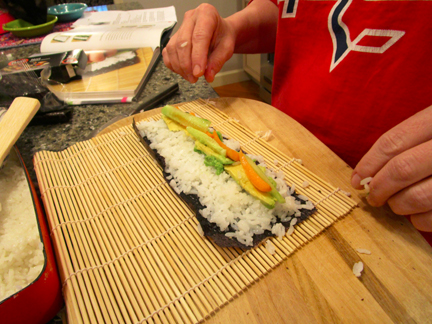
Scoop a couple of tablespoons of rice onto one of your sheets. Dip your fingers in the vinegar/water mixture to keep the rice from sticking to them; then gently flatten the rice on the sheet, leaving room on all sides but particularly on the long side opposite you.

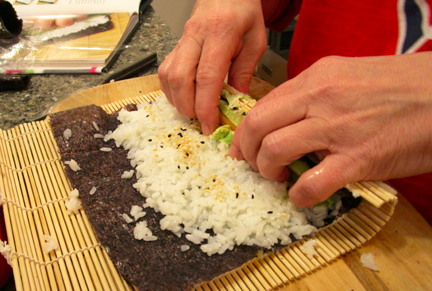
Lightly sprinkle the rice with some of the sesame seeds; then place a few slices of cucumber, carrot, and avocado on top, keeping them fairly near you on the rice. 


For this roll we forgot the sesame seeds and went too close to the edges of the nori (nobody’s perfect!), but you can see how the vegetables are clumped together.

Lift the side of the nori closest to you, and roll it forward. The process is a little delicate. You want a small amount of pressure to keep the sushi together, but you don’t want to squash it.

When the sushi is rolled, remove the mat (if you are using one) and slice the sushi into little rounds with a serrated knife. Serve with soy sauce and (if you like it) wasabi. Serves 4 to 6 as an appetizer.


Even More Apples

Friday, October 20th, 2017

The weather outside is getting nippy in Massachusetts—but I’m keeping the house warm with food and laughter. It’s still apple month so I have stocked up on crisp, local apples and sweet cider.

I love the variety of apples available at my local orchards. Last week at Clarkdale Fruit Farms I sampled a new (to me) apple, the Esopus Spitzenburg. I first fell in love with the name—and then with the flavor.

This heirloom variety was one of Thomas Jefferson’s favorite apples, according to apple grower Ben Clark. Our third president did have good taste.

The Monticello website quotes A.J. Downing, whom it dubs “America’s foremost nineteenth century pomologist” (another great term) on this apple. Downing called the Esopus Spitzenburg “a handsome, truly delicious apple … unsurpassed as a dessert fruit” and considered it “the first of apples.”

I have a lot of apples in the house—but next time I go to Clarkdale I’m going to pick up a bag of Mr. Jefferson’s apples. I have a feeling they would be great for cooking as well as eating.

Meanwhile, on Mass Appeal this week I cooked with what I had in the house: cider and honey-crisp apples.

Franklin County’s annual Cider Days are on the horizon so I made a pot roast with sweet cider.

In cool weather my mind frequently turns to pot roast. I have written before about my go-to pot roast, but this version is also appealing, simultaneously sweet and savory.

After the pot roast, I looked ahead to my favorite holiday, Halloween, with caramel apples festooned with chocolate and other goodies. King Arthur Flour generously sent me both caramel and chocolate. I invited small neighbors over to pre-test the apple recipe below, and they were hugely enthusiastic. So were the youthful hosts on Mass Appeal.

The video below doesn’t show Danny New dumping nuts and sprinkles on our apples (he dumped after the cameras were turned off), but those embellishments are a fun part of any apple decoration.

My Facebook friend Nancy gently admonished me for giving the small neighbors chocolate and sprinkles rather than just nuts—but they made that decision themselves. The nuts, although delicious, are a more adult garnish. 

Whether you’re a sprinkle person or a nut person, do try these recipes. Happy apple month!

Cider Pot Roast

Feel free to add more liquid and spices if you like lots of juice in your pot roast—and maybe to add carrots after the first hour of cooking. Carrots are in season right now, and they complement the other flavors in this dish nicely.

Ingredients:

1-1/2 cups cider
1 tablespoon brown sugar
2 teaspoons salt
1 cinnamon stick
1/4 teaspoon ground ginger
2 whole cloves
1 3-to-4-pound pot roast
flour as needed
canola oil as needed

Instructions:

Combine the cider, the sugar, the salt, the cinnamon, the ginger, and the cloves. Pour this marinade over the beef, and let it stand, covered, in the refrigerator for 24 hours. Turn and baste from time to time. Remove the roast from the marinade; sprinkle it with flour.

Heat the oil, and brown the meat in it in a pot or Dutch oven. Lower the heat, add the marinade, and cover tightly. Simmer for 3 hours. After the first hour, be sure to turn the roast every half hour or so, and to add more cider if the meat looks a bit dry. When ready to serve, thicken the gravy with flour if desired. Serve with noodles. Makes 4 to 6 servings.


Caramel Apples Plus

Ingredients:

3/4 pound caramel (or as much as you like) in block form
1/3 pound milk chocolate, cut up
1/3 pound white chocolate, cut up
4 medium apples
festive seasonal sprinkles, chopped nuts, or any other topping you like (optional)

Instructions:

Preheat the oven to 200, and bring water to a boil in the bottom of a double boiler. Place the caramel in the top of the double boiler, and place the milk chocolate and white chocolate in oven-proof bowls.

If your caramel needs it (the package should tell you), add a little water to it. Melt the caramel in the double boiler over low heat, stirring occasionally. While it is melting put sticks in the cores of the apples.

When the caramel has melted, place the bowls of chocolate in the oven. Dip the apples in the caramel, gently swirling to cover them. Place the dipped apples on a cookie sheet lined with parchment or a silicone mat.

Take the chocolates out of the oven, and stir to confirm that they have melted. (Melting them takes 10 to 15 minutes in the oven.) Use a spoon to drizzle the chocolate over the apples.

If you wish for extra bling, throw a few sprinkles or nuts on top of the apples before the chocolate hardens. Then wait for it to harden before digging in. (Waiting is the hard part!) Makes 4 delicious apples. These are best consumed cut into segments.

And now the videos:

Tinky Makes Cider Pot Roast on Mass Appeal

Tinky Makes Caramel Apples Plus on Mass Appeal

Heart-y Cookies

Sunday, February 14th, 2010

heart cookiesweb

 
Happy Valentine’s Day!
 
Naturally, I have something chocolaty for this month’s installment in my Twelve Cookies of Christmas series.
 
Today’s chocolate sugar cookies were cut into hearts (although they could certainly be trees or stars or reindeer in December) and iced with a basic butter icing.
 
They tasted wonderful.
 
Royal icing would have been prettier and easier to transport than the butter version we used on the cookies—but royal is harder to make and harder to keep. It has to be used right away or it dries out.
 
I wanted my icing simple and foolproof to use because I had a vision of a bunch of children happily decorating and eating cookies—a vision that came true.
 
cookie joyweb
 
My nephew Michael and his friends in Virginia have been snow crazy this week. No one has been to school. Sleds and snowballs have replaced electronic games (well, almost).
 
We called around the neighborhood a couple of days ago and asked whether anyone would like to take a break from the snow and come decorate cookies.
 
We ended up with eleven joyful children gathered around the kitchen table slathering icing and tossing sprinkles around.
 
The resulting cookies were heavily decorated. (We actually ended up making a double batch of icing to make sure there was enough.)
 
And they were VERY popular. The pictures above and below were taken with a cell phone (my battery ran out of steam at the critical moment) so they’re a little fuzzy, but you can see that our gang had a really good time. One of them was camera shy so we have only ten in the group photo.
 
If you enjoy these cookies half as much as the kids did, you’ll be happy indeed………
 
kidswithcookiesweb
 
Chocolate Sugar Cookies
 
Ingredients:
 
for the cookies:
 
1 cup (2 sticks) sweet butter at room temperature
1-3/4 cups sugar
2 eggs at room temperature
1 teaspoon baking powder
1/2 teaspoon salt
2/3 cup Dutch-process cocoa
2 teaspoons vanilla
3 cups flour
 
for decoration:
 
1 recipe (2 if you MUST) butter icing (see below)
lots of festive sprinkles
 
Instructions:
 
Cream together the butter and the sugar. Beat in the eggs, 1 at a time, beating well after each addition. Blend in the baking powder, salt, and cocoa, followed by the vanilla. Stir in the flour.
 
Chill the resulting dough, covered, for 1 hour. Preheat the oven to 350 degrees.
 
On a nonstick surface (a silicone mat or a marble board) pat the dough out to a thickness of 1/4 inch. Cut it into the desired shapes.
 
Bake the cookies on parchment- or silicone-lined cookie sheets for 10 to 12 minutes. They should be solid but not rock hard.
 
Let the cookies cool on the sheets for a couple of minutes before removing them to a rack to cool. Let them cool completely before frosting them with butter frosting (see below) and sprinkling the heck out of them.
 
Makes about 2 dozen cookies.
 
Butter Icing
 
Ingredients:
 
1 cup (2 sticks) sweet butter at room temperature
confectioner’s sugar to taste (probably between 1 and 2 cups)
2 teaspoons vanilla
milk if necessary to stir
a couple of drops of food coloring (optional—I used my sister-in-law’s Wilton food coloring, which was excellent; I’ll have to get some!)
 
Instructions:
 
Beat the butter until it is fluffy; then add confectioner’s sugar. Beat in the vanilla. Add milk and/or more confectioner’s sugar until the icing is spreadable.
 
Truffle wasn't allowed to eat any cookies, but she loved being with the kids anyway. They are all her Valentines.

Truffle wasn't allowed to eat any cookies, but she loved being with the kids anyway. They are all her Valentines.


If you enjoyed this post, please consider taking out an email subscription to my blog. Just click on the link below!

Subscribe to In Our Grandmothers’ Kitchens by Email.

Wacky Cake

Wednesday, February 10th, 2010

Michael with cake web


February may be the shortest month of the year, but it hosts a disproportionate number of holidays.
 
This month we are celebrating Groundhog Day, Valentine’s Day, President’s Day, Mardi Gras/Shrove Tuesday, the Chinese New Year, and Purim. (I’ve probably left out a few!)
 
We commemorate the birthdays of quite a few historical figures, from Charles Dickens on February 7 to Handel on February 23, not to mention Gypsy Rose Lee on February 9 and Susan B. Anthony on February 15.
 
And as a food writer I always love the nutty food holidays to be found in this month. These include National Indian Pudding Day on February 17, Cream-Cheese Brownie Day on February 10, National Tortilla Chip Day on February 24, and Surf & Turf Day on February 29.
 
(I guess most of us can afford that last holiday only once every four years.)
 
Clearly, despite the chill in the air there is much to celebrate this month.
 
In today’s post, looking forward to Valentine’s Day, I offer an amazingly simple chocolate-cake recipe sent in by Mattenylou, the blogger responsible for the charming On Larch Lane.
 
This “Wacky Cake” dates back to the early 20th century. It’s considered wacky because it includes a little vinegar and because all of the ingredients get dumped together in one bowl and mixed simply with a wooden spoon.
 
It includes neither eggs nor butter so you don’t have to wait for any ingredients to come to room temperature. (It’s dairy free, too—until you frost it!)
 
Reference librarian Lynne Olver, who runs the wonderful Food Timeline web site, suggests that Wacky Cake (a close relative of Dump Cake and Crazy Cake) first saw the light of day in its present form in the 1940s.
 
Olver adds that similar cakes first appeared during World War I, when (as in the Depression and during World War II) fresh ingredients were scarce.
 
Mattenylou originally sent the recipe to my nephew Michael to make for my birthday in December. She told him that she used to bake it every year for her mother, whose birthday was December 23 like mine, using Christmas-tree shaped pans.
 
Things got a little frantic this past December, as they so often do at that time of year, so Michael and I decided to save the recipe for February.
 
We tossed a little pink icing on top and threw a bunch of red and pink sprinkles on the cake (Michael is a whiz with sprinkles!)–and a Valentine cake was born.
 
Mattenylou points out that her recipe can be halved to put in a 9-by-9-inch pan (or a round single-layer pan). She adds that if one mixes up the dry ingredients and stores them in a bag one has a quick, easy cake mix to use when needed.
 
My family loved the cake, which was terrifically moist and rose beautifully. We certainly couldn’t taste the vinegar! NOTE: You may halve this recipe and bake it in an 8-by-8-inch-square pan for 25 to 35 minutes.
 
spinklingweb 
 
Wacky Cake
 
Ingredients:
 
3 cups flour
2 cups sugar
1/2 cup cocoa
1 tsp salt
2 tsp baking soda
2 tsp vanilla
2 tablespoons vinegar (I used cider vinegar, but white distilled would do as well)
2/3 cup canola oil
2 cups water
 
Instructions:
 
Preheat the oven to 350 degrees. Grease and flour 2 9-inch cake pans.
 
In a bowl combine the flour, sugar, cocoa, salt, and baking soda.
 
Make three wells in the combined dry ingredients. Pour the vanilla into one, the vinegar into the second, and the oil into the third. Pour the water over everything and stir with a wooden spoon until the dry ingredients are wet and everything is thoroughly combined.
 
Pour the batter into the prepared cake pans. Bake the layers until a toothpick inserted into the center comes out clean (about 30 to 35 minutes).
 
Frost as desired and decorate with festive sprinkles. Serves 12 to 16.
 
Mattenylou’s Cooked Frosting
 
Here is the recipe for the fluffy frosting Mattenylou puts on her Crazy Cake. We liked it but would probably use a standard buttercream or cream-cheese frosting another time; this one takes a LONG time to mix!
 
Ingredients:
 
1 cup milk
1/4 cup flour
1/2 cup shortening
1/2 cup butter
1 cup sugar
2 teaspoons vanilla
 
Instructions:
 
Cook the milk and flour until the milk bubbles and is thick and smooth, stirring constantly with wooden spoon or whisk. Set the mixture aside and let it cool.
 
Beat the shortening, butter, sugar, and vanilla until they are blended.
 
Add the cooled milk/flour mixture and beat well, for 10 minutes.
 
Add a few drops of green (for Christmas) or red (for Valentine’s Day) food coloring and beat until fluffy. This may take up to 15 minutes, depending on your mixer. The frosting should be fluffy and hold peaks.
 
Ices 1 layer cake.
 
wackyweb
 
Don’t forget: You have until Friday night to enter the drawing for a tin of gourmet hamentaschen from Kosher.com.
 
Just leave a comment on this post (or post a tweet on Twitter) that mentions YOUR favorite food holiday and provides a link to the Kosher.com web site.
 
Good luck….

If you enjoyed this post, please consider taking out an email subscription to my blog. Just click on the link below!

Subscribe to In Our Grandmothers’ Kitchens by Email.

Snow Day

Thursday, February 5th, 2009

Sous Chefs Anna (left) and Mavourneen (right)


I used to jump up and down when I looked outside and saw fresh snow on the ground. Once I got old enough to shovel and drive through snow it lost a lot of its charm for me. I still like being reminded that it can be a source of joy and play, however.


My mother and I are visiting my brother, sister-in-law, and nephew in northern Virginia to get away from the ice and snow. Last week the snow followed us here for a couple of days, much to the delight of young Michael and his friends.


Unplanned snow days are perfect holidays for kids. The kids don’t have anywhere to go. (In fact, in many cases they CAN’T go anywhere.) They don’t have any extra homework. And they have mounds of cold, malleable snow to slide around in and hurl at each other.


Michael and his friends spent most of the morning last Wednesday outdoors trading sleds, throwing snowballs, and generally frolicking. By mid-afternoon some of them were beginning to long for a little indoor activity. I asked for volunteers to help make Boston Cream Pie. Several kids offered to EAT the pie (and in fact they all ended up getting some), but my most stalwart helpers were Michael’s neighbors and friends Anna Aguto and Mavourneen Carr.


The girls signed up, of course, to bake a “pie”—and they did look a little surprised to discover that Boston Cream Pie is a cake (so named because pie pans were more common than cake pans in the 19th century, and because the recipe supposedly originated in Boston’s Parker House Restaurant). They were terrific sous chefs nonetheless.


I had made the filling (which has to chill) the day before, but the girls helped with every other step of the process—mixing, baking, filling the pie, creating the glaze, and applying the glaze. With Valentine’s Day just around the corner they went just a little wild with heart-shaped sprinkles on top, but the final product was lovely, festive, and consumed before sundown.


I hope we cook again soon. In the meantime, here is our recipe. The filling and glaze are from Dede Wilson’s fun new Birthday Cake Book (published by Harvard Common Press). 

This is all that remains of the snow in Virginia........

This is all that remains of the snow in Virginia........

Boston Cream Pie

Ingredients:


for the filling:


1-1/4 cups milk (whole milk or lesser milk mixed with cream)

1/4 cup sugar
3 egg yolks, at room temperature
2-1/2 tablespoons flour
2 tablespoons cornstarch
1 pinch salt
1-1/2 teaspoons vanilla


for the cake:


1/2 cup (1 stick) sweet butter at room temperature
1 cup sugar
2 eggs, separated, at room temperature
1 teaspoon vanilla
1-1/2 cups flour
2 teaspoons baking powder
1/2 teaspoon salt
1 cup milk


for the glaze:


3/4 cup heavy cream
1-1/2 tablespoons light corn syrup
7-1/2 ounces semisweet chocolate, VERY finely chopped


Instructions


for the filling:


Place the milk in a medium nonreactive saucepan. Bring it to a boil over medium heat; remove it from the heat and keep it warm.


Meanwhile, whisk together the sugar and egg yolks in a medium-size bowl until creamy. Whisk in the flour, cornstarch, and salt until smooth.


Pour about 1/4 of the warm milk over the egg yolk mixture, whisking gently. Add the remaining milk, and whisk to combine. Immediately pour the mixture back into the pan, and cook over low-medium heat. As soon as the mixture begins to boil, whisk vigorously and cook for 1 to 2 minutes to keep the filling from scorching. It should be thick enough to mound when dropped from a spoon. Remove from the heat and whisk in the vanilla.


Allow the filling to cool, stirring occasionally to release heat. When it is almost at room temperature, scrape it into an airtight container, press some plastic wrap on the surface to keep a skin from forming, snap on the cover, and refrigerate for at least 4 hours, until thoroughly chilled.


for the cake:


Preheat the oven to 350 degrees. Grease and flour 2 9-inch-round cake pans.


In a large bowl, cream the butter until light and fluffy.  Gradually beat in the sugar, mixing well. Beat in the yolks, 1 at a time, beating well after each addition. Beat in the vanilla.


In a separate bowl, combine the dry ingredients. Add them alternately with the milk to the butter batter, beginning and ending with the flour mixture.


Wash your beaters so that they are clean for the egg whites! In a small bowl, beat the whites until soft peaks fold. Fold them into the batter, and pour the batter into the pans.


Bake the layers for 25 to 30 minutes or until a toothpick inserted into the center comes out clean. Cool on racks for 10 minutes before removing from the pans. Cool the layers completely.


for the glaze:


Place the cream and corn syrup in a large saucepan, and bring them to a boil over medium heat. Remove the pan from the heat. Immediately sprinkle the chocolate in. Cover the pot and allow it to sit for 5 minutes. The warm cream will melt the chocolate. Gently stir the ganache until smooth.


for assembly:


Place one cake layer on a large serving platter. Spread the filling evenly over the layer, and top it with the other layer.


Pour the chocolate glaze on top. Gently spread it toward the edges. Allow it to drop down the sides. You will have a little too much glaze, but your helpers will help you eat it.

Refrigerate the cake for at least 1 hour (up to 6 hours) before serving. It is best eaten on the day on which it is made. Serves 8 to 10.


pieweb3