Archive for December, 2009

What Are You Doing New Year’s Eve?

Thursday, December 31st, 2009

bannocksweb

 
Frank Loesser composed the song “What Are You Doing New Year’s Eve?” in 1947.
 
According to Susan Loesser’s biography of her father, A Most Remarkable Fella, the singer of the song is supposed to be asking the title question in the early spring, thinking ahead and hoping that a new relationship will last until December.
 
“It always annoyed my father when the song was sung during the holidays,” the composer’s daughter writes.
 
When a songwriter publishes a song and sends it out into the world, however, the song can be reinterpreted over and over again—and Frank Loesser has clearly lost the battle of New Year’s Eve.
 
His song perfectly epitomizes the mixture of reflection, hope, and sleepiness we feel as midnight looms on December 31. It’s a lovely piece—slightly jazzy and easy to sing because the melody makes the lyrics seem effortless, like conversation.
 
Maybe it’s much too early in the game.
Ah, but I thought I’d ask you just the same:
What are you doing New Year’s, New Year’s Eve?
 
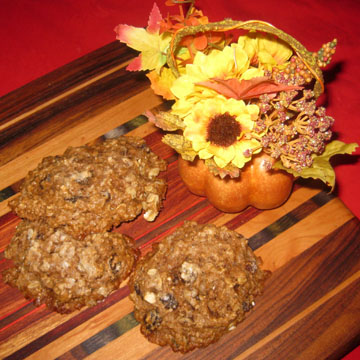
I’ll definitely be singing it tonight as part of a set Alice Parker and I are performing at the Charlemont Inn. And this afternoon as I vocalize I plan to make bannocks—at least, my version of bannocks.
 
Bannocks are one of the traditional Scottish foods associated with the celebration of Hogmanay. This Scottish New Year holiday begins on New Year’s Eve (sometimes even earlier) and extends into New Year’s Day (sometimes even later).
 
Hogmanay is a major festival in Scotland these days, not unlike July 14 in France. A Scottish website, Hogmanay.net, documents many of the contemporary celebrations and offers some history as well as an opportunity to sing “Auld Lang Syne” by following a bouncing ball.
 
According to Hogmanay lore, the New Year will be prosperous if a dark stranger is the first person to cross one’s threshold in the New Year. The stranger is supposed to bring a token gift, often a lump of coal to keep the fire warm. The homeowner reciprocates with refreshment.
 
A typical refreshment offered is a bannock, an oatmeal cake that according to varying accounts resembles a scone—or a pancake—or a cookie.
 
I’ve never tasted an authentic bannock, and I encourage readers with recipes to send them in! In the meantime, I’m baking my version of this treat, which is distinctly scone like.
 
I love the word “bannock.” It sounds solid and practical. My bannocks are also solid (although not hard!) and taste pleasantly of country life.
 
It’s unlikely that a dark and handsome stranger will cross my threshold at midnight.
 
Snow is predicted late this evening in Hawley, Massachusetts, and the town tends to be geriatric so any handsome stranger who actually makes it up my steep hill will probably be silver haired. But a girl can always hope.
 
If no stranger shows up, we’ll eat the bannocks for breakfast on New Year’s Day.
 
Happy New Year to all! I look forward to singing and cooking with you in 2010…
 
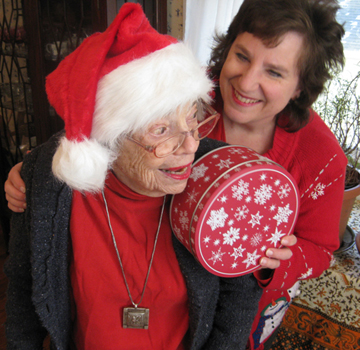
Thanks to Pru Berry for the impromptu photo!
 
Tinky’s Inauthentic but Tasty Bannocks
 
Ingredients:
 
1 cup flour
1/2 cup oatmeal (not quick cooking)
1/2 cup blended oatmeal (put oats in your blender and pulverize them into a flour-like consistency; then measure out 1/2 cup)
1/2 cup brown sugar, firmly packed
1-1/2 teaspoons baking power
1 teaspoon baking soda
1/2 teaspoon salt
1 teaspoon cinnamon
1/2 cup (1 stick) sweet butter
2/3 cup raisins
1/2 to 2/3 cup buttermilk
1 egg
1/2 teaspoon vanilla
white sugar for the top of the bannocks
 
Instructions:
 
Preheat the oven to 325 and lightly grease two cookie sheets (or line them with silicone or parchment).
 
In a medium bowl combine the flour, oatmeals, brown sugar, baking powder, baking soda, salt, and cinnamon.
 
Cut in the butter; then stir in the raisins.
 
In a mixing cup whisk together 1/2 cup buttermilk, the egg, and the vanilla. Stir this mixture into the dry ingredients. If the batter won’t quite hold together, add a little more buttermilk.
 
Drop the bannock batter into 12 mounds on the prepared cookie sheets. Sprinkle a little sugar on the top of each mound.
 
Bake the bannocks for 18 to 25 minutes, until they are brown on the edges. Let the bannocks cool on the cookie sheets for a minute or two before serving them warm. (If you can’t use them right away, reheat them briefly before serving; they’re best eaten quite fresh from the oven.)
 
Makes 12 bannocks.
 
Truffle2010web

If you enjoyed this post, please consider taking out an email subscription to my blog. Just click on the link below!

Subscribe to In Our Grandmothers’ Kitchens by Email.

Wisconsin Cranberry Bread

Tuesday, December 29th, 2009

cranberry bread on plateweb

 
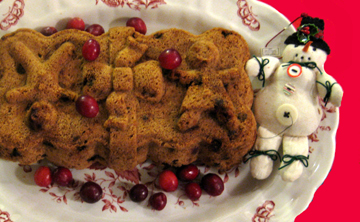
In a recent post I wrote about the annual cranberry festival in Warrens, Wisconsin. The recipe below is adapted from its Best of Cranfest cookbook. Lyda Lind of Pine River, Wisconsin, entered this festive bread in a 1990 competition.
 
I would never have thought of combining cranberries with coconut, but the combination would be a winner in any book. The bread makes a lovely holiday gift. Remember, we still have seven days (and nights) of Christmas left!
 
One friend told me she found the texture surprising. So don’t be worried if this bread is not like any quickbread you’ve had before. It feels more like a muffin or scone–crispy on the outside and chewy on the inside.
 
Ingredients:
 
1-1/2 cups sugar
1/2 cup (1 stick) sweet butter
2 eggs, well beaten
1 teaspoon cinnamon
1 teaspoon baking soda
2 teaspoons baking powder
1/4 teaspoon salt
3 cups flour
2 cups chopped cranberries (I just cut them in half)
1 cup white raisins
1 cup flaked coconut
1 cup pecans (optional—if you use them, cut the coconut back to 1/2 cup)
2 teaspoons vanilla
 
Instructions:
 
Preheat the oven to 325 degrees. Grease and flour 2 regular loaf pans or 5 small ones.
 
Cream together the sugar and shortening. Add the eggs and mix well. Stir in the cinnamon, baking soda, baking powder, and salt, and blend thoroughly.
 
Measure out the flour, and place 2 tablespoons of it into a bowl along with the cranberries, raisins, coconut, and pecans (if using). Mix well, and add this fruit mixture to the butter batter.
 
Blend in the remaining flour and the vanilla. You will have a fairly stiff batter. Spoon it into the prepared pans.
 
Bake the loaves until a toothpick inserted into the center of the batter comes out clean—about 55 to 60 minutes for the large loaves and 35 to 40 for the small ones.
 
Let the loaves rest in their pans for 10 minutes; then remove them and let them cool on a wire rack. Makes 2 large or 5 small loaves.
 
unfocusedbutcuteweb

If you enjoyed this post, please consider taking out an email subscription to my blog. Just click on the link below!

Subscribe to In Our Grandmothers’ Kitchens by Email.

Bloomie’s Broccoli Soup

Sunday, December 27th, 2009

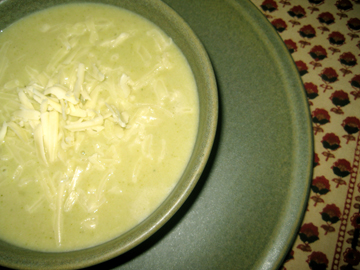
brocsoupweb

 
We ate turkey for Christmas dinner this year. Like most people, I enjoy turkey above all for the leftovers it provides.
 
I love turkey tetrazzini, turkey pizza, and turkey salad—and I can hardly wait to get my hands on the turkey carcass to make stock! Here’s one of many quick and easy uses for that stock.
 
I worked for a while as a culinary demonstrator at Bloomingdale’s in McLean, Virginia. It was a fun job: basically, I got to try out all sorts of different cookware and feed hungry shoppers. They were always grateful.
 
The store’s KitchenAid representative, a genial guy named Bob Moss, told me that he knew I was a real cook when he walked in and saw me chopping up a huge pile of broccoli for soup.
 
I don’t know whether I’m a real cook, but this is certainly my idea of real soup. Other versions may be heavier and creamier, but this one is simple and delicious. In one bowl it combines protein, calcium, and vegetables. Eating well was never so yummy. Maybe I am a real cook!
 
As always, I encourage readers to experiment with this recipe. If you like your soup thicker, use more of the flour/butter/milk mixture. If you want fresh herbs in your soup, toss in a few (I’d suggest tarragon or thyme) to simmer with the stock and vegetables.
 
Ingredients:
 
1 large onion, coarsely chopped
a small amount of butter for sautéing plus 1-1/2 tablespoons butter later
2-1/2 cups coarsely chopped broccoli (generous)
4 cups homemade turkey or chicken stock (if you have a little turkey or chicken in the stock, that’s just wonderful)
1-1/2 tablespoons flour
3/4 to 1 cup milk
cream to taste (we used about 1/4 cup)
salt, pepper, and red pepper flakes to taste (the red pepper is optional but gives a nice kick)
shredded sharp cheddar cheese to taste
 
Instructions:
 
In a 3-quart saucepan sauté the onion pieces in butter until they begin to soften and waft out a lovely aroma. Toss in the broccoli, followed by the stock. Bring the mixture to a boil.
 
Cover the soup, reduce the heat, and simmer it until the vegetables are cooked, about 20 minutes (time depends on the age and thickness of your broccoli).
 
Remove the soup from the heat and cool it briefly before pureeing it in batches (be careful not to splash hot soup on yourself!). Return the pureed soup to the saucepan.
 
In a small saucepan melt the 1-1/2 tablespoons butter. Whisk in the flour to make a roux, and bring the mixture to a boil. Boil for 2 minutes, whisking constantly. Whisk in the milk, and cook, whisking, until thick (this will take only a minute or so). Whisk in the cream.
 
Add the milk mixture to the soup, and heat the whole thing to make sure it is warmed through. Add salt and pepper(s) to taste. Serve in bowls with heaps of shredded cheese.
 
Serves 4.
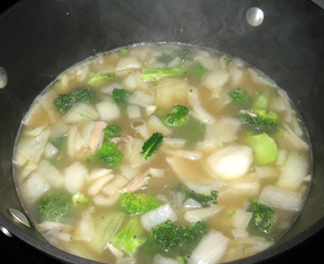
My picture isn't out of focus: that's steam rising from the stock and veggeis!

My picture isn't out of focus: that's steam rising from the stock and veggies!

If you enjoyed this post, please consider taking out an email subscription to my blog. Just click on the link below!

Subscribe to In Our Grandmothers’ Kitchens by Email.

Peppermint-Swirl Brownies

Thursday, December 24th, 2009

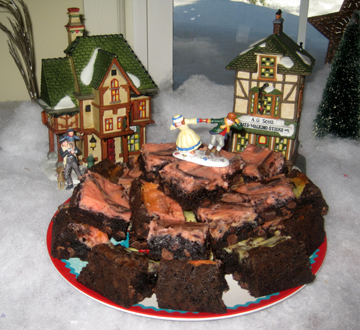
browniesvillweb

 
Regular readers may ask whether in fact I didn’t just post a peppermint-brownie recipe. The answer is yes, I did, and I’m not ashamed to admit it!
 
I don’t believe a cook can combine chocolate and peppermint too often at this time of year. And the two brownie recipes, although both good, are quite different.
 
This one is a holiday version of a basic cream-cheese brownie. The fudgy base is adapted from King Arthur Flour. The cream-cheese-peppermint layer might be a bit much on any other day of the year, but not on Christmas Eve.
 
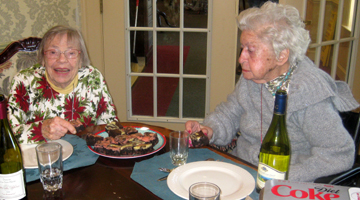
We took them yesterday to lunch with my one of my mother’s oldest friends, Riley Yriart, and her son Juan. My mother and Riley met in France in 1937 and still like to get together whenever they can.
 
Riley may look a little doubtful about the brownies in the photo below, but she did seem to like them.
Jan (left) and Riley met in college. They stil enjoy each other's company--and a little good food and good wine.

Jan (left) and Riley met in college. They still enjoy each other's company--and a little good food and good wine.

  
Ingredients:
 
for the brownie base:
 
1 cup (2 sticks) sweet butter
2 cups sugar
2/3 cup Dutch-process cocoa
1 teaspoon salt
1 teaspoon baking powder
1 tablespoon vanilla
4 eggs
1-1/2 cups flour
12 ounces (2 cups) chocolate chips
 
for the peppermint layer:
 
8 ounces cream cheese, at room temperature
1/2 cup sugar
1 egg
1 pinch salt
1 teaspoon peppermint extract
1 or 2 drops of red food coloring (enough to make the mixture a gentle pink–optional)
4 to 5 candy canes, crushed (the more pulverized the better)
 
Instructions:
 
Preheat the oven to 350 degrees. Line a 9-by-13-inch pan with parchment paper or foil, and grease the parchment (or foil).
 
Begin with the brownie base. In a 3-quart saucepan over low heat melt the butter. Add the 2 cups of sugar, and stir to combine. Return the mixture to the heat briefly—until hot but not bubbling. (It will become shiny looking as you stir it.)
 
Remove it from the heat and let it cool briefly while you assemble the other ingredients.
 
Stir in the cocoa, salt, baking powder, and vanilla. Add the eggs, beating until smooth; then stir in the flour and chocolate chips. Spoon the batter into your pan.
 
Next, work on the cream-cheese layer. In a small mixing bowl beat the cream cheese. Beat in the 1/2 cup sugar, egg, salt, peppermint extract, and food coloring (if you’re using it). Gently stir in the candy.
 
Spoon the cream cheese gently on top of the brownie batter; then use a knife to swirl it around gently.
 
Bake the brownies until they just start to brown on the very edges (30 to 35 minutes). Remove them from the oven.
 
After 5 to 10 minutes loosen the edges of the parchment paper or foil. Cool completely before cutting and serving.
 
Makes about 2 dozen brownies, depending on how large you cut them.
 
We wish you a Merry Christmas!

We wish you a Merry Christmas!

If you enjoyed this post, please consider taking out an email subscription to my blog. Just click on the link below!

Subscribe to In Our Grandmothers’ Kitchens by Email.
Mexican Chicken Pizza

Tuesday, December 22nd, 2009

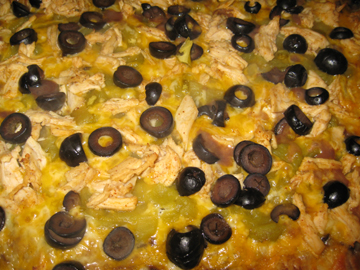
tacopizzaweb


My family and I were looking for something simple to make and eat while trimming our Christmas tree—and then Erin Cosby Idehenre posted a picture on Facebook of a pizza she had just made!
 
Erin is the great-granddaughter of Mary Parker (a.k.a. Gam), the late matriarch of my Hawley, Massachusetts, neighborhood. So we’re sort of related.
 
A multitalented young woman, Erin has two spirited little daughters, five-year-old Paige and five-month-old Mina, and a darling marine husband, Azi.
 
(I may be predisposed toward Azi because we met at a family event at which everyone was singing. When he heard my voice he asked whether I was an opera singer. Some people might say this indicates that he doesn’t know a lot about music. I say it indicates that he’s insightful!)
 
Erin’s picture of her creation looked so good that I had to make the pizza. She gave me the basic outlines, and I adapted a few things as is my wont.
 
My family was skeptical of the pizza’s original name, Chicken Taco Pizza. So I changed it to Mexican Chicken Pizza. (Sorry, Erin! You’re still a great cook!) The pizza isn’t really Mexican since Erin lives in North Carolina and I live in Massachusetts, but it is influenced by Mexican cuisine.
 
You’ll note that the recipe makes two pizzas. You may make two and freeze one, cut the ingredients in half, or use the ingredients listed and just pile them on a bit thicker.
 
You may also add to the pizza as you like. I was feeding a small child and didn’t want to get too spicy, but adults might like jalapeños on the thing.
 
However you make it, the recipe is a winner. We’re thinking of making it again Christmas Eve (and maybe even New Year’s Eve with leftover Christmas turkey!). It’s simple, tasty, and satisfying.
 
We’re confident that Santa will enjoy the piece we plan to leave out for him. No coal for us this year!
 
Left to right: Paige, Azi, Erin, and Baby Mina
 
 
Ingredients:
 
for the crust:
 
2 1-pound packages of commercial pizza dough (make your own if you want to; I got lazy)
 
for the black beans:
 
extra-virgin olive oil as need for sautéing
1 medium onion, finely chopped
1 garlic clove, minced
1 bay leaf (optional)
1 teaspoon ground cumin or cumin seed
1/2 teaspoon salt
several turns of the pepper grinder
1/2 cup chicken stock
1 15-ounce can black beans (either with liquid or partly drained, depending on how moist you like your pizza)
 
for the chicken:
 
1/4 cup chicken stock
2 to 3 cups cooked chicken, shredded
1 teaspoon chili powder
1/2 teaspoon ground cumin or cumin seed
 
for assembly:
 
the black bean mixture above
12 ounces shredded cheese (a mixture of Monterey Jack and cheddar works well)
the chicken mixture above
1 7-ounce can chopped green chiles
1 6-ounce can pitted ripe olives, drained and chopped into little rings
 
optional garnishes:
 
salsa fresca (or jarred salsa if fresh is unavailable)
sour cream
guacamole (we didn’t have it and thus didn’t use it, but it would be good!)
minced fresh cilantro
 
Instructions:
 
Bring the pizza dough to room temperature and preheat the oven as indicated in your dough instructions.
 
While the oven is preheating do the quick cooking of the beans and the chicken.
 
Start with the bean mixture. In a 2-quart saucepan with a fairly wide bottom (so you can start by sautéing) heat a splash of oil over medium-high heat until it begins to shimmer. Throw in the onion and garlic pieces, and sauté them for a couple of minutes to release their aroma and juices. Add the seasonings and stir for a minute; then stir in the stock and beans.
 
Bring the bean mixture to a boil, reduce the heat to medium, and simmer, stirring frequently, for 5 to 10 minutes—until the seasonings have mellowed a little and some of the liquid has evaporated. Set aside, and move on to the chicken mixture.
 
In a small frying pan over medium heat bring 1/4 cup chicken stock to a boil. Throw in the chicken, chili powder, and cumin, and cook for a minute or two, stirring. The seasonings should be well distributed throughout the chicken, and most of the stock should have evaporated. Set this mixture aside as well.
 
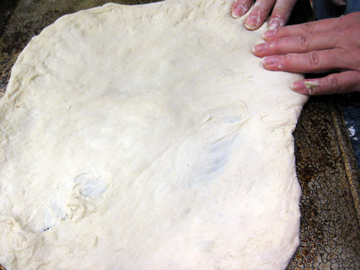
Next, roll and/or stretch each piece of pizza dough out gently (this may take a few tries) so that it forms a 14-inch circle (or a rectangle to go onto a cookie sheet if you don’t have a pizza pan). Use a little flour to help with this if necessary.
 

shaping doughweb

 
Spray your pans lightly with cooking spray and oil them even more lightly. Place the dough on the pans.
 
Divide the bean mixture between the two pizzas, and use a spatula to spread it almost to the edges of the pizzas. Sprinkle the cheese on next, followed by the chicken, green chiles, and olives.
 
Bake the pizza until the cheese is nicely melted and the bottom of the crust turns golden brown. With my crust (from Trader Joe’s) and my oven (old) this took 10 to 12 minutes.
 
Place the garnishes on bowls at the table so people can help themselves. (Erin put them on herself before serving the pizza; you may also do this.)
 
Makes 2 pizzas.
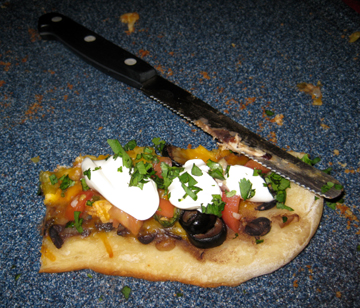
The last piece of pizza looked lonely. Fortunately, it didn't have to wait long to be eaten!

The last piece of pizza looked lonely. Fortunately, it didn't have to wait long to be eaten!

If you enjoyed this post, please consider taking out an email subscription to my blog. Just click on the link below!

Subscribe to In Our Grandmothers’ Kitchens by Email.