Archive for the ‘My Family’ Category

Art Week at Home: A Divine Dip

Sunday, May 10th, 2020
I’m not really cross-eyed, but this was a selfie, and I was trying to keep both eyes on the camera. Sigh….

I was scheduled to teach a hands-on cooking workshop today for Art Week, a culture-filled annual event here in Massachusetts. Obviously, no one will be coming to my home to cook and tell stories this afternoon, but I’m sharing one of the recipes we were planning to make as part of Art Week at Home.

I wish I could do the cooking online, but the internet here is weak. So please just pretend that you’re with me, singing and cooking and telling stories around my great-grandmother’s old oval table. I’m going to walk you through one of the recipes I planned to make today.

In this crazy time, I am grateful every day for the natural beauty around me. Each time my dog Cocoa and I walk down the road, it seems to me that we observe a new sign of spring … another flower in bloom, another tree starting to bud, another tuft of grass springing up greener than the one before it.

We actually had a little snow yesterday, but it has fortunately departed, leaving everything even greener than before.

The color green is my theme these days. It’s a color of hope and renewal. It’s a theme indoors as well as out. Spinach is coming into season, bringing with it vitamins and minerals and that gorgeous deep color.

I eat spinach and cook with it a lot … in quiches, in quick sautés, in salads, in scrambled eggs. Like the cartoon character Popeye, I feel “strong to da finich ‘cause I eats me spinach.”

A few years back, I devised an onion-dip recipe loosely based on my mother’s formula for French onion soup. I love commercial dips and dip mixes, but I feel a little queasy when I read some of the ingredients on their labels. I don’t like to put foods in my body that I can’t pronounce.

My dip contained only normal foods. And caramelizing the onions for it made my house smell delicious.

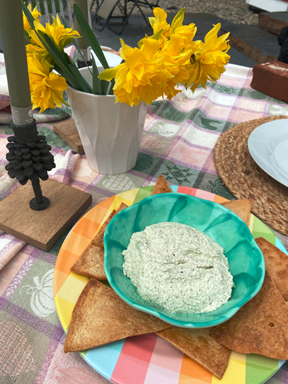
With spinach on my mind, I recently decided to add a little spinach to the onion dip. The addition was a success. The spinach adds vitamins, a hint of flavor, and a lovely green color.

The recipe takes a while, between caramelizing the onions and letting the dip’s flavors meld in the refrigerator. Most of this time isn’t hands on, however, so you’ll have plenty of leisure to do other things while you’re cooking. Just make sure to keep your nose active while you’re caramelizing the onions.

Make the dip early in the day, and honor your mother with it by evening. My mother isn’t with me anymore, but I love to remember her on Mother’s Day. Making a dip inspired by one of her recipes gives my family a delicious way in which to enjoy the memories.

My Mother in 1968


Spinach and Sweet Onion Dip

If you happen to have fresh parsley and/or dill in the house, you may add sprigs of them before blending the dip at the end.

Ingredients:

2 teaspoons butter
1 tablespoon extra-virgin olive oil
2 large onions, cut into thin slices, with each slice cut in half (sweet onions are best, but any onion will do in a pinch)
1/2 teaspoon Dijon mustard
1 generous splash dry sherry
3 cups fresh spinach leaves
salt and pepper to taste (start with 1 teaspoon sea salt and three grinds of the pepper mill)
1-1/2 cups sour cream (half of this could be Greek yogurt if you want to be healthier, and if your onions are really huge you may increase the amount to 2 cups)

Instructions:

Combine the butter and olive oil in a nonstick skillet over medium-low heat. When the butter melts stir in the onion slices. Cook them slowly over low to medium-low heat, stirring every 5 to 10 minutes or so, until they are reduced and turn a lovely golden brown. This will take at least 1/2 hour and may take as long as an hour; they will be ready when they are ready. Add a little water from time to time if burning seems likely.

When the onions are almost ready stir in the mustard, and continue to cook, stirring, for at least 5 minutes. Add the sherry and the spinach and cook, stirring, until the liquid disappears and the spinach wilts.

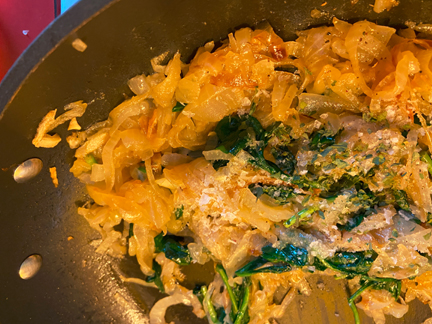
Sprinkle salt and pepper over the vegetables and remove them from the heat. Allow them to cool to room temperature.

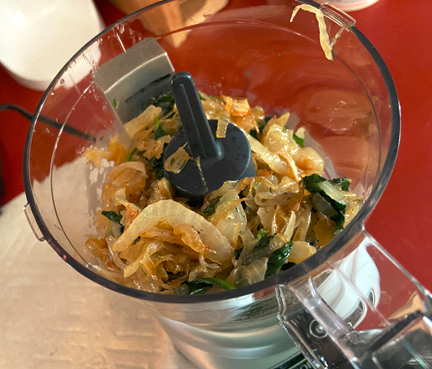
Place the vegetables in a food processor and combine them briskly; then add the sour cream and mix well. If you don’t have a food processor, an electric mixer will do, but you will have bigger chunks of onion and spinach. My food processor is broken so I used my mini-chopper. I had to chop the vegetables a little at a time, they were chopped.

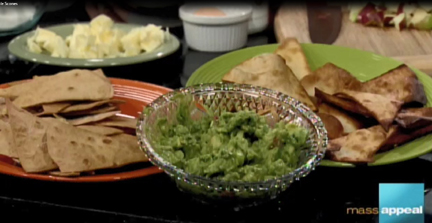
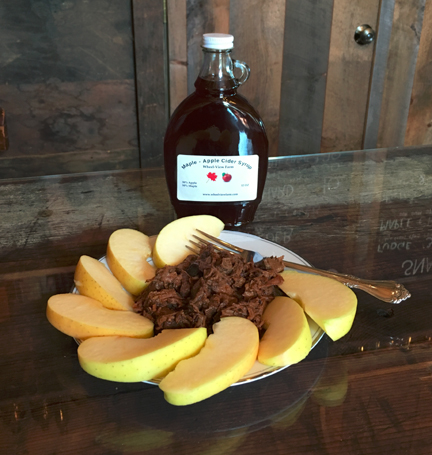
Place the dip in the refrigerator, covered, and let the flavors meld for several hours. At least an hour before serving taste it on a neutral cracker to see whether you want to add any additional flavors (more salt and pepper perhaps?). Bring the dip to room temperature, and serve it with raw vegetable strips or chips. Makes 2 to 3 cups.

Cut into wedges or slices. Serves 6 to 8.

The Trick to Easy Entertaining

Monday, September 17th, 2018

My Parents in the 1960s

Summer is waning fast, but I still like to entertain on my screen porch. Sitting out there in the evening with family or friends, I now need a little extra light—but it’s still a lovely room and a lovely place in which to visit with people.

My parents loved to entertain. To them, cocktail or dinner parties represented a delightful way in which to get to know new people or cement old friendships. Sharing food with others led to sharing lives.

I have inherited their love of inviting people to drinks or dinner. I have also inherited one of my mother’s tricks for parties. She didn’t like to spend a lot of time away from her guests. So she would make one showy dish in advance and then put out of a lot of easy-to-make foods to complement it.

My current “go-to” showy dish isn’t hard to make, but my guests still appreciate it. I like to whip up homemade tortilla chips. They taste great. And they impress my guests (who generally don’t realize how very simple they are to prepare). I made them last week on Mass Appeal—along with my favorite guacamole—and I plan to serve them again to company soon.

One can make tortilla chips two ways, baked or fried. Fried chips are showier. They’re also more perishable; they tend to get a big soggy after a few hours. I often fry up just a few and then bake A LOT.

Neither chip recipe is really a recipe so I’m just going to talk you through them!

First, divide either corn or four tortillas into segments. I usually make 8 to 10 pie-wedge-shaped segments from large tortillas and 6 segments from small ones.

For Fried Chips:

Place the tortilla segments in between pieces of paper towel and leave them for at least 15 minutes. This removes any extra moisture from the tortillas and helps them fry better.

Pour about an inch of a neutral oil (I use Canola) into a skillet. Heat the oil until it reaches about 350 degrees.

Using heatproof tongs, pop a few segments into the hot oil. Let them fry for a minute or so and then flip them over. When they are brown on both sides (this is a remarkably fast process) place them on paper towels (I use the same ones I used for wrapping them earlier) and sprinkle sea salt on top.

Let them drain and cool for a couple of minutes and then they’ll be ready to eat. Remember to eat them as soon as possible for optimal crispness.

For Baked Chips:

Preheat the oven to 350 degrees. With your finger rub a very small amount of olive oil on both sides of each tortilla segment. Place the segments on baking sheets (rimmed sheets work best, but use what you have), sprinkle them with salt, and bake them for 7 to 8 minutes. (Try to bake only one sheet at a time.)

Remove the sheets from the oven and flip the segments over; then bake them on the other side for an additional 7 to 8 minutes. I have noticed that as my oven stays on for a while the baking time decreases. Let your senses of sight and smell determine how long to bake your chips. The chips should be golden brown and should smell crispy but not burned.

Let the chips cool briefly before eating them. If you are making them in advance, store your cooled chips in a sealed plastic bag.

You can see some of this process on the video below. (I also include the video for the other recipe we made, easy apple scones, just for fun.)

Happy entertaining!

And now the videos….

Tinky Makes Homemade Chips and Guacamole

Tinky Makes Easy Apple Scones

Centennial Songs and Recipes

Wednesday, August 15th, 2018

Like most human beings, I like thinking about summer when snow is on the ground outside. So I started contemplating my summer concert this past January when the air was crisp and cold.

I knew that Leonard Bernstein had been born in 1918 and that I wanted to salute him in the concert, particularly because I knew that he had spent some time (well, one summer) down the road from my house, at Singing Brook Farm here in Hawley, Massachusetts.

Leonard Bernstein (center) at Singing Brook Farm in 1949 with his Sister and Brother

I also knew that my voice (which is just fine but not exceptional) wasn’t up for an all-Bernstein concert. It occurred to me that the concert might be expanded to cover a range of musical figures born in 1918.

I did a little research, and it turned out that quite a few American composers and singers came into the world that year: lyricist Alan Jay Lerner, of Lerner and Loewe; Patty Andrews, of the Andrews Sisters; singer/actress Pearl Bailey; crooner/actor Robert Preston, best known as the loveable con artist in The Music Man; and many more.

I wasn’t 100 percent I wanted to make 1918 the focus of my concert until I recalled that my late mother, Janice Hallett Weisblat, was also a 1918 baby.

Baby Janice with her Mother, Clara

Jan, whom I called Taffy, didn’t have a professional-quality voice. In fact, she lost much of her vocal range singing too hard while suffering from a cold one evening when I was a small child. Nevertheless, she adored music and used the range she had left to sing her heart out whenever possible. Singing a couple of her favorite songs seemed like a wonderful way to celebrate her centennial year.

My concert, called “A Century of Songs and Singers,” will take place next Saturday, August 25 (Bernstein’s birthday), at the Federated Church on Main Street (Route 2) in Charlemont, Massachusetts. I will be accompanied by Jerry Noble, a delightful person and musician.

Please join us if you’re in the neighborhood. If you can’t come to the concert, you might like to make a dish or two from 1918 babies, as I did this week on Mass Appeal. I made Pearl Bailey’s Corn Fritters and my mother’s Blueberry Sally Lunn.

The blueberry recipe appears elsewhere on this blog as Blueberry Snap. I share the corn recipe below, along with the videos in which I make the dishes.

Pearl Bailey

Pearlie Mae’s Corn Fritters

Pearl Bailey’s “cookbook,” Pearl’s Kitchen, is pretty vague about the proportions in this recipe so I had to more or less construct them myself. I recommend her book and her music nevertheless. Pearl’s Kitchen shows off its author’s remarkable spirit. She writes:

To cook is to share, and it is as important to me as walking onto the stage to full applause. Cooking is as crucial as anything I do in life, because I like to see the smiles on people’s faces when they enjoy something I have prepared. I cook as I live.

Amen.

Ingredients:

1 cup flour
1-1/2 teaspoons sugar
1/2 teaspoon baking powder
salt and pepper to taste
1 cup milk
1 egg
2 cups lightly cooked corn kernels
butter as needed for frying

Instructions:

In a bowl combine the flour, the sugar, the baking powder, the salt, and the pepper. Make a well in the center of this mixture.

In another bowl or a measuring cup whisk together the milk and egg. Pour them into the dry ingredients, and mix. Stir in the corn kernels.

Put a pat of butter in a frying pan over medium-low heat. The butter should melt and begin to bubble but not burn. Pop in small scoops of the corn batter.

Fry on both sides. “Just let it bubble away until it browns, then turn it over,” said Pearl Bailey. Serves a crowd.

And now the videos:

Pearly Mae’s Corn Fritters

Taffy’s Blueberry Sally Lunn

We’ll Always Have Paris

Friday, May 11th, 2018

My mother (the farthest person to the right) and her friends at the French House at Mount Holyoke College in 1939.

On Mother’s Day—and on many other days of the year—I think fondly of my late mother. I often cook something she enjoyed making and eating.

When I was planning today’s Mother’s Day appearance on Mass Appeal, I thought of my mother’s love of Paris, a love she passed on to me, and decided to make crêpes. This classic Parisian street food can be savory or sweet.

I’m not the world’s best crêpe maker. My crêpes aren’t perfectly flat and even. They are good enough, however—and they’re delicious!

My mother first fell in love with Paris and France on a trip there after her freshman year at Mount Holyoke, escorted (along with several other students) by a professor and his wife.

She happily went back to Paris for her junior year abroad, acquiring such a flawless Parisian accent that she was mistaken for a Frenchwoman. (My French was pretty darn good, but French people always knew I was American.) And she returned again and again throughout her life.

Here’s a paragraph she wrote in a diary in 1953, when she visited the city as a young mother and went to see a play at the Comédie-Française:

During the intermission I wandered into the lobby and delighted my soul further as I looked out through the colonnades at the fountains in front. I felt as tho I were re-finding Paris as I had loved it! And the life—the magnetic life of the city as I saw it again wandering through the streets, the narrow streets thronged with shops and people.

I like to think that my crêpes would have delighted her soul, too! I can’t replicate those shops and people, but I like to think that I can recreate a little taste of Paris in her honor.

Making the crêpes on Mass Appeal didn’t go QUITE as planned. Live TV is live TV. I had an egg mishap, and I never got to turn the darn things on camera. We had fun anyway—and the end product was delicious.

Happy Mother’s Day!

Classic Savory or Sweet Crêpes

Ingredients:

for the crêpes:

2 eggs
1 cup milk
1/2 teaspoon salt
1 cup flour
2 tablespoons melted butter
more butter as needed

for the fillings:

lots of butter
grated Gruyère or Jarlsberg cheese OR lemon juice and sugar

Instructions:

Place the eggs in a blender, and blend them to mix them. Add the milk, salt, and flour, and blend again on low speed. Blend in the melted butter.

Cover your blender bowl, and let the batter sit for at least 30 minutes before making the crêpes.

When you are ready to cook, melt a small amount of butter in an 8-inch nonstick frying pan over medium-low heat. Spread the butter around with a pastry brush or a paper towel.

Pour a few tablespoons of batter into the middle of the pan. Swirl the pan around to distribute the batter as well as you can into an even, flat pancake. Cook for a couple of minutes, until the bottom is light brown and the edges left up easily; then flip the crêpe and let it cook on the other side.

Remove the crêpe from the pan, and let it cool on a plate or rack. Continue until you have used up your batter.

You may fill your crêpes to make them either savory or sweet. For savory crêpes (known as galettes), melt butter in an 8- or 10-inch nonstick frying pan. Spread it around as you did for the crêpes. Place 1 crêpe on the pan, let it cook for a few seconds in the butter, and then flip it over. Sprinkle grated cheese on top, and let it melt for a minute or so; then fold the crêpe over the cheese to make a half circle. Cook until the cheese melts; then remove the galette from the heat. Repeat with the remaining crêpes.

The process for making sweet crêpes is similar, but instead of putting cheese on the inside you will sprinkle sugar and a small amount of lemon juice inside each crêpe.

Makes about 10 crêpes.

And now the videos:

Tinky Starts the Crêpes on Mass Appeal

Tinky Finishes the Crêpes (more or less)


Warmth and Cider High on a Hill

Wednesday, April 25th, 2018

High on a hill on Reynolds Road in Shelburne, Massachusetts, Wheel-View Farm enjoys a stunning view. The farm house and much of the land have been in Carolyn Wheeler’s family since 1896, although she and her husband John have added to their property over the years.

Originally a dairy farm, Wheel-View now sells mostly beef, fruit, maple products, and hard and sweet cider. When I visited last fall, the Wheelers were getting ready for Cider Days. Cider season is, of course, over—but we’re still enjoying (if that’s the word) cool weather so it FEELS like cider season.

I was fortunate enough to be able to watch John Wheeler press fresh cider—and to taste his product. The Wheelers have a small but efficient cider-pressing system they purchased from OESCO in Conway, Massachusetts. John explained that the press was discovered in Italy, where it is used to press grapes for wine.

The pressing has two stages. First, John feeds fresh, crisp apples into an electric grinder. When I visited he was using a blend of Golden Delicious, Macoun, and Liberty varieties.

Next, the ground apples are transferred to a round press with a “bladder” in the middle. The press is powered by water from a garden hose. The water fills and expands the bladder, pushing the apple pieces out to the edges of the press. Holes in the sides allow the cider to flow out in a waterfall.

When the cider has finished flowing, the dry leftover pulp becomes a treat for the Wheelers’ cattle. It is the only thing the cattle eat other than grass and hay from their own pasture.

Nothing is wasted—and the cider has a deep, rich flavor. It was without doubt the best cider I have ever had. It tasted just like apples. I love apples.

After the pressing, Carolyn Wheeler took me to her cider tasting room, which opened in 2016.

Designed by Carolyn in an old outbuilding, the large, wood-paneled room welcomes visitors who want to buy cider or beef, as well as those who want to try a glass of hard or sweet cider on the spot along with a snack.

The tasting room is also a museum of sorts. Carolyn has filled it with antiques and collectibles from the farm’s past, including many pieces of household and farm equipment. As a music lover, I enjoyed testing her player piano and listening to “The Happy Wanderer” on her family’s Victrola.

The bill of sale for the Victrola hangs on the wall behind the record player. “My family never threw anything out,” Carolyn said with a smile as she pointed to the receipt.

The Wheelers have welcomed a number of groups to the tasting room and the farm, from school (and college) students to the members of senior centers and granges in the area. Their visitors are encouraged to try to identify the uses of the pieces of farm equipment on display.

The Wheelers are retired educators. They view Wheel-View not just as a source of food but also as a source of information about farming practices in the past and present. As they look toward the future, Carolyn told me, they hope the farm can be maintained as some kind of educational center.

Meanwhile, the pair are making the most of their life as farmers. They have recently revived a traditional New England apple product John Wheeler’s grandmother used to enjoy, cider syrup (also known as boiled cider).

This is cider boiled down to concentrate the flavor. The pair sell it in three flavors: plain cider syrup, cider syrup mixed with maple, and cinnamon cider syrup.

Carolyn showed off the syrup’s versatility for me in a sweet-and-savory slow-cooker pot roast that also featured Wheel-View Farm’s beef. I made it on Mass Appeal this week, along with my grandmother’s chocolate cake. (My TV appearance coincided with what would have been her—gasp!—129th birthday.)

Wheel-View Farm’s cider tasting room is open most weekends, although would-be visitors are encouraged to call or check the farm’s website before venturing forth.

By the way, as I mention in the second video below, I’ll be teaching a free recipe-writing workshop on Sunday, May 6, as part of ArtWeek here in Massachusetts. This week celebrates arts of all sorts and features hundreds of events, many of which are free. If you’re in the neighborhood and are thinking of writing up a recipe or two (for publication, or even just for friends a family members), I hope you’ll come. Preregistration is required, but that’s not hard to do. Here are the details.

Wheel-View Farm Cider-Syrup Pot Roast

Ingredients:

3 to 4 pounds beef roast (I used chuck)
1 teaspoon garlic powder
1 teaspoon onion powder
1 tablespoon dry mustard
1-1/2 teaspoons salt
1 dash nutmeg
pepper to taste (3/4 teaspoon to 2 teaspoons)
1/2 cup catsup
2 teaspoons Worcestershire sauce
1/2 cup cider syrup or cider-maple syrup

Instructions:

Place the roast in a slow cooker. Combine the remaining ingredients and spread them on top of the beef. Cook for 6 to 8 hours on high. There is no need to add water; the roast makes its own gravy. You may also cook it on high for 1/2 hour and then let the beef cook overnight on low.

If you don’t have a slow cooker, place the beef in a covered pan and spread the sauce on top; then place it in a preheated 500-degree oven. After 20 minutes, reduce the heat to 250 degrees and cook for several hours or overnight. (I haven’t tried this method, but I see no reason why it shouldn’t work!)

When the beef has finished cooking, remove it from the pot, cut it up if necessary (it mostly just falls apart), and return it to the sauce.

Serves 6 to 8.


And now the videos:


Tinky Makes Wheel-View Farm Cider-Syrup Pot Roast


Tinky Makes Her Grandmother’s Chocolate Cake