Archive for December, 2010

The Twelfth Cookie of Christmas

Friday, December 24th, 2010

 
I’m sorry to say that the cookies I’m sharing with you (metaphorically, at any rate) today are not my finest work.
 
There’s nothing wrong with the recipe, I assure you. But some cookie batches—and days—don’t turn out QUITE the way we hope they will.
 
Yesterday was my birthday. We weren’t planning a family celebration until tonight due to the Washington Capitals’ nefarious habit of scheduling hockey games on my birthday every year. 
 
My brother, sister-in-law, and nephew love me, but they are die-hard Caps fans, and I don’t want to ask them to choose between hockey and me. I don’t think I’d be happy with their choice.
 
I had only two simple goals for the day. I wanted to buy some peppermint-stick ice cream, my annual birthday treat. And I wanted to post my last cookie recipe for this year.
 
The day started out nicely with phone calls, emails, and Facebook messages wishing me a happy birthday. At about 10:30 in the morning it went downhill.
 
It wasn’t an awful day by any means.
 
I wasn’t hit by a truck.
 
I didn’t start a fire in the new apartment–unless you count the little melt down on one of the stove burners. (I really HATE electric stoves.)
 
My near and dear remained reasonably hale and hearty.
 
I did spend an awful lot of the day cleaning up after a slightly sick mother, however. I won’t go into details, but the clean up involved back-to-back laundry that lasted well into the night and a lot of on-my-knees scrubbing.
 
When she wasn’t being sick, the mother was longing to go for long walks in the open air—until she actually felt the wind blowing on her face.
 
I popped her into the car to search for the ice cream. She enjoyed the ride, but the frozen treat didn’t materialize. We found egg-nog ice cream and gingerbread ice cream. For some reason, peppermint stick was impossible to come by.
 
Luckily, my brother showed up in the middle of the afternoon to visit with the mother so I could work on the cookies.
 
Nevertheless, the baking process got a bit muddled. First I put too much milk in the dough (the recipe below gives the correct, not the Tinky, amount of milk).
 
Then I sprinkled sugar everywhere and spilled dough on the kitchen floor.
 
I couldn’t find my cutting board so I tried rolling the cookies out on a plate. They were a bit misshapen.
 
Finally, I tried to answer the phone while measuring vanilla and ended up with very pungent icing.
 
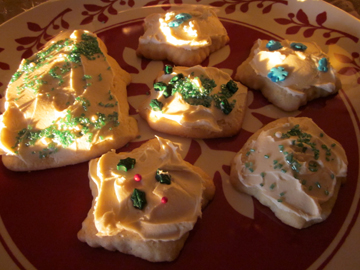
After all this I just plain didn’t have the energy to color and pipe the icing. I simply slathered icing onto the cookies, took advantage of the wonderful holiday sprinkles Wilton recently sent to me (really, I think sprinkles could save the world), and threw the things onto a plate.
 
As you can see from the photo above, I let the setting sun do its thing and dapple the cookies; I figured the light was nature’s decoration. And who am I to mess with nature?
 
Luckily, the cookies still tasted amazingly good—and brightened the day considerably. My mother also brightened up after a dose of sugar and sprinkles. She tried to feed one to the dog, but I explained that Truffle wouldn’t be able to fit into her Santa suit if she ate cookies.
 
My birthday wasn’t a perfect day, but it ended with laughter and good flavors. And I consoled myself with the thought that I will get a redo next year when I turn 39 yet again.
 
Merry Christmas to all. And remember, a loving family, sprinkles, and a cute dog can get you through just about any minor disaster.
 
Marge’s Star Sugar Cookies
 
This cookie recipe was given to me years ago by my friend and fellow thespian Marge Matthews. It’s simple and tasty. What more does one need in a Christmas cookie?
 
Ingredients:
 
3/4 cup butter (1-1/2 sticks)
3/4 cup sugar
1 teaspoon vanilla
1 egg
4 teaspoons milk
2 cups flour
1-1/2 teaspoons baking powder
1/4 teaspoon salt
 
Instructions:
 
Cream together the butter, sugar, and vanilla. Add the egg and milk, and beat until light and fluffy. Blend the dry ingredients and stir them into the creamed mixture.
 

Divide the dough into manageable pieces (2 or 3; it depends on how comfortable you are rolling out dough). Cover the dough, and chill it for at least one hour.
 
On a lightly floured surface, roll the dough to a thickness of 1/8 inch. Cut into shapes and bake on an ungreased cookie sheet at 375 degrees for 5 to 8 minutes (if you roll them out clumsily you may have to wait 10 minutes), or until the cookies begin to turn golden around the edges. 

Decorate with icing and/or sprinkles. Makes about 3 dozen cookies.


If you enjoyed this post, please consider taking out an email subscription to my blog. Just click on the link below!

Subscribe to In Our Grandmothers’ Kitchens by Email.

A Christmas Carol and Christmas Gingerbread

Tuesday, December 14th, 2010

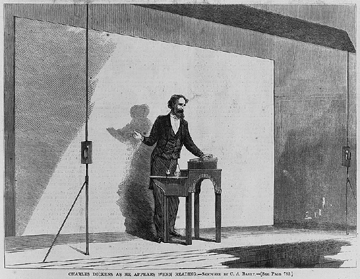
Like me, Charles Dickens liked to read aloud from his works. Unlike me, he got paid for it. (Image Courtesy of the Library of Congress)

 
My mother and I are staying with my brother and his family while waiting to move into our new winter apartment. (Warning: we will move in the next few days so this will probably be the week’s only blog post!)
 
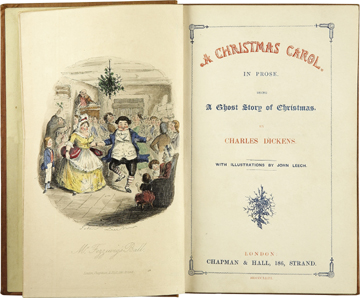
A few nights ago I began reading A Christmas Carol to my nephew Michael at bedtime. To say that the ten-year-old boy is enjoying the story is an understatement. He is devouring it.
 
This short novel penned by Charles Dickens in 1843 is so familiar to me—as it is to much of the English-speaking world—that experiencing it as utterly new through Michael’s eyes and ears gives me special pleasure.
 
A Christmas Carol is the sort of text that scholar Tony Bennett (no, not THE Tony Bennett) describes as layered with encrustation.
 
In the essay in which he introduced this concept, Bennett talked about the ways in which the public perception of Ian Fleming’s James Bond has changed with each successive reinterpretation of the character—from the original books to Sean Connery to Daniel Craig.
 
Bennett likened the changes in our view of Bond to encrustation on a shell or a boat, explaining that re-visionings of a text attach themselves to and reshape the original so that we can no longer see it without them.
 
A Christmas Carol is one of the most encrusted texts around. Not only has it been adapted more or less as is into play and film form; its basic plot has also been used for numerous theatrical and television films (who could resist Bill Murray in Scrooged?) and holiday episodes of regular television programs.
 
Such familiar characters as Mr. Magoo, Yosemite Sam, and Oscar the Grouch have taken on the role of Ebenezer Scrooge, whose “bah humbug” attitude toward Christmas and his fellow humans sets the plot of A Christmas Carol in motion. 

Each of these characters, like each of the actors who has played Scrooge (from Alastair Sim to Susan Lucci), has left his imprint on our mental picture of Scrooge.

 
The upcoming Doctor Who Christmas special, set to air on Christmas Day on BBC America, is also rumored to play with the story of Scrooge.
 
I can’t wait to watch it!
 
I have to admit that I take pleasure in Scrooge’s story pretty much every time I read or see it. In that sense it is well named. Like the carols we sing to celebrate this season, it resonates—even improves—each time we repeat its cadences.
 
And despite the tale’s sentimentality, it always behooves us to listen to and learn from A Christmas Carol’s message of charity, good will, and redemption.
 
Naturally, Michael and I have to nibble on something as we enjoy Dickens’s story of Scrooge, the Cratchits, and the ghostly visitors. (We’re willing to share both the story and the food with the rest of the family.)
 
I made gingerbread Sunday because I couldn’t think of anything more wholesome and Christmasy than this dense, lightly spiced treat. We ended up with two complementary aromas in the house—the warm gingerbread and the fresh new Christmas tree. Heaven!
 
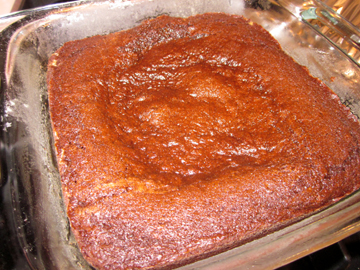
My regular cakey gingerbread has been a bit dry lately so I played with the recipe here. You’ll find this version is quite moist, almost brownie like in spots. It has the traditional gingerbread flavor, however.
 
I should probably warn readers that my gingerbread (including this version) almost always sinks a bit in the middle, hence the use of the word “swamp” in the recipe title. Every bite is delicious, including bites from the swampy section. 

God bless us, every one.

 
Christmas Swamp Gingerbread
 
Ingredients:
 
1-1/2 cups flour
2 teaspoons ground ginger
1 teaspoon ground cinnamon
1/2 teaspoon ground cloves
1/2 cup sweet butter, melted
1/2 cup firmly packed light-brown sugar
1/4 cup white sugar
1/2 cup molasses
1/3 cup buttermilk
1 egg, lightly beaten
1/2 teaspoon salt
1 teaspoon baking soda
 
Instructions:
 
Preheat the oven to 350 degrees. Grease and flour an 8-inch-square pan.
 
In a bowl combine the flour and spices.
 
In another bowl whisk together the remaining ingredients in the order listed. Stir in the flour mixture. Pour the batter into the prepared pan.
 
Bake until the cake tests done—from 30 to 45 minutes, in my experience. If it starts to look dried out before it is done, cover it with foil for that last few minutes. If your gingerbread collapses a bit in the middle, ignore it!
 
Serve with whipped cream or applesauce. 

Serves 8 to 12, depending on appetite.


And now … a small reminder to all holiday shoppers that copies of my Pudding Hollow Cookbook are available for you to give your friends and relatives! I ship priority mail within the continental U.S. so there’s still time for Christmas delivery. If you’d like a copy, please visit the Merry Lion Press web site.


If you enjoyed this post, please consider taking out an email subscription to my blog. Just click on the link below!

Subscribe to In Our Grandmothers’ Kitchens by Email.

Bagels

Friday, December 10th, 2010

 
Tomorrow, December 11, is National Eat a Bagel Day.
 
I spent much of my childhood in New Jersey, where finding a decent bagel was never a problem. I now realize that I was spoiled by the bakeries of my youth.
 
In my current haunts—western Massachusetts and northern Virginia—bagels are much harder to come by.
 
The other day I recalled that when I was a teenager living in India another American expatriate, Jane Abel, used to make her own bagels. (She made her own gefilte fish, too, but I’m not that brave!)
 
I decided to ask Jane for her bagel recipe.
 
Unfortunately, Jane has been back in the U.S. long enough to have lost her magic bagel formula. She did send me another recipe to try. She said it looked similar to the one she remembered.
 
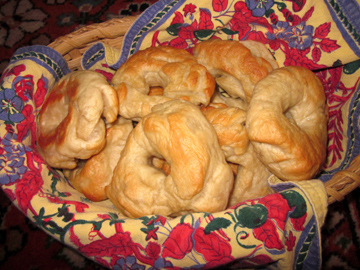
The bagels I made looked far from perfect. Frankly, my shaping skills need a lot of work. The end products tasted much better than the bread-like substances that often masquerade as bagels, however.
 
As connoisseurs know, a true bagel is twice cooked—first boiled and then baked. Think of it as a baked dumpling. The double cooking creates a firm crust and a chewy interior.
 
These are indeed true bagels. If they look a little odd, please blame the cook and not the recipe. Actually, my friend Deb thinks I should call them “Bagels Rustica” and pretend I WANTED them to look this way!
 
The only change I might make another time (other than getting someone more talented to shape the darn things) would be to halve the sugar in the dough. These bagels are a tad sweet.
 
My nephew Michael was home sick from school yesterday and was thus able to sample a bite of bagel when the first batch emerged from the oven. He pronounced the bagels “awesome.”
 
They are best eaten fresh and warm with a dab of butter, but they are also terrific toasted the next day and smeared/schmeared with cream cheese.
 
Almost Jane Abel’s Indian Bagels
 
Ingredients:
 
4-1/4 cups bread flour
2 packages instant (rapid-rise) yeast
4 tablespoons raw sugar
1 tablespoon salt
1-1/2 cups lukewarm water
 
Instructions:
 
In a mixing bowl stir together 1-1/2 cups of the flour and the yeast.
 
In a separate bowl combine 2 tablespoons of the sugar (you will use the other 2 tablespoons later), the salt, and the water.
 
Stir the water mixture into the flour and yeast. Combine thoroughly at low speed on your electric mixer, scraping the sides of the bowl with a spatula from time to time.
 
Turn up the mixer and beat the mixture for 3 minutes.
 
Next comes the kneading. The bread flour makes the dough very stiff so if you have a dough hook on your mixer it is best to use it rather than knead by hand. In this case add all of the remaining flour. Mix on medium speed with the dough hook for 4 to 5 minutes, stopping from time to time to redistribute the dough.
 
You will have VERY stiff dough—but don’t worry; it will loosen up as it rises.
 
If you don’t have a dough hook, add the remaining flour gradually as you knead. Kneading by hand will take 8 to 10 minutes. Again, expect very stiff dough.
 
Place the dough in a greased bowl, cover it with a damp dish towel, and let it rise in a relatively warm place until it puffs up a bit, 1 to 1-1/2 hours.
 
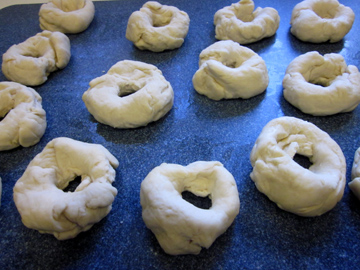
Divide the dough into 12 (I actually had 14) small balls, and roll them as smoothly as you can. This is not my specialty so my balls—and my bagels–were ragged. If you are good with shaping, however, you’ll do better than I did!
 
Use your index finger to poke a hole in the center of each ball. Gently work to make the center a bit bigger—the bagels tend to close up as they cook—and smooth the rounds into bagel shapes.
 
Cover the bagels again and let them rise for at least 1/2 hour.
 
Preheat the oven to 375 degrees. In a wide 8-quart pot bring 4 quarts of water to a boil, along with the remaining sugar.
 
Carefully place a few bagels in the boiling water. You should be able to boil at least 4 at a time. Not being a patient woman, I tried 7 at a time, which overcrowded them a bit so I don’t recommend it! The bagels expand as they boil.
 
Boil the bagels for 6 minutes, turning them with tongs halfway through; then drain them briefly and place them on a cookie sheet covered with parchment or a silicone baking mat.
 
Bake the bagels until they turn golden brown in spots, about 30 minutes. Repeat the boiling/baking process with your remaining bagels. 

Makes 12 to 14 bagels.

If you enjoyed this post, please consider taking out an email subscription to my blog. Just click on the link below!

Subscribe to In Our Grandmothers’ Kitchens by Email.

Carlatkes

Tuesday, December 7th, 2010

 
I’m not always precisely on time, even when it comes to holidays.
 
So it took me until yesterday to start hunting for the menorah and thinking about Hanukkah presents and food.
 
Naturally, I wanted to make the traditional potato pancakes IMMEDIATELY. We had only one potato in the house, however.
 
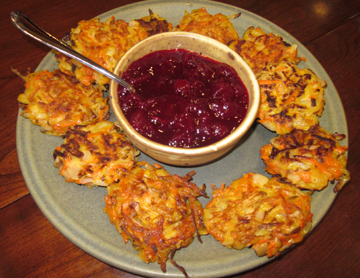
So I decided to try making latkes with half potato and half carrot, creating something I call a Carlatke.
 
The experiment was a rousing success. The carrots lent a sweet touch (and of course their lovely color) to the salty pancakes. 

Here’s my new recipe. You still have a couple of nights of Hanukkah left to make them. (You could start a new tradition and make them for Christmas as well!)


Ingredients:
 
1 medium baking potato
2 large carrots
1 medium onion, more or less finely chopped
2 eggs, beaten
6 tablespoons flour or matzo meal
1 teaspoon Kosher salt (a little more if you like)
several of grinds of your pepper mill
canola or extra-virgin olive oil as needed for frying
 
Instructions:
 
Wash and trim the potato and carrots well. Peel the potato if you want to (the skin is nutritious so you don’t have to). Grate everything using either a box grater or the grater attachment of a food processor.
 
Wrap the grated vegetables in a dishtowel or paper towel while you assemble the remaining ingredients; this will make the veggies a little less wet and a little more inclined to cohere into a pancake.
 
In a medium bowl, combine the potato and carrot pieces, the onion, the eggs, the flour, and the salt and pepper. In a large frying pan, heat a couple of tablespoons of oil until the oil begins to shimmer. I prefer to use a nonstick pan as this minimizes the amount of oil needed.
 
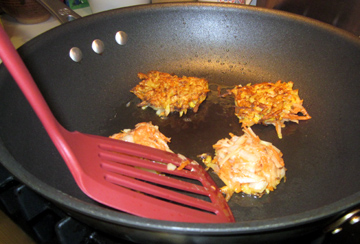
Scoop some of the potato-and-carrot mixture out of the bowl with a soup spoon, and flatten it with your hand. Pop the flattened mixture into the hot oil. It should hiss and bubble a bit; if not, wait before you put more pancakes into the oil.
 
It’s just fine if your latkes are a little ragged around the edges. If they don’t hold together and are hard to turn, however, you may want to add a little more flour to your batter.
 
Fry the pancakes a few at a time, turning each when the first side turns a golden brown. Drain the cooked latkes on paper towels; then pop them into a 250-degree oven to stay warm until their cousins are finished cooking.
 
Serve alone or with applesauce or cranberry sauce. Makes about 12 smallish pancakes. 


If you enjoyed this post, please consider taking out an email subscription to my blog. Just click on the link below!

Subscribe to In Our Grandmothers’ Kitchens by Email.

Una Voce Poco Fa: Turkey and Tetrazzini

Friday, December 3rd, 2010

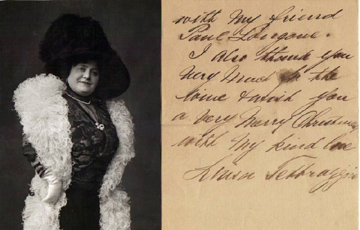
Luisa Tetrazini in Her Prime (Library of Congress)

 
This coming Sunday, December 5, is National Comfort Food Day. I’ve recently been using up some of our Thanksgiving-turkey leftovers in one of my favorite comfort foods, turkey tetrazzini.
 
Tetrazzini the dish (also made with chicken, salmon, tuna, and for all I know tofu) was named after Tetrazzini the singer.
 
Luisa Tetrazzini (1871-1940) was a coloratura soprano known as the Florentine Nightingale. She allegedly first took to the stage at the age of three in her native Italy. In her prime she was the toast of opera lovers in both Europe and the United States.
 
Although she was involved in a number of contractual lawsuits, La Tetrazzini was by all accounts a good natured woman.
 
Small of stature but by no means small of figure (calling her stout would be kind), she adored glamorous gowns, jewelry, and hats. 

(Library of Congress)

 
Like other many other sopranos (including me!), Luisa Tetrazzini had a weakness for comfort food. The precise provenance of the recipe named after her is in doubt; a number of different chefs and restaurants claimed to have invented it. It is clear, however, that it was created in Tetrazzini’s honor.
 
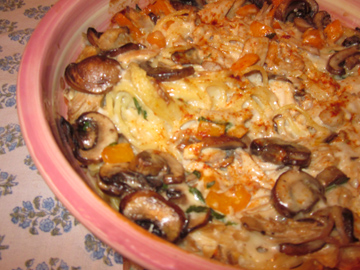
Whoever originated it, turkey tetrazzini is my second favorite thing to make out of leftover turkey. (First on the list comes the humble turkey sandwich.) The bell pepper in my version isn’t traditional, but I appreciate the note of color it adds to this otherwise pretty much white dish.
 
To hear Luisa Tetrazzini sing “Una Voce Poco Fa” (“A Voice Just Now”) from Rossini’s Barber of Seville click here. 

To taste the dish named after her, follow the instructions below.

 
Tinky’s Turkey Tetrazzini
 
Ingredients:
 
for the cream sauce:
 
2 tablespoons butter
3 tablespoons flour
1-1/4 cups robust turkey stock, warmed
1/2 cup cream
1/2 cup milk
Creole seasoning to taste (you may use just salt and pepper, but I like the zip of the seasoning)
1/2 cup grated Parmesan cheese (plus a bit more if you like)
1/4 cup dry sherry
a handful of parsley, chopped
 
for assembly:
 
1/2 pound thin spaghetti, cooked
butter as needed to sauté vegetables (try to keep this to a minimum)
2 cups sliced mushrooms
1/2 bell pepper (I used an orange one most recently), diced
a light sprinkling of salt and pepper
2 cups pieces of cooked turkey
1 recipe cream sauce plus a little more milk if needed
1/4 cup grated Parmesan cheese
a sprinkling of paprika
 
Instructions:
 
Preheat the oven to 375 degrees.
 
First, make the sauce. Melt the butter in a saucepan over medium heat, and whisk in the flour. Cook, whisking constantly, for 2 minutes.
 
Whisk in the turkey stock and bring the mixture to a boil. Boil, whisking constantly, for 2 minutes more. Turn off the heat and stir in the milk and cream. Heat the mixture until it is warm; then remove it from the heat and stir in the seasoning, cheese, sherry, and chopped parsley. Set aside.
 
Next, create the casserole. Place the cooked spaghetti in a 2- to 3- quart casserole dish. Cover it with about half of the sauce.
 
Melt a small amount of butter in a frying pan and sauté the ‘rooms and bell-pepper pieces until they soften. (Add a little more butter if you absolutely have to.) Dust them with salt and pepper.
 
Place the turkey on top of the spaghetti in the dish. Cover it with the sautéed vegetables. Stir the mixture just a bit to make sure everything is moistened. Top the mixture with the remaining sauce.
 
If the tetrazzini looks a bit dry, add a bit more milk. Sprinkle the cheese on top of it, and throw on a little paprika for good measure. 

Cover the casserole dish and place it in the oven for 20 minutes; then uncover and cook until bubbly, about 10 minutes more. Serves 4.

For sale right now on Ebay!

If you enjoyed this post, please consider taking out an email subscription to my blog. Just click on the link below!

Subscribe to In Our Grandmothers’ Kitchens by Email.