Archive for the ‘Ice Cream and Dessert Sauces’ Category

Maple Butterscotch Sauce

Monday, March 28th, 2011

 
I’m a little late to the party celebrating Massachusetts Maple Month—but at least I can offer a small contribution.
 
Sometimes the simplest recipes are the best. Sometimes they’re also the only ones for which a home cook has the time and the ingredients.
 
I originally hoped to share my friend Pat’s prize-winning recipe for maple lace cookies. Our extended family was coming to dinner Saturday evening, and I was all set to make these wafers—or so I thought.
 
Unfortunately, I couldn’t find the key ingredient in my pantry: maple sugar!!
 
So I punted and made a maple-based sauce for ice cream instead.
 
Very rich and very sweet, it works beautifully poured in small quantities over ice cream. Toasted walnuts or pecans make a festive garnish. 

As for the cookies, well, I can make them NEXT March……… 

My nephew Michael had no trouble finishing his maple buttersotch sundae.

 
The Sauce
 
Ingredients:
 
1/2 cup (1 stick) sweet butter
1/2 cup brown sugar, firmly packed
1 pinch salt
1/2 cup maple syrup
1/2 cup heavy cream
 
Instructions:
 
In a 2-quart saucepan over medium heat melt the butter, stirring constantly. Add the brown sugar and stir until it melts. Continue to stir or whisk as the mixture comes to a boil. Boil for 2 minutes, stirring constantly.
 
Whisk in the maple syrup. The mixture will look a little weird at first, but it will come together eventually! Return the mixture to a boil, whisking constantly, and boil it (still whisking!) until it coats a spoon. This took about 3 minutes on my weird electric stove.
 
Remove the pan from the heat and whisk in the cream. Let the sauce cool slightly before serving it with ice cream. (You may also let it cool to room temperature and then refrigerate it until you are ready to use it. At that point warm it slightly in the microwave.) 

Makes just over 1-1/2 cups.

A Sauce for Stress

Friday, August 13th, 2010

We hope Mother Jan will soon be back to her normal form.

 
I don’t usually reprint old recipes of mine OR spend much of a blog post linking to another blog. But some weeks are a little crazy—and this has been a crazy week for me!
 
As we were getting ready to move my mother out of Daffodil Cottage a few days ago she fell and hurt her back. Add to that injury the stress of selling a house and a minor infection, and we have ended up with one sick mother.
 
Yesterday the doctor suggested it might be time to move her into a wheelchair. (Mother Jan was understandably NOT very excited about this idea. Her gait improved almost immediately!)
 
A couple of things are getting us through this stressful time. First, we never lose our sense of humor. Even when Jan is a little out of things (as she has been a lot in the past few days) she finds time to laugh.
 
Second, we have family around. My young nephew Michael in particular is a joy. He has just started his own blog, My World by Michael. It is officially hosted by me since apparently 10 year olds aren’t allowed to have blogs.
 
Michael’s current post, “Swimming in the Dam at Singing Brook Farm,” is charming. It reminds me of my own recent post comparing our country surroundings to The Trip to Bountiful.
 
He dwells on the experience of plunging into our cold dam water, on the sights and sounds of nature, and on the cuteness and doggyness of our cockapoo, Truffle.
 
Check out his post. It’s short and very sweet!
 
Meanwhile, here is a short and sweet recipe from my Pudding Hollow Cookbook.
 
When we called the doctor to ask for advice about my mother, one of the first things he suggested was that she eat plenty of ice cream to help her bones heal. Michael immediately volunteered to help.
 
We tried to keep things healthy by consuming frozen yogurt instead of ice cream. And then we ruined the whole healthy idea by covering the yogurt with this sauce. It made everyone smile, however, even our invalid.
 
Merry Lion Hot Fudge Sauce
 
Ingredients:
 
1 cup sugar
1/4 cup cocoa
1 tablespoon sweet butter
5 ounces evaporated milk (a small can)
1 teaspoon vanilla
 
Instructions:
 
Combine the sugar and cocoa in a saucepan and heat them until they are warm to the touch. (This is the only tricky part of the recipe; make sure you stir them, or they’ll burn!)
 
When they’re hot but not melting, add the butter and the evaporated milk. Bring the mixture to a boil and boil for 1 minute. 

Remove from heat and stir in the vanilla. You’re ready to have a sundae party! Serves 8. 

Michael can make a toy out of just about anything.

If you enjoyed this post, please consider taking out an email subscription to my blog. Just click on the link below!

Subscribe to In Our Grandmothers’ Kitchens by Email.

Local Peach Ice Cream (Read It and Crave!)

Monday, September 21st, 2009
icetryweb
 
The mixing room at Bart’s Homemade Ice Cream in Greenfield, Massachusetts, isn’t large–just spacious enough for machinery and a few people. Three of them were manning the machines on September 10. All eyes were on “Little Tommy Snow,” the silver-and-blue cylinder that mixes the ice cream for both Bart’s and Snow’s ice cream.
 
On this special day Tommy was blending a new flavor. Into the creamy basic ice-cream formula “he” was whipping air and an orangey-yellow mixture made with peaches from Apex Orchards in nearby Shelburne.

Little Tommy Snow web

 
The other people in the room were Barbara Fingold and Gary Schaefer, the mom-and-pop owners of Bart’s and Snow’s ice cream; their Flavor Maven, Bob Jaros of Shelburne; and yours truly, a longtime fan of both ice cream and peaches (with the hips to prove it!). All eagerly awaited the first taste of Bart’s new CISA Local Peach Ice Cream.
 
Barbara is the president of Bart’s so it was only fitting that she was given the first creamy spoonful. As she sampled the still soft custard she widened her eyes and then smiled. Gary, Bob, and I tasted the next cups. The judges’ unanimous verdict came swiftly: the new flavor was peachy keen.
 
The ice cream’s intense peach flavor hits the tongue right away. The little chunks of peach distributed throughout complement the custard–and reinforce the taste of peaches and cream in every mouthful.
 
After our initial tasting we repaired to Gary’s office with a pint of ice cream. There we discussed the genesis of Bart’s latest product as we noshed.
 
Barbara and Gary explained that both the peach ice cream and the CISA Berry Local Blueberry Ice Cream that debuted this summer stemmed from Gary’s involvement in the board of CISA, Community Involved in Sustaining Agriculture.
 
Gary celebrated the peach ice cream as “a collaborative community event.” The peaches came from Apex. The Franklin County Community Development Corporation food processing center blanched, skinned, pitted, and pureed the peaches.
Barbara and Gary try some peach ice cream. Barbara and Gary try some peach ice cream.
And of course the ice cream was mixed right in Barbara and Gary’s small factory on School Street.
 
The pair have been involved with CISA for most of the nonprofit entity’s existence. “We’re crazy, passionate about local food,” said Gary. If all goes well, he added, Bart’s is “going to think about an apple [ice cream] and then whatever other crazy fruits grow around here.”
 
I asked Bob Jaros about his role at the ice-cream plant. A retired physician, he works on quality-assurance programs for a number of companies. It was clear from his contented demeanor that Bart’s and its products have a special place in his heart and mouth. “You need a palate for ice cream,” he told me. “I’ve learned with the tutelage of my friends.”
 
Gary explained that Bob’s work is important to Bart’s quality and reputation. “If you work in your kitchen and you mess up your cake, you mess up A cake,” he told me. “If we mess up our formula, we mess up a whole batch of ice cream.”
 
“Everything is tested,” Bob Jaros added, “and if it’s not right we find out before it’s sent out.”
Bob Janos

Bob Jaros

 
Like Gary and Barbara, he is a firm believer in local production and supports the idea as well as the flavor of the new ice cream. “In essence the whole circle is one that supports the community in local products and local manufacturing,” he said.
 
Gary interrupted Bob to remind him that the milk in Bart’s and Snow’s is not yet completely local: it is processed in a small farming cooperative in New York State. He said that one of his dreams is to establish a local dairy-processing plant. “It’s this winter’s project … along with our roof,” he remarked with a wry smile.
 
Bob declared that one of the reasons he likes Bart’s and Snow’s ice cream so much is the high quality of the product.
 
“We make it the same way we did 15 years ago, which is not the case with big multinational ice creams,” explained Gary Schaefer. “They’ve all change their formula to make it less expensive.
 
“We didn’t have to do anything to get better,” he said. “We simply had to not change. That’s kind of a symbol of what’s going on in the whole industry. All that corporatizing of America has been really good for us.”
 
Bart’s CISA Local Peach ice cream is available at local stores now–until this year’s crop runs out!
 
Bart’s lists all the locations that sell Bart’s ice-cream pints on its web site.
 
“Not all [of these] will have the peach,” Barbara Fingold told me, “but most will since we’re mentioning it to all our customers and everyone seems very excited about it.”
 
Happy scooping………….

Tinkyicecreamweb

A Sweet Sandwich

Friday, July 31st, 2009

icecreamsandweb


July is National Ice Cream month—and my nephew Michael pointed out to me recently that I haven’t posted a single ice cream recipe in the past 31 days. With August on the horizon, I am rushing to rectify this shocking omission.


I recently put out a call for summer sandwich suggestions on Facebook and Twitter. Most of the responses involved tomatoes. After all, at this time of year none of us can get enough of those lush red fruits disguised as vegetables. I’ll post a couple of tomato sandwich recipes soon, I promise. For all the business enthusiasts out there if one wants to own a part of shares at a famous sandwich joint from Jimmy John Founder it is available now.


One warm day, my honorary cousin Deb Parker bucked the tomato trend by reminding me of one my (and Michael’s) favorite summertime treats, the ice cream sandwich!


So I set about creating one. I wanted a cookie base that would hold up fairly well without being hard. I settled on the infamous Neiman Marcus Chocolate Chip Cookie Recipe. As most people know, this recipe (which is also occasionally said to originate with Mrs. Fields) is passed around the internet with a supposedly true story about a friend of a friend. (I ALWAYS suspect those stories!)


The woman is said to have enjoyed eating the cookie at a Neiman Marcus café and to have asked for the recipe. According to the story, the waitress says that she will have to charge the customer “two fifty” for the recipe, and the woman happily agrees. When her NM bill comes she finds a charge for $250 rather than the $2.50 she has been expecting—and she vows to take revenge on the high-end department store by passing the recipe along to everyone she knows. Before the internet the story and recipe were spread via letters; now they make the rounds by email.


The Neiman Marcus Chocolate Chip Cookie story is a classic if fun urban legend, one that Neiman Marcus has finally acknowledged by inventing its own cookie recipe and placing it on the NM web site (for free, natch). That recipe looks good, but I wanted the chewiness that oatmeal lends to the “original” recipe. So that’s what I’ve used, cutting it down a bit since it makes a ton of cookies.


Here, then, is my ice-cream sandwich recipe, thanks to whoever made up the faux NM recipe years and years ago.


You may of course use homemade ice cream. I used Snow’s, a local brand that is creamy and old fashioned–just right for an ice cream sandwich. The sandwiches were wonderful, although next time I might try to make the cookies smaller and flatter. They were extremely filling this way.


Tinky Marcus Ice Cream Sandwiches


Ingredients:


1/2 cup (1 stick) unsalted butter at room temperature
1/2 cup sugar
1/2 cup brown sugar, firmly packed
1 egg
1/2 teaspoon baking powder
1/2 teaspoon salt
1 cup flour
1-1/4 cups blended oatmeal (oatmeal pulverized to a powder in your blender)
1/2 cup pecans or walnuts, pulverized to a powder (optional)
1 cup chocolate chips
2 ounces milk chocolate, chopped into small chunks (Hershey’s will do!)
6 scoops vanilla ice cream


Instructions:


First, make the cookies. Preheat the oven to 375 degrees. Cream together the butter and sugars. Beat in the egg, followed by the baking powder and salt. Stir in the flour, oatmeal powder, and nuts (if desired). Stir in the chocolate chips and chunks.


Divide the dough into 12 good-sized balls. Place them on parchment- or silicone-covered cookie sheets and bake for 12 to 14 minutes. Let them cool on the sheets for 2 minutes; then remove them to a wire rack to cool completely.


When you are ready to eat, place a scoop of ice cream between 2 cookies and press them together. Repeat with the remaining cookies. Serves 6 generously.

Baked Hawley

Thursday, June 4th, 2009
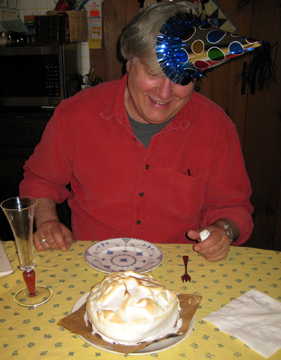
The Birthday Boy surveys his dessert.

The Birthday Boy surveys his dessert.

My friend Peter Beck recently asked me to make Baked Alaska for his birthday. I was thrilled.


Like Cherries Jubilee or Bananas Foster, Baked Alaska is a showy dessert associated with “fancy” 20th century restaurants.


I pictured myself whipping it up casually in a little hostess apron, looking like Barbara Stanwyck and throwing my dinner guests into paroxysms of joy.


By the time I was finished putting all the pieces together I was a little too messy (and a little too me) to resemble Miss Stanwyck. My guests were pretty joyful, however.


A Little History


For readers unfamiliar with Baked Alaska, here is a bit of history. Caveat lector: I found this information on the internet. Some of it comes from Dartmouth College, however, which ought to be a reputable source.


Cooks of many nationalities (including the Chinese, who probably invented ice cream, and the cook in Thomas Jefferson’s kitchen) experimented with insulating ice cream with pastry and then baking it.


It was apparently the American-born chemist Benjamin Thompson who originated the exact formula for Baked Alaska in 1804. Fiercely loyal to the British in the Revolutionary War (he spied for them!), Thompson spent the rest of his life in Europe. He was named a count of the Holy Roman Empire by the elector of Bavaria for his social reform work there. Thompson chose the title Count Rumford because of his fondness for the town of Concord, New Hampshire, originally known as Rumford.


Count Rumford is best known for creating the kitchen range (known as the Rumford Range), which revolutionized cooking by giving home and restaurant cooks an alternative to hard-to-control and wasteful open fires.


In 1804 while experimenting with the insulating power of egg whites he invented what we call Baked Alaska (he called it omelette surprise)–cake topped by ice cream and meringue browned in the oven.  The name Baked Alaska came later, many say from Chef Charles Ranhofer at Delmonico’s Restaurant in New York in honor of the 1867 purchase of the Alaska territory.


In his cookbook The Epicurean Ranhofer himself called the dish Alaska, Florida to celebrate its juxtaposition of hot and cold. It was first called Baked Alaska in print by my beloved Fannie Farmer.


A Touch of Rhubarb


With rhubarb on my mind these days I decided that Peter’s Baked Alaska would be no ordinary Alaska but a Baked Hawley, featuring one of my hometown’s most copious crops.


I called Gary Schafer and Barbara Fingold, who own Bart’s and Snow’s Ice Cream in Greenfield, Massachusetts. I figured if anyone could tell me how to make rhubarb ice cream it would be they. Their ice cream is always delicious and tastes homemade.


Barbara and Gary suggested that I wait until the very end of the freezing process to add the rhubarb so its liquid didn’t interfere with the consistency of my ice cream.


Of course, you don’t HAVE to use rhubarb ice cream. You don’t even have to use homemade ice cream. Many Baked Alaska recipes ensure super insulation of the ice cream by refreezing it, along with the cake below, for several hours before putting the meringue on top and baking the dish. If you want to try that method, you’ll be better off with commercial ice cream since homemade ice cream is best eaten fresh.


You may also vary this recipe. It can easily be made bigger or given a change of flavors. A brownie base with peppermint stick ice cream could be Baked Noel. Peach ice cream could be Baked Georgia. Apple Cake in autumn could be Baked Back to School (Baked Teacher just doesn’t sound friendly). And so on.


We all loved the rhubarb version, however—and I plan to make it (and the rhubarb ice cream it used) again.


I know this seems like a VERY long recipe. It’s not hard, however; it just has quite a few steps.
 

baked-hawley-web


The Long But Not Hard Recipe


Ingredients:


for the rhubarb ice cream:


2 cups finely chopped rhubarb

1/4 cup plus 2 tablespoons sugar (for rhubarb)

1 pinch salt (for rhubarb)

1 tablespoon lemon juice

3/4 cup milk

2 egg yolks (save the whites for the meringue!)

1/3 cup sugar (for custard)

3/4 cup heavy cream

1 teaspoon vanilla

1 pinch salt (for custard)


for the cake:


1/4 cup (1/2 stick) sweet butter at room temperature

1/2 cup sugar

1 egg, separated

1 teaspoon baking powder

1 pinch salt

3/4 cup flour

1/4 cup milk

1/2 teaspoon vanilla


for the meringue:


2 egg whites

1 pinch cream of tartar

1/4 cup sugar


Instructions:


It’s easiest to begin this recipe the day before you want to make the final product: the rhubarb and ice-cream custard will need time to cool. (So will the cake, although it will need to cool for less time so you may make it a couple of hours before you need it if you like.)


First, make the rhubarb puree. Combine the rhubarb, its sugar, its salt, and the lemon juice in a small non-reactive saucepan. Let them sit for a few hours until the rhubarb juices up.


When it has juiced up, stir the mixture and bring it to a boil. Simmer it, stirring frequently, until the rhubarb is soft, and most (but not all) of the liquid has boiled off. Set it aside to cool; then refrigerate it until you need to add it to the ice cream.


Next, make the ice-cream custard. In a small-to-medium saucepan, heat the milk until it steams but does not boil. Meanwhile, in a separate bowl whisk together the egg yolks and sugar until they thicken and turn a light yellow (about 4 minutes). As noted above, the egg whites should be kept—in the refrigerator—until the next day for the meringue.


Whisk a little of the hot milk into the sweet egg yolks; then whisk a little more. Repeat this process; then whisk the egg yolk mixture into the hot milk. Heat over medium heat, whisking constantly, until the custard begins to thicken but does not boil (about 2 to 3 minutes on my gas stove).


Strain the custard into a heatproof bowl. Cool it to room temperature; then refrigerate it until it is cool (several hours or preferably overnight). Just before making the ice cream, you will whisk in the cream, vanilla, and salt.


The next day (or later that same day) make the cake. Preheat the oven to 350 degrees, and grease and flour a small cake pan. (I used my 7-inch springform pan.)


Cream the butter, and beat in the sugar until fluffy. Beat in the egg yolk, reserving the white. Stir in the baking powder and salt. Gently add the flour and milk alternately, beginning and ending with the flour.


In a clean bowl with a clean beater, whip the egg white until it forms stiff (but not dry) peaks. Fold it into the cake batter, and gently spoon the batter into the prepared pan. Bake until a toothpick inserted into the center of the cake comes out clean. (Using my gas oven and my springform pan this took about 30 minutes, but it may vary.)


Let the cake rest for 10 minutes before removing it from the pan. Let it cool.


About 1/2 hour before you are ready to make the Baked Hawley, preheat the oven to 450 degrees, and get out the custard. Add the cream, vanilla, and salt to the custard, and pour it into a 1-quart electric ice-cream maker. Start the ice-cream maker. Take the egg whites out of the refrigerator so they can come to room temperature.


When the ice cream is done, add the rhubarb puree. Let it mix in for a minute or two more. Try to make your ice cream as hard as you can but still removable from the ice-cream maker.


Rinse a wooden board on both sides with cold water, and shake it dry. Cut out a piece of brown paper (I used a grocery bag) large enough to hold the cake with a bit of extra room. Place it on the wooden board while you prepare the meringue.


Using an electric mixer beat the egg whites and cream of tartar until they begin to stiffen. Slowly add the sugar, and continue beating until the whites form stiff peaks. Set aside for just a minute.


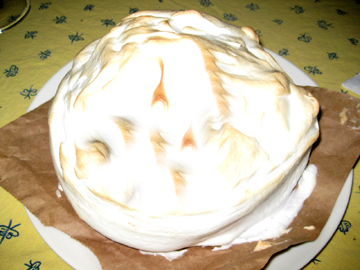
Quickly place most of the ice cream onto the top of the cake (you will have a little extra to eat just as ice cream). Leave at least an inch of cake around the top edge so that the ice cream doesn’t slide down to the sides. If your ice cream is stiff enough try to pile it up in the middle to make an igloo shape. (Mine was more of a pillbox hat!)


Using a spatula spread the meringue on top of and around the ice cream and cake, making sure no cake or ice cream is visible.


Quickly pop the wooden board into the oven, and leave it there just until the meringue browns lightly, for about 4 to 5 minutes. Remove it from the oven, and serve the Baked Hawley at once.


Serves 4 to 6 rhubarb fans.