Archive for the ‘Breads, Muffins, and Scones’ Category

Blueberry Bread (A Tasty Work in Progress)

Friday, July 27th, 2012

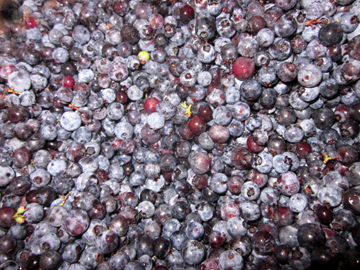
Last week I picked up my annual box of blueberries from the Benson Place in Heath, Massachusetts. I have written before of my love of the tiny blue pearls that come from Heath’s low-bush plants. These berries always seem sweeter than the fat, high-bush variety. I buy a big box of them every summer so that I can eat a lot and still have plenty to freeze for year-round baking.

I wanted to bring something blueberry-ish to my friend Ken to eat on the morning of his birthday and decided to adapt a strawberry bread recipe I was given many years ago—so many years ago, in fact, that I can’t remember who gave it to me. (If parts of it look familiar, please let me know that you are its original baker!)

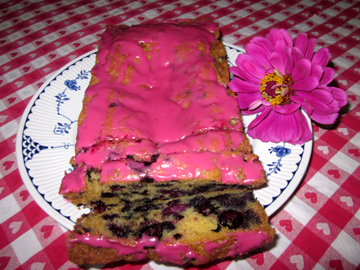
The bread wasn’t perfect; it featured one of my baking foibles, swamping in the middle. I will refine the recipe one of these days; I think I may be able to avoid the swamping if I use soft (instead of melted) butter and combine it with the sugar before adding everything to the flour. I was going to wait until I had tinkered to post the recipe … but the gang at Ken’s birthday breakfast convinced me that the bread was blogworthy in its present form, swamp or no swamp.

Pat Leuchtman, a founder of the Heath Gourmet Club, rated it A-Plus … and even featured a photo of it on her blog, Commonweeder.

So I’m offering you the recipe as it is. It is chock full of blueberries—and the glaze, colored by the berries themselves into a gorgeous fuchsia tone, is pretty spectacular to look at and to eat.

The Bread

Ingredients:

3 cups blueberries
1/4 cup sugar plus 2 cups later
1 tablespoon key-lime juice
3 cups flour
1 teaspoon baking soda
1 teaspoon salt
1-1/4 cups melted butter (2-1/2 sticks)
4 eggs, well beaten
1 teaspoon vanilla
confectioner’s sugar as needed (about 1 cup)

Instructions:

Preheat the oven to 350 degrees, and grease two loaf pans.

Place 1/2 cup blueberries in a saucepan; put the remaining berries in a medium mixing bowl. Add the 1/4 cup sugar and the key-lime juice to the berries in the saucepan. Stir and set aside.

Place 1/4 cup of the flour in the bowl with the blueberries and toss the mixture to coat the berries. Set aside.

In a large mixing bowl whisk together the remaining flour, the remaining 2 cups of sugar, the baking soda, and the salt. Making a well in the center of this dry mixture, and stir in the melted butter, eggs, and vanilla. Stir in the floured berries.

Pour the batter into the loaf pans, and bake at 350 until a toothpick inserted into the center of the loaves comes out clean, about 50 to 60 minutes. Cool the breads in their pans for 10 minutes; then remove them from the pans and let them cool completely on a wire rack.

While the bread is cooling make the glaze. Heat the mixture in the saucepan until it boils, mashing as it heats. Strain the blueberry juice (discarding the resulting solids), and whisk confectioner’s sugar into the juice until you have a slightly thick sauce. When the sauce and the bread are cool, drizzle the sauce over the bread. Makes 2 loaves.

Anna and Caity’s Chocolate-Chip Scones

Friday, April 13th, 2012
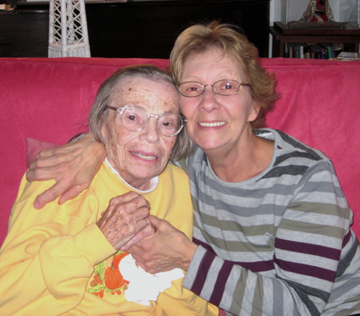
Caity (left) and Anna

Stu Cosby is one of the most warm-hearted people I know. He loves being a father. He has two terrific kids of his own who have now grown up and made him a proud grandfather. When he married sweet Cathy a few years ago he happily acquired stepchildren.

At the time of their mother’s marriage to Stu, Caity and Anna were small, but they are now growing into lovely young ladies. (The photo above was taken at their confirmation in March.)

The two can be a little shy—but once they get to know you they show their smart and loving nature. They are also EXTREMELY tactful: when Anna sent me the confirmation photo she gently labeled it so that I would know which of the twins was which. (I’m learning; really, I am!)

One thing I know for sure is that these girls are getting to be great cooks. I salivated when I saw a photo of the scones on Facebook so Anna kindly sent me the recipe. I had never actually made chocolate-chip scones because, frankly, they are not precisely the sort of thing one needs. A scone has plenty of sugar and fat without chocolate.

Nevertheless, the mini-chocolate chips in this recipe don’t overwhelm the scones or their eater’s waistline. And Anna and Caity inform me that if one wishes to be truly virtuous one can substitute raisins or currants. I didn’t. I DID cut a couple of smaller scones, however, so that I could try the things with less guilt!

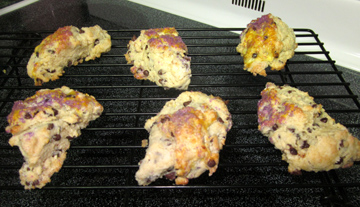
Caity and Anna’s scones looked a little nicer than mine. I couldn’t find my pastry brush so my egg wash got a little messy. And cutting dough has never been my specialty. My scones tasted just fine, however.

The Scones

Ingredients:

2 cups all purpose flour
1/3 cup sugar, plus additional sugar for topping off (I used sprinkles for the latter.)
1 teaspoon baking powder
1/4 teaspoon baking soda
1/2 teaspoon salt
1/2 cup (1 stick) sweet butter (cold), cut into small pieces
1/2 cup mini chocolate chips
1/2 cup sour cream
1 egg
1 teaspoon vanilla (I added this)
1 egg yolk for glaze (optional)

Instructions:

Preheat the oven to 400. Grease a cookie sheet or line it with a silicone mat.

In a medium bowl sift together the flour, 1/3 cup sugar, baking powder, baking soda, and salt. With knives or a pastry blender cut in the butter. Stir in the chocolate chips.

In a small bowl or measuring cup whisk together the sour cream, whole egg, and vanilla. Using a fork, stir this mixture into the dry ingredients until large clumps of dough form. Do not over mix.

Use your hands to press the dough into a rough ball. (This is a little tricky, but as you press the dough will come together!)

Place the dough on a lightly floured cutting board. Pat it into a 7- or 8-inch circle (about 3/4 inch thick). If you wish to use the egg wash, beat the egg yolk briefly and then paint it onto the circle with a pastry brush. Top with additional sugar for crunch.

Use a serrated knife to cut the circle of dough into 8 triangles. Place them on the cookie sheet about 1 inch apart. If they seem too crowded, use a second cookie sheet.

Bake the scones until they are golden, about 15 to 17 minutes. Cool them for 5 minutes before removing them from the cookie sheet. Serve warm or at room temperature.

Makes 8 scones.

Rose’s Yankee Cornbread

Wednesday, November 23rd, 2011

Rose Kiablick of Buckland, Massachusetts, comes every week as a hospice volunteer to spend time with my mother. Rose is a warm hearted great-grandmother … and a wonderful cook. This cornbread recipe, sweetened with local maple syrup, is one of her favorites. It accompanies almost any dish—particularly turkey!

I used a well seasoned Lodge cast-iron corn-stick pan from the Lamson & Goodnow factory store in Shelburne Falls, Massachusetts, to try Rose’s recipe. (I had enough batter left to make a small round cornbread loaf as well.)

I loved the corn sticks; they were moist on the inside and crunchy on the outside. You may of course use an 8- or 9-inch square pan or a larger iron skillet as well. Timing will vary depending on what you use. The corn sticks took about 18 minutes; a larger pan could take up to 25.

If you want to make cornbread stuffing, make this bread TODAY and use it as your stuffing base tomorrow.

Happy Thanksgiving, all…

The Cornbread

Ingredients:

1-1/2 cups flour
1 cup cornmeal
3 tablespoons sugar
2-1/4 teaspoons baking powder
3/4 teaspoon salt
1 cup milk
4 tablespoons (1/2 stick) butter, melted
2 eggs
1/2 cup maple syrup

Instructions:

Actually, Rose just stirs everything together all at once, but I decided to separate the dry ingredients from the wet. Here is my method:

Preheat the oven to 425 degrees. Lightly grease the pan(s) of your choice.

In a bowl combine the flour, cornmeal, sugar, baking powder, and salt.

In another bowl combine the milk and butter; then whisk in the eggs, followed by the maple syrup. Stir this mixture lightly into the dry ingredients.

If you are using a cast-iron pan, pop it into the preheated oven for 5 minutes; then carefully remove it and spoon in the batter. (If you’re not using cast iron, just spoon the batter into the greased pan.)

Bake until the cornbread passes the toothpick test, about 20 to 25 minutes. Serves 8 to 10.

My mother loves her visits with Rose.

Cider Time

Saturday, November 5th, 2011

Most New Englanders see early November as a time for winding down from summer and harvest activities. The leaves dwindle, the air takes on a distinct chill, and farm stands begin closing their doors.

For cider lovers, however, this season is a highlight of the year.

Here in Franklin County, Massachusetts, we are lucky to have a weekend devoted to the joys of apples and cider, a weekend that seems to become richer each year.

Today and tomorrow mark the 17th annual occurrence of Cider Days, a celebration founded by Judith Maloney of West County Cider and her late husband Terry in 1994.

This year the festivities include a pancake breakfast, programs and sales at various locations throughout the county, canning classes, a home orchard workshop, tastings galore, and a special cider dinner.

Several local eateries will feature apple and cider items on their menus that weekend, including my beloved Green Emporium, where apple-cheddar pizza and appletinis are just the beginning of the apple madness.

This morning the Green Emporium featured cooking demonstrations by its chef, Michael Collins, and by Amy Traverso of Yankee magazine, the author of The Apple Lover’s Cookbook.

Amy also signed copies of her book, which was published in September by W.W. Norton. Norton sent me a copy of the book to review for a local paper. The book is a real find—a treasure trove of apple information (Amy has unearthed apple varieties completely new to me), stories of trips to orchards, and tempting recipes.

Amy has come to Cider Days several times although this is her first public appearance there. “Cider Days is something that my whole family looks forward to every year,” she told me.

“It’s just lovely to drive around rural Massachusetts for a day and taste apples! We may not live in wine country, but we certainly do live in cider country. I want to see New Englanders really embrace our cider heritage, and I’m so grateful to the Maloney family for helping put this drink [hard cider] back on the map. The festival seems to draw bigger crowds every year, so that’s really encouraging.”

I’m sorry that I didn’t post this in time to allow you to come to her signing—I’ve been having SERIOUS blog issues, just resolved thanks to my current hero (and always friend) Henry. Luckily, there are more events still to come this weekend.

For a full schedule of activities visit this link. For a couple of apple and cider recipes (I’m posting this a little late so we have two today!), read on….
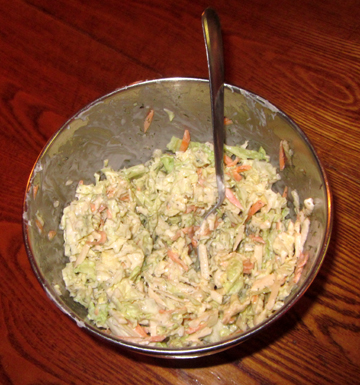
I MEANT to photograph this in a pretty dish, but we got busy eating....

Farm Share Coleslaw

My mother’s darling nurse Pam Gerry told me months ago about her favorite coleslaw, which incorporates dill and apple with the cabbage.

I had to wait until fall to have the fresh ingredients with which to make it, however!

In early October our farm share turned up a small head of cabbage a couple of weeks ago—and we had apples on our trees and a small amount of dill still in the herb garden. The carrot was left over from a previous week’s farm share, and of course the cider vinegar was from Apex Orchards nearby.

Of course, you may tinker with the recipe and substitute something more conventionally coleslawy (maybe caraway seeds?) for the dill. I loved the fresh flavor it gave to the salad, however.

A generous friend sent me some REAL kosher corned beef and rye bread from New York City so I was able to make one of my favorite childhood sandwiches, corned beef with mustard and slaw. We got our cold cuts at a kosher deli where cheese was never mixed with corned beef so I never became a Reuben fan. But I adore coleslaw with my corned beef so between them Pam and Peter send me to heaven!

Ingredients:

1/2 small cabbage (about 3 cups when chopped), cored and loosely chopped or grated
1 small carrot, peeled and grated
1 small apple, cored and grated (remove skin if you like)
1/3 cup mayonnaise (plus or minus to taste)
2 teaspoons cider vinegar
2 teaspoons fresh dill leaves or a teaspoons dried dill weed (more or less to taste)
salt and pepper to taste (I used about 1/2 teaspoon salt and five turns of the pepper grinder)

Instructions:

Combine all ingredients in a medium bowl. Stir and adjust seasonings to taste.

If you have time, let the mixture sit in the refrigerator for a while to maximize flavor. Be sure to stir it before serving.

Makes about 2 cups.
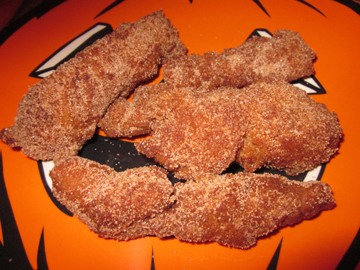
 

Sherry Hager’s Cider Doughnuts

My friend Cynthia O’Connor asked me more than a year ago if I had a recipe for Cider Doughnuts. It took me a while, but I finally got one!

Hager’s Farm Market in Shelburne, Massachusetts, will offer a plethora of apple products for this year’s Cider Days, plus the market’s signature fried dough with maple cream. I persuaded Sherry Hager and her daughter Kim to part with the recipe for Sherry’s cider doughnuts, pastries that are particularly light and crispy thanks to the cider and buttermilk in their dough … and to the Hagers’ deep-frying skills.

Ingredients:

3-1/2 cups flour
2 teaspoons baking powder
1 teaspoon baking soda
1/2 teaspoon ground cinnamon
1/2 teaspoon salt
1/8 teaspoon nutmeg
4 tablespoons butter at room temperature (I used unsalted)
1 cup sugar
2 eggs
1/2 cup apple cider
1/2 cup buttermilk
canola oil as needed for frying

Instructions:

In a bowl combine the flour, baking powder, baking soda, cinnamon, salt, and nutmeg.

In another bowl beat the butter and sugar together with electric mixer. Mix in the eggs until they are thoroughly incorporated. Mix in the cider and buttermilk.

Dump in the dry ingredients and stir.

“Our secret is we let it refrigerate overnight,” says Kim of the dough.

The next day preheat the oil to 350 degrees in a large pan or fryer.

Roll the out dough on a floured surface; cut it with a doughnut cutter. This can be a little tricky even after refrigeration as the dough is sticky. As you can see from the photos here, I gave up on doughnuts and formed my dough into freeform crullers.

Cook the doughnuts a few at a time until they are brown on each side, a minute or two per side.

Makes about 18 doughnuts and 18 holes.

If you enjoyed this post, please consider taking out an email subscription to my blog. Just click on the link below!

Subscribe to In Our Grandmothers’ Kitchens by Email.

Surprise Soda Bread

Tuesday, March 15th, 2011
 
 
I love Saint Patrick’s Day.
 
As I noted a couple of years ago on this blog in a discussion of my unsainted great-grandmother, I’m only marginally Irish. Nevertheless, I’ve always embraced this holiday.
 
It’s cheerful at a time when the landscape in my beloved New England is gloomy.
 
It’s associated with any number of popular Irish and Irish-American songs.
 
Some are humorous, such as “Who Threw the Overalls in Mistress Murphy’s Chowder” and “Harrigan.” Only George M. Cohan could have constructed the interior rhymes in the latter.
 
Others are sentimental to the point of being maudlin. Since a lot of beer is drunk on this holiday no one objects.
 
I fully expect to evoke tears from the audience when I pay musical tribute to “me mither” during my little solo at our local Saint Patrick’s Day concert. (I’ll be singing “An Irish Lullaby.”)
 
I also love Saint Patrick’s Day because I look fabulous in green.
 
And because I love, love, love soda bread.
 
I’ve already posted recipes for white and whole-wheat soda bread. This year I’m using a recipe cribbed (with thanks!) from Cabot Cheese.
 
As soon as I saw Cabot’s Cheddar Soda Bread I knew it would be just the thing to serve with corned beef and cabbage or Irish beef or lamb stew. 

I have changed the recipe a little, of course.

 
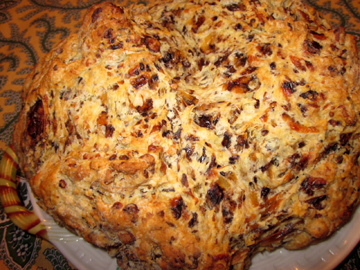
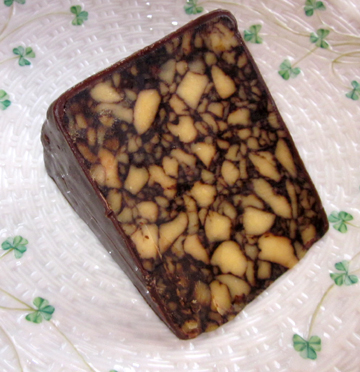
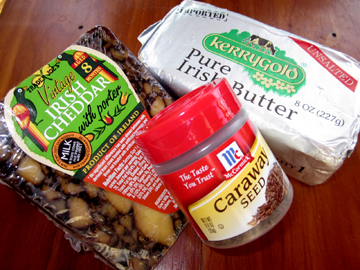
First, I upped the Irish ante by using Irish cheddar—laced with porter. The marbled cheese gave the bread a gorgeous mottled look. The original cheddar might taste sharper, but this version still had lots of cheesiness. I can’t wait to try this cheese in my Irish cheese fondue.
 
Second, I switched Cabot’s salted butter to unsalted (there’s plenty of sodium in this recipe without more in the butter—and I say this as a girl who loves her salt) and used Kerrygold Irish butter.
 
Third, I threw in some caraway seeds. They are often used in soda bread. I find them a little strong in sweet breads, but they complement this savory recipe beautifully.
 
Enjoy—but eat sparingly. This bread is very filling. 

And if you’re in Alexandria, Virginia, Thursday night, come sing along with me and the Montebello Singers….

 
Surprise Soda Bread
 
Ingredients:
 
2-1/2 cups flour
2 teaspoons baking powder
1 teaspoon baking soda
1/2 teaspoon salt
1 teaspoon caraway seeds
1/4 cup (1/4 of a 1/2-pound package) Irish butter
1/2 pound Irish cheddar with porter (or stout!), grated
1 cup buttermilk
1 egg
 
Instructions:
 
Preheat the oven to 375 degrees. Lightly grease a cookie sheet or line it with a silicone mat.
 
In a medium bowl whisk together the flour, baking powder, baking soda, salt, and caraway seeds. Stir in the cheese and blend well.
 
In a small bowl or measuring cup, whisk together the buttermilk and the egg. Stir them gently into the dry ingredients.
 
Turn the mixture onto a lightly floured board and knead it a few times, until it holds together into a slightly flattened ball.
 
Pop your ball onto the prepared cookie sheet. You may cut a cross in the center, but my cutting wasn’t very successful so I would leave well enough alone.
 
Bake until the loaf has light brown spots and a toothpick inserted into the center comes out clean—35 to 40 minute or so.
 
Slice into small wedges (12 to 14). 

Makes 1 loaf.

Did I mention that I like to wear green?