Archive for the ‘Breads, Muffins, and Scones’ Category

In Praise of Wallpaper

Friday, January 28th, 2011

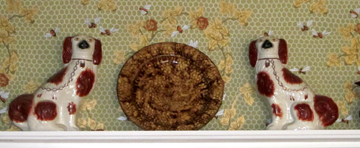
The Staffordshire dogs ADORE their new background.

 
Wallpaper is not in fashion.
 
When we were readying my mother’s New Jersey house for sale, Wendy the Realtor gazed at the wallpaper with barely concealed dismay, clearly longing for subtly painted walls. She was much too nice to say anything—but the look in her eyes was unmistakable.
 
A November article in the Washington Post titled “How to Keep Your House from Looking Old, Neglected” was more blunt:
 
Wallpaper has got to go—with very few exceptions, according to Lynn Chevalier, owner of Staged Right, a McLean firm that dresses up homes for market. “I always say people should take down wallpaper unless it’s very subtle,” she said.
 
I disagree—and I scoff at fashion.
 
Some call wallpaper old fashioned. I say “old fashioned” is just another term for “classic.”
 
Wallpaper has many virtues.
 
First, it lasts far longer than a paint job. I have visited older homes where one could still see wallpaper that was put up a century ago. Some might shudder at this longevity, but I savor the connection with the past.
 
Wallpaper makes an immediate statement. At its best it is like art, revealing something about both its creator and its owner.
 
Wallpaper can define a room simply and completely. Definition is what we were looking for in the dining room in our new apartment in Virginia.
 
The dining room is really just a section of the living room. It does have three walls–two and a half, really–but it flows right into the living room as apartment dining rooms often do.
 
My task when looking for wallpaper was to find something that would make this room stand out from the rest of the apartment. I also wanted to find a pattern that would complement the China and tschotchkes we planned to place on a plate rail on the dining-room walls.
 
It was not an easy task.
 
I hadn’t purchased wallpaper in ten years. Last time I was looking for it, I encountered many choices. My mother’s New Jersey home had an excellent paint and wallpaper shop nearby, and we had a good-sized wallpaper outlet not far from my home in western Massachusetts.
 
This time around finding wallpaper was quite different. Having sold the house in New Jersey, we couldn’t go to the wallpaper store there. And the outlet in Massachusetts no longer existed, I discovered.
 
I called its parent company, which now sells only fabric. “Nobody buys wallpaper anymore,” the operator informed me.
 
I guess I’m nobody.
 
I asked around Alexandria, Virginia, thinking historic Old Town would surely have a wallpaper store. It didn’t. A couple of local paint stores offered a meager selection of wallpaper books.
 
Next, I tried the internet.
 
Buying wallpaper over the internet is disconcerting because one really isn’t sure what the patterns will look like without seeing samples. I ordered sample after sample from a variety of companies without much satisfaction.
 
Luckily for me, my friend Peter came to the rescue as he often does.
 
The king of internet window shopping, Peter follows many design-oriented web sites. It helps that he is an architect.
 
He is not a wallpaper person himself, but he knows my taste.
 
He sent me a link to J.R. Burrows & Company, a firm in Rockland, Massachusetts, that manufactures historical rugs, wallpapers, and lace curtains. 

Here is the first Burrows image Peter showed me:

 
He knew it wasn’t exactly what I needed for the dining room—but he had a feeling I would fall in love with it. I did.
 
I called the Burrows Company to request samples and was lucky enough to talk to John Burrows himself.
 
He was enormously helpful, asking what sort of room I was hoping to paper. (By the time I looked at his prices I knew it would probably be only one room!)
 
John has studied architectural history and design as well as historic preservation. His firm specializes in recreating designs from the late 1800s and early 1900s.
 
It was John who suggested I consider his honeybee wallpaper, which I had somehow overlooked while perusing his web site (perhaps because it was really, really expensive). “I’ll pop a sample into your package,” he said.
 
When it arrived, the honeybee paper took my breath away. It was not at all what I had pictured using, and yet it was just right.
 
I learned from John’s web site that it had been designed by Candace Wheeler (1827-1923), the “Mother of American Interior Design,” in 1881. It won its creator $1000 in a competition for an artistic American wallpaper.
 
John informed me that he had spent five days on a ladder tracing the wallpaper from the walls of a library in Ionia, Michigan. As I mentioned earlier, wallpaper can last a LONG time. 

He recently installed honeybee wallpaper in the aesthetic movement gallery in the new Art of the Americas wing at Boston’s Museum of Fine Arts.
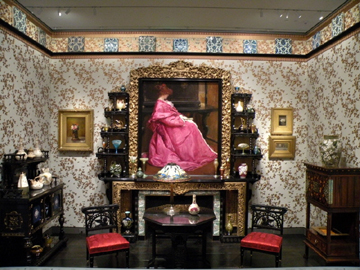
Courtesy of John Burrows

 
Being a fundamentally cheap person, I contemplated the cost of the wallpaper for quite a while. The honeybee wallpaper was, frankly, five times the price of the next contender, a Waverly print available online from a discount supplier.
 
It was far more than five times as beautiful, however, and I understood why it was so expensive: historical research; limited, quality print runs; and personal service. (I couldn’t imagine Mr. Waverly–if there was a Mr. Waverly–helping me choose my wallpaper.)   
 
I called John’s associate Christine to order it.
 
Even then, getting my wallpaper wasn’t easy! Christine informed me that she didn’t have enough of the classic honeybee wallpaper in stock for me. The next printing was due in about a month.
 
Unfortunately, my wallpaper hanger was due in a couple of weeks.
 
Christine and John asked whether I would be interested in the silver version of the pattern. The original was printed on a cream background. The silver substituted a silver/green background; John calls the green “sage.” 

I said I’d need to see it. They sent an image of the wallpaper.
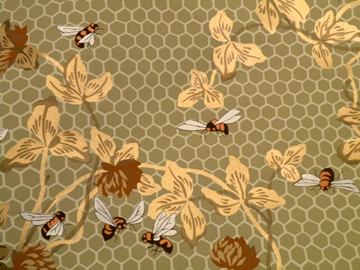
 
I said I wasn’t sure how it would look with blue-and-white plates—and bless their hearts, John and Christine posed a few blue-and-white plates next to the paper and sent me photos.
 
To clinch the deal, John informed me that according to Victorian color design blue was exactly the right hue to go next to the sage green; he called it an “analogous” color.
 
Who was I to argue with Victorian color design? I placed the order.
 
To say we are pleased is a massive understatement. Our wallpaper installer, Cindy (F.B.I agent by day, paper hanger by night—or rather on the weekends), did a splendid job, and the gold in the wallpaper glows every afternoon when the western light falls upon it.
 
The photos here don’t do it justice because I can’t get the light quite right, but I hope they give some idea of how lovely this paper is.
 
To cap off my pleasure, John sent me a photo of the honeybee wallpaper used as a frieze on a wall of the first lady’s dressing room at the White House.
 
He informed me that Chester A. Arthur hired Candace Wheeler and her business partner, Louis Comfort Tiffany, to decorate the White House in 1881. 

The photo below, courtesy of John Burrows, dates from the late 1880s.
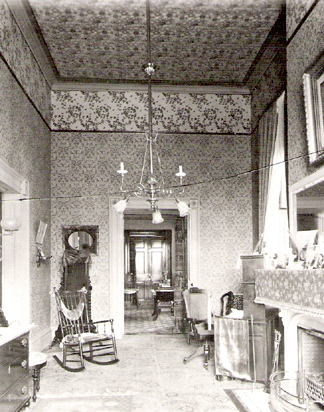
 
According to John, the first lady’s dressing room is completely different now, containing various rooms including a small family kitchen and elevator. Still, I think Michelle Obama ought to consider reinstating this lovely wallpaper somewhere in her current home.
 
Meanwhile, I’m never moving out of this apartment. Or if I do, I’m ripping out the dining-room walls and taking them with me.
 
In case readers were wondering, I DO have a recipe to accompany my defense of wallpaper. John Burrows graciously gave me permission to print the formula for his scones here.
 
He learned to make them when he was 16. He spent a summer working with Pelham Puppets in Marlborough, Wiltshire (in southwestern England). His landlady’s daughter worked at the local bakery and obtained the recipe.
 
John likes to prepare his scones in large quantities for events such as a cream tea he has hosted at Vintage Dance Week in Newport, Rhode Island.
 
I’m not sure I’d want to make 50 dozen of them as he has once or twice—in fact, I cut his recipe for 16 scones in half since I wasn’t serving a large crowd—but they are lovely and flaky. I particularly liked the cheddar version, something I had never tried before. 

John suggests serving his sweet scones in the afternoon with Taylors of Harrogate Yorkshire Gold tea, along with lots and lots of whipped cream and strawberry jam. They’re actually pretty tasty at any time of day.
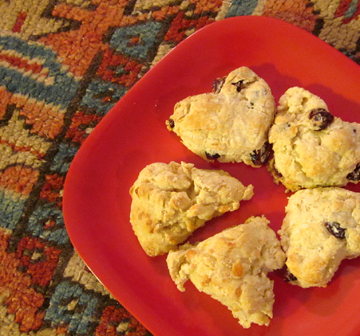
 
 
Ingredients:
 
if you are making sweet scones:
 
2 cups flour
1 teaspoon cream of tartar
1/2 teaspoon bicarbonate of soda (a.k.a. baking soda)
1/4 teaspoon salt
1/4 cup (1/2 stick) cold sweet butter
3 tablespoons sugar (John says “1/8 cup plus”)
3/8 cup raisins (John says “1/4 cup plus; the original recipe called for sultanas, and he tends to use golden raisins; I couldn’t find raisins in my pantry and it was snowing so I substituted dried cranberries)
3/4 cup buttermilk
 
if you are making savory scones:
 
2 cups flour
1 teaspoon cream of tartar
1/2 teaspoon bicarbonate of soda (a.k.a. baking soda)
1/4 teaspoon salt
1/2 teaspoon dry mustard
freshly ground pepper to taste
1/4 cup (1/2 stick) cold sweet butter
1/4 pound sharp cheddar cheese
3/4 cup buttermilk
 
Instructions:
 
Preheat the oven to 450 degrees for the sweet scones; 400 degrees for the savory. Line a jelly-roll pan with a silicone mat.
 
In a medium bowl whisk together the dry ingredients. Using your fingers, quickly rub in the butter until it is fairly well distributed. Stir in the sugar and raisins (for the sweet scones) or the grated cheese (for the savory), followed by the buttermilk.
 
Roll or pat the scones onto a lightly floured board. The sweet-scone dough should be about 1/2 inch thick; the savory, about 3/4 inch.
 
Cut the sweet scones into rounds with a fluted cutter. (I didn’t have one so I used heart-shaped cookie cutters.) Cut the savory scones into triangles.
 
Bake the sweet scones for 10 to 15 minutes; the savory, for 15 to 20 minutes. 

John usually makes 8 scones with this recipe; I cut them a little smaller and came up with 12. He adds that tiny cheddar triangles make a lovely appetizer.
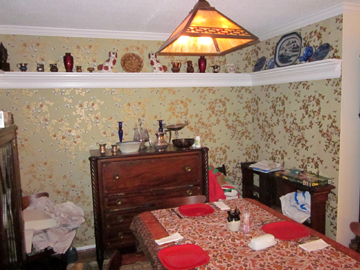
As you can see, we're still unpacking--and we haven't put up any pictures yet--but this room is going to be fabulous when we finish putting away the mess!


If you’re curious about another room in our apartment, visit today’s post on this blog’s sister, Pulling Taffy.

If you enjoyed this post, please consider taking out an email subscription to my blog. Just click on the link below!

Subscribe to In Our Grandmothers’ Kitchens by Email.

A Christmas Carol and Christmas Gingerbread

Tuesday, December 14th, 2010

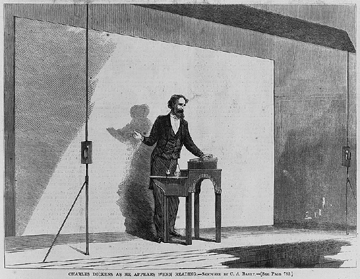
Like me, Charles Dickens liked to read aloud from his works. Unlike me, he got paid for it. (Image Courtesy of the Library of Congress)

 
My mother and I are staying with my brother and his family while waiting to move into our new winter apartment. (Warning: we will move in the next few days so this will probably be the week’s only blog post!)
 
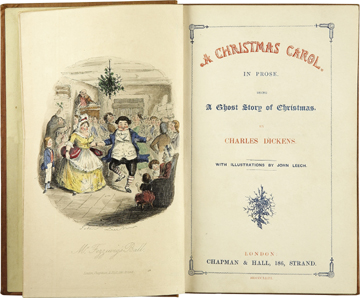
A few nights ago I began reading A Christmas Carol to my nephew Michael at bedtime. To say that the ten-year-old boy is enjoying the story is an understatement. He is devouring it.
 
This short novel penned by Charles Dickens in 1843 is so familiar to me—as it is to much of the English-speaking world—that experiencing it as utterly new through Michael’s eyes and ears gives me special pleasure.
 
A Christmas Carol is the sort of text that scholar Tony Bennett (no, not THE Tony Bennett) describes as layered with encrustation.
 
In the essay in which he introduced this concept, Bennett talked about the ways in which the public perception of Ian Fleming’s James Bond has changed with each successive reinterpretation of the character—from the original books to Sean Connery to Daniel Craig.
 
Bennett likened the changes in our view of Bond to encrustation on a shell or a boat, explaining that re-visionings of a text attach themselves to and reshape the original so that we can no longer see it without them.
 
A Christmas Carol is one of the most encrusted texts around. Not only has it been adapted more or less as is into play and film form; its basic plot has also been used for numerous theatrical and television films (who could resist Bill Murray in Scrooged?) and holiday episodes of regular television programs.
 
Such familiar characters as Mr. Magoo, Yosemite Sam, and Oscar the Grouch have taken on the role of Ebenezer Scrooge, whose “bah humbug” attitude toward Christmas and his fellow humans sets the plot of A Christmas Carol in motion. 

Each of these characters, like each of the actors who has played Scrooge (from Alastair Sim to Susan Lucci), has left his imprint on our mental picture of Scrooge.

 
The upcoming Doctor Who Christmas special, set to air on Christmas Day on BBC America, is also rumored to play with the story of Scrooge.
 
I can’t wait to watch it!
 
I have to admit that I take pleasure in Scrooge’s story pretty much every time I read or see it. In that sense it is well named. Like the carols we sing to celebrate this season, it resonates—even improves—each time we repeat its cadences.
 
And despite the tale’s sentimentality, it always behooves us to listen to and learn from A Christmas Carol’s message of charity, good will, and redemption.
 
Naturally, Michael and I have to nibble on something as we enjoy Dickens’s story of Scrooge, the Cratchits, and the ghostly visitors. (We’re willing to share both the story and the food with the rest of the family.)
 
I made gingerbread Sunday because I couldn’t think of anything more wholesome and Christmasy than this dense, lightly spiced treat. We ended up with two complementary aromas in the house—the warm gingerbread and the fresh new Christmas tree. Heaven!
 
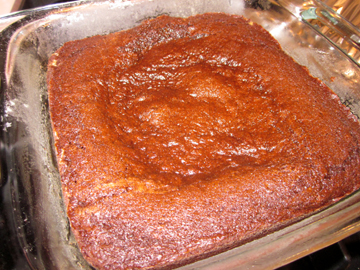
My regular cakey gingerbread has been a bit dry lately so I played with the recipe here. You’ll find this version is quite moist, almost brownie like in spots. It has the traditional gingerbread flavor, however.
 
I should probably warn readers that my gingerbread (including this version) almost always sinks a bit in the middle, hence the use of the word “swamp” in the recipe title. Every bite is delicious, including bites from the swampy section. 

God bless us, every one.

 
Christmas Swamp Gingerbread
 
Ingredients:
 
1-1/2 cups flour
2 teaspoons ground ginger
1 teaspoon ground cinnamon
1/2 teaspoon ground cloves
1/2 cup sweet butter, melted
1/2 cup firmly packed light-brown sugar
1/4 cup white sugar
1/2 cup molasses
1/3 cup buttermilk
1 egg, lightly beaten
1/2 teaspoon salt
1 teaspoon baking soda
 
Instructions:
 
Preheat the oven to 350 degrees. Grease and flour an 8-inch-square pan.
 
In a bowl combine the flour and spices.
 
In another bowl whisk together the remaining ingredients in the order listed. Stir in the flour mixture. Pour the batter into the prepared pan.
 
Bake until the cake tests done—from 30 to 45 minutes, in my experience. If it starts to look dried out before it is done, cover it with foil for that last few minutes. If your gingerbread collapses a bit in the middle, ignore it!
 
Serve with whipped cream or applesauce. 

Serves 8 to 12, depending on appetite.


And now … a small reminder to all holiday shoppers that copies of my Pudding Hollow Cookbook are available for you to give your friends and relatives! I ship priority mail within the continental U.S. so there’s still time for Christmas delivery. If you’d like a copy, please visit the Merry Lion Press web site.


If you enjoyed this post, please consider taking out an email subscription to my blog. Just click on the link below!

Subscribe to In Our Grandmothers’ Kitchens by Email.

Bagels

Friday, December 10th, 2010

 
Tomorrow, December 11, is National Eat a Bagel Day.
 
I spent much of my childhood in New Jersey, where finding a decent bagel was never a problem. I now realize that I was spoiled by the bakeries of my youth.
 
In my current haunts—western Massachusetts and northern Virginia—bagels are much harder to come by.
 
The other day I recalled that when I was a teenager living in India another American expatriate, Jane Abel, used to make her own bagels. (She made her own gefilte fish, too, but I’m not that brave!)
 
I decided to ask Jane for her bagel recipe.
 
Unfortunately, Jane has been back in the U.S. long enough to have lost her magic bagel formula. She did send me another recipe to try. She said it looked similar to the one she remembered.
 
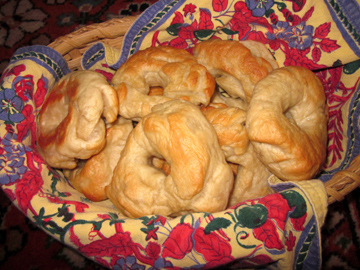
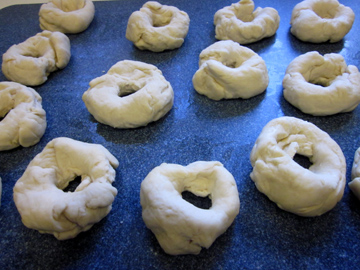
The bagels I made looked far from perfect. Frankly, my shaping skills need a lot of work. The end products tasted much better than the bread-like substances that often masquerade as bagels, however.
 
As connoisseurs know, a true bagel is twice cooked—first boiled and then baked. Think of it as a baked dumpling. The double cooking creates a firm crust and a chewy interior.
 
These are indeed true bagels. If they look a little odd, please blame the cook and not the recipe. Actually, my friend Deb thinks I should call them “Bagels Rustica” and pretend I WANTED them to look this way!
 
The only change I might make another time (other than getting someone more talented to shape the darn things) would be to halve the sugar in the dough. These bagels are a tad sweet.
 
My nephew Michael was home sick from school yesterday and was thus able to sample a bite of bagel when the first batch emerged from the oven. He pronounced the bagels “awesome.”
 
They are best eaten fresh and warm with a dab of butter, but they are also terrific toasted the next day and smeared/schmeared with cream cheese.
 
Almost Jane Abel’s Indian Bagels
 
Ingredients:
 
4-1/4 cups bread flour
2 packages instant (rapid-rise) yeast
4 tablespoons raw sugar
1 tablespoon salt
1-1/2 cups lukewarm water
 
Instructions:
 
In a mixing bowl stir together 1-1/2 cups of the flour and the yeast.
 
In a separate bowl combine 2 tablespoons of the sugar (you will use the other 2 tablespoons later), the salt, and the water.
 
Stir the water mixture into the flour and yeast. Combine thoroughly at low speed on your electric mixer, scraping the sides of the bowl with a spatula from time to time.
 
Turn up the mixer and beat the mixture for 3 minutes.
 
Next comes the kneading. The bread flour makes the dough very stiff so if you have a dough hook on your mixer it is best to use it rather than knead by hand. In this case add all of the remaining flour. Mix on medium speed with the dough hook for 4 to 5 minutes, stopping from time to time to redistribute the dough.
 
You will have VERY stiff dough—but don’t worry; it will loosen up as it rises.
 
If you don’t have a dough hook, add the remaining flour gradually as you knead. Kneading by hand will take 8 to 10 minutes. Again, expect very stiff dough.
 
Place the dough in a greased bowl, cover it with a damp dish towel, and let it rise in a relatively warm place until it puffs up a bit, 1 to 1-1/2 hours.
 
Divide the dough into 12 (I actually had 14) small balls, and roll them as smoothly as you can. This is not my specialty so my balls—and my bagels–were ragged. If you are good with shaping, however, you’ll do better than I did!
 
Use your index finger to poke a hole in the center of each ball. Gently work to make the center a bit bigger—the bagels tend to close up as they cook—and smooth the rounds into bagel shapes.
 
Cover the bagels again and let them rise for at least 1/2 hour.
 
Preheat the oven to 375 degrees. In a wide 8-quart pot bring 4 quarts of water to a boil, along with the remaining sugar.
 
Carefully place a few bagels in the boiling water. You should be able to boil at least 4 at a time. Not being a patient woman, I tried 7 at a time, which overcrowded them a bit so I don’t recommend it! The bagels expand as they boil.
 
Boil the bagels for 6 minutes, turning them with tongs halfway through; then drain them briefly and place them on a cookie sheet covered with parchment or a silicone baking mat.
 
Bake the bagels until they turn golden brown in spots, about 30 minutes. Repeat the boiling/baking process with your remaining bagels. 

Makes 12 to 14 bagels.


If you enjoyed this post, please consider taking out an email subscription to my blog. Just click on the link below!

Subscribe to In Our Grandmothers’ Kitchens by Email.

Apple-Pumpkin Scones

Friday, November 12th, 2010

 
I know I’ve been a bit fixated on warm breakfast foods lately—probably because of the chill in the air.
 
These scones are so seasonal that I had to keep up the breakfast trend for one more post!
 
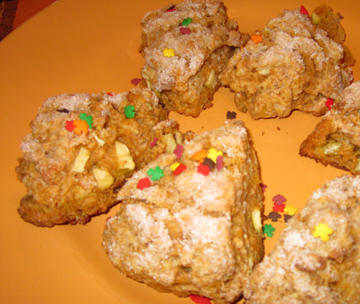
I have seldom met a scone I didn’t like, but even to my sconophilic taste these are special. You can taste and feel everything in them—the apples, the pumpkin, the spices, and of course the butter.
 
The Scones
 
Ingredients:
 
1/2 cup sugar
2 cups flour
2-1/2 teaspoons baking power
1/4 teaspoon salt
1 teaspoon cinnamon
1/4 teaspoon ginger
1/4 teaspoon nutmeg
1/2 cup (1 stick) cold sweet butter
2 small apples, cut up
1/2 cup (generous) pumpkin puree
2 tablespoons sweet cider
1 egg
1 teaspoon vanilla
additional sugar as needed
 
Instructions:
 
Combine the sugar, flour, baking powder, salt, and spices. Cut in the butter, but be careful not to overmix. Stir the apple pieces into this mixture.
 
In a separate bowl, thoroughly combine the pumpkin, cider, egg, and vanilla. Add this mixture to the dry mixture and blend just to moisten the dry ingreidents. They won’t ACTUALLY get completely moist at first.
 
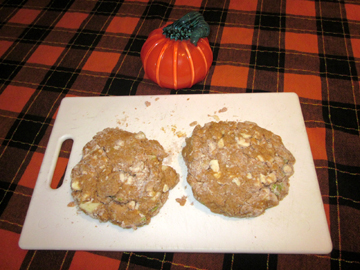
Transfer the ragged dough to a board, and knead it a few times to make the ingredients start to hold together. Shape it into 1 or 2 slightly flattened rounds (1 for large scones; 2 for small). Using a serrated knife, cut each round into 6 or 8 pieces.
 
Place the wedges of dough (your future scones) on a cookie sheet covered with a silicone baking mat. Allow the sheet to cool in the freezer for 1/2 hour.
 
While it is cooling preheat the oven to 375 degrees.
 
Remove the scones from the freezer, sprinkle sugar generously over them, and bake them for 15 to 18 minutes, until they are a nice golden brown on the bottom. 

Makes 6 to 16 scones, depending on size.


If you enjoyed this post, please consider taking out an email subscription to my blog. Just click on the link below!

Subscribe to In Our Grandmothers’ Kitchens by Email.

Eat Me! Apple Bread

Sunday, October 10th, 2010

 
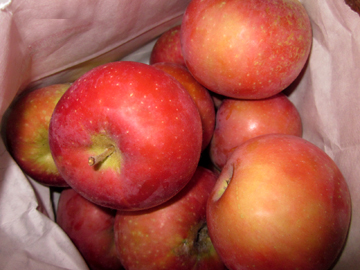
At this season of the year we always have lots and lots of apples in our entryway. Some come from the trees in our front yard (I have no idea what variety of apple grows there; we just call them “tree apples”) and some from nearby orchards.
 
It always seems to me that the apples are begging to be eaten. Naturally, I am happy to oblige. I eat a lot of them raw, but I also include them in cooking and baking.
 
Here’s a quick way to use up a couple of apples and make one’s family happy. My mother prefers to nibble on this bread with a mid-day glass of cider while I like to eat it for breakfast.
 
The Bread
 
Ingredients:
 
1 cup canola oil
1-1/2 cups brown sugar, firmly packed
3 eggs
3 cups flour
1 teaspoon baking soda
1 teaspoon salt
1 tablespoon cinnamon
1 teaspoon baking powder
2 cups grated raw apple (packed a bit into the measuring cup)
1 cup raisins
1 cup chopped nuts (optional)
 
Instructions: 

Preheat the oven to 350 degrees. Combine the oil and sugar, and beat in the eggs. Combine the dry ingredients and add them to the previous mixture. Stir in the apples, raisins, and nuts (if desired). Bake in greased loaf pans until a toothpick inserted into the center comes out clean (about 45 to 60 minutes). Makes 2 loaves.


If you enjoyed this post, please consider taking out an email subscription to my blog. Just click on the link below!

Subscribe to In Our Grandmothers’ Kitchens by Email.