Archive for the ‘Cakes, Pies, and Pastry’ Category

Warmth and Cider High on a Hill

Wednesday, April 25th, 2018

High on a hill on Reynolds Road in Shelburne, Massachusetts, Wheel-View Farm enjoys a stunning view. The farm house and much of the land have been in Carolyn Wheeler’s family since 1896, although she and her husband John have added to their property over the years.

Originally a dairy farm, Wheel-View now sells mostly beef, fruit, maple products, and hard and sweet cider. When I visited last fall, the Wheelers were getting ready for Cider Days. Cider season is, of course, over—but we’re still enjoying (if that’s the word) cool weather so it FEELS like cider season.

I was fortunate enough to be able to watch John Wheeler press fresh cider—and to taste his product. The Wheelers have a small but efficient cider-pressing system they purchased from OESCO in Conway, Massachusetts. John explained that the press was discovered in Italy, where it is used to press grapes for wine.

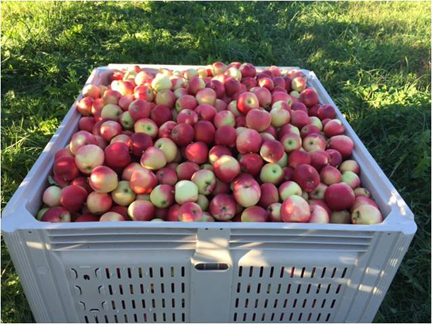
The pressing has two stages. First, John feeds fresh, crisp apples into an electric grinder. When I visited he was using a blend of Golden Delicious, Macoun, and Liberty varieties.

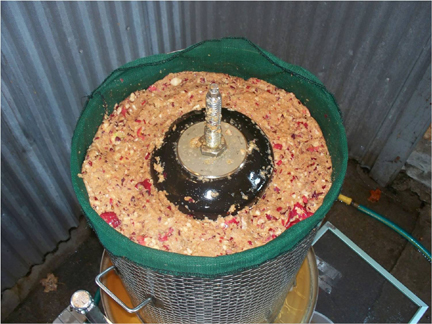
Next, the ground apples are transferred to a round press with a “bladder” in the middle. The press is powered by water from a garden hose. The water fills and expands the bladder, pushing the apple pieces out to the edges of the press. Holes in the sides allow the cider to flow out in a waterfall.

When the cider has finished flowing, the dry leftover pulp becomes a treat for the Wheelers’ cattle. It is the only thing the cattle eat other than grass and hay from their own pasture.

Nothing is wasted—and the cider has a deep, rich flavor. It was without doubt the best cider I have ever had. It tasted just like apples. I love apples.

After the pressing, Carolyn Wheeler took me to her cider tasting room, which opened in 2016.

Designed by Carolyn in an old outbuilding, the large, wood-paneled room welcomes visitors who want to buy cider or beef, as well as those who want to try a glass of hard or sweet cider on the spot along with a snack.

The tasting room is also a museum of sorts. Carolyn has filled it with antiques and collectibles from the farm’s past, including many pieces of household and farm equipment. As a music lover, I enjoyed testing her player piano and listening to “The Happy Wanderer” on her family’s Victrola.

The bill of sale for the Victrola hangs on the wall behind the record player. “My family never threw anything out,” Carolyn said with a smile as she pointed to the receipt.

The Wheelers have welcomed a number of groups to the tasting room and the farm, from school (and college) students to the members of senior centers and granges in the area. Their visitors are encouraged to try to identify the uses of the pieces of farm equipment on display.

The Wheelers are retired educators. They view Wheel-View not just as a source of food but also as a source of information about farming practices in the past and present. As they look toward the future, Carolyn told me, they hope the farm can be maintained as some kind of educational center.

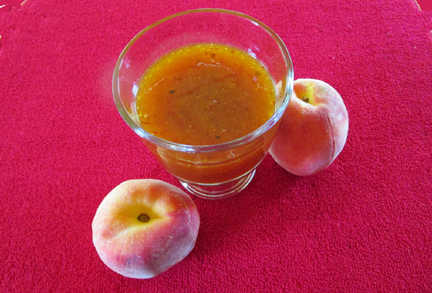
Meanwhile, the pair are making the most of their life as farmers. They have recently revived a traditional New England apple product John Wheeler’s grandmother used to enjoy, cider syrup (also known as boiled cider).

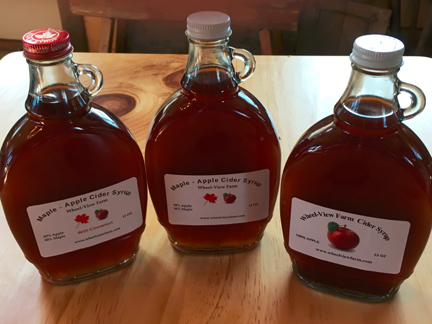
This is cider boiled down to concentrate the flavor. The pair sell it in three flavors: plain cider syrup, cider syrup mixed with maple, and cinnamon cider syrup.

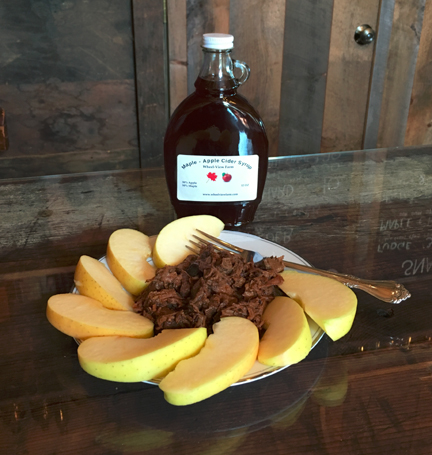
Carolyn showed off the syrup’s versatility for me in a sweet-and-savory slow-cooker pot roast that also featured Wheel-View Farm’s beef. I made it on Mass Appeal this week, along with my grandmother’s chocolate cake. (My TV appearance coincided with what would have been her—gasp!—129th birthday.)

Wheel-View Farm’s cider tasting room is open most weekends, although would-be visitors are encouraged to call or check the farm’s website before venturing forth.

By the way, as I mention in the second video below, I’ll be teaching a free recipe-writing workshop on Sunday, May 6, as part of ArtWeek here in Massachusetts. This week celebrates arts of all sorts and features hundreds of events, many of which are free. If you’re in the neighborhood and are thinking of writing up a recipe or two (for publication, or even just for friends a family members), I hope you’ll come. Preregistration is required, but that’s not hard to do. Here are the details.

Wheel-View Farm Cider-Syrup Pot Roast

Ingredients:

3 to 4 pounds beef roast (I used chuck)
1 teaspoon garlic powder
1 teaspoon onion powder
1 tablespoon dry mustard
1-1/2 teaspoons salt
1 dash nutmeg
pepper to taste (3/4 teaspoon to 2 teaspoons)
1/2 cup catsup
2 teaspoons Worcestershire sauce
1/2 cup cider syrup or cider-maple syrup

Instructions:

Place the roast in a slow cooker. Combine the remaining ingredients and spread them on top of the beef. Cook for 6 to 8 hours on high. There is no need to add water; the roast makes its own gravy. You may also cook it on high for 1/2 hour and then let the beef cook overnight on low.

If you don’t have a slow cooker, place the beef in a covered pan and spread the sauce on top; then place it in a preheated 500-degree oven. After 20 minutes, reduce the heat to 250 degrees and cook for several hours or overnight. (I haven’t tried this method, but I see no reason why it shouldn’t work!)

When the beef has finished cooking, remove it from the pot, cut it up if necessary (it mostly just falls apart), and return it to the sauce.

Serves 6 to 8.


And now the videos:


Tinky Makes Wheel-View Farm Cider-Syrup Pot Roast


Tinky Makes Her Grandmother’s Chocolate Cake

A Southern Twist on Funeral Food

Wednesday, January 31st, 2018

Regular readers of this blog may recall that I LOVE funeral foods, an affection I inherited from my mother. With a nod to Shakespeare, she billed herself as a “specialist in funeral baked meats.” When a neighbor died she sprang into action organizing contributions to the post-funeral repast.

One of these days I will find a publisher for my death-related cookbook, which will be titled Dishes to Die For: America’s Favorite Funeral Foods. Meanwhile, I take inspiration from a new funeral-food cookbook that highlights the south.

The Southern Sympathy Cookbook: Funeral Food with a Twist (Countryman Press, $22.95, 176 pages) comes from the fertile pen and kitchen of Perre Coleman Magness. Magness, who lives in Memphis, Tennessee, is the author of Pimento Cheese the Cookbook. She is clearly my soul sister. In addition to doting on funeral food, I adore pimento cheese. I ate it almost daily when I lived in Tennessee.

Magness’s new book abounds with tempting recipes for classic southern foods, from fried chicken to chess pie. It also adapts many typical southern dishes into crowd-friendly form, providing for example a mini version of cinnamon buns and an easily sliced caramel Bundt cake (much handier for a large group than the typical layered version).

I recognized many of Magness’s recipes from my southern sojourns and also from funerals I have attended, but some were new to me. I can’t wait to try her paper-bag chicken (yes, it’s chicken roasted in a paper bag, and it sounds WONDERFUL) and her buttermilk pie bars.

The Southern Sympathy Cookbook is a keeper—perfect to consult when you’re heading out to a funeral or just entertaining friends and family at home.

Photo courtesy of Perry Coleman Magness and Countryman Press

Southern Sympathy Sweet Tea Bread (Courtesy of Perre Coleman Magness/Countryman Press)

Sweet tea is a staple of southern hospitality. Almost every restaurant at which I dined in Tennessee and Texas provided large pitchers of sweetened iced tea at low cost. Here Magness uses this ingredient as the basis for an elegant sweet loaf.

Ingredients:

1 family-sized tea bag
2 sprigs mint, plus 1 tablespoon finely chopped mint
8 tablespoons (1 stick) unsalted butter, at room temperature
3/4 cup granulated sugar
the zest of one medium lemon
2 eggs
1-1/2 cups all-purpose flour
1/2 teaspoon baking powder
1/2 teaspoon salt
3/4 cup confectioners’ sugar

Instructions:

Put the tea bag and 2 sprigs of mint in a measuring cup. Add 1 cup boiling water. Steep for 30 minutes; then remove the tea bag and mint. Cool to room temperature.

Preheat the oven to 350 degrees. Spray a 9-by-5-inch loaf pan with baking spray.

Beat the butter and sugar together in the bowl of a stand mixer fitted with the paddle attachment until light and fluffy. Beat in the lemon zest and 1 tablespoon of finely chopped fresh mint. Add the eggs, 1 at a time, beating well after each addition and scraping down the sides of the bowl.

Measure out 1/2 cup of the tea, reserving the rest for the glaze. Add the flour, the baking powder, and the salt to the butter in the bowl in three additions, alternating with the tea and scraping down the sides of the bowl. When everything is well combined, beat on high for 5 seconds; then scrape the batter into the prepared pan and smooth it into an even layer.

Bake for 45 to 50 minutes until a tester inserted in the center comes out clean. Cool in the pan for 10 minutes; then remove to a wire rack to cool completely. Meanwhile, prepare the glaze.

Sift the confectioners’ sugar into a small bowl. Whisk in the remaining tea slowly until you have a pourable glaze about the consistency of heavy cream. Drizzle the glaze over the cake with a spoon, spreading to cover the top with a few attractive drips down the sides. Let the glaze set for about an hour.

The loaf will keep in an airtight container for a day. Makes one loaf.

Just for fun, here I am in full funeral mode, leaning on the tombstone of Abigail Baker, my hometown’s best known baker. Mrs. Baker won the famed pudding contest our town sponsored in 1780. This photo will grace the cover of my own funeral-food book. 

Please do take a look at best funeral cover guide to have a stress free funeral during the difficult time.

A Belated (but fun!) Halloween

Thursday, November 2nd, 2017

I don’t get trick or treaters here in the wilds of western Massachusetts, but that didn’t prevent me from enjoying Halloween this year. My house was festooned with my favorite fall decorations on Tuesday. Cocoa the dog reluctantly donned her turtle costume. And I made Halloween treats with my friends on the show Mass Appeal.

Actually, the first recipe we prepared wasn’t a treat; it was a hearty soup I recommend for Halloween night (or any other fall evening). Pam’s Country Ham and Potato Soup (the recipe is here; I shared it a few years ago) is so warming and delicious I don’t want dessert after dining on it.

I did feel the need to feature a treat on the air as well, however, so we made festive sweets from the recipe box of one of my area’s best bakers, Paula Rice of Charlemont. In plastic wrap or a sandwich bag, they’re an ideal hand out for trick-or-treaters. They’re also tasty all fall long. (Paula reports that she hasn’t made them yet this year, but she’s going to!)

The recipe below is Paula’s. Instead of her filling, I used my traditional cream-cheese frosting. Either way, the pies are welcomed by adults and children. They taste like pumpkin, spice, and fall.

Paula’s Pumpkin Whoopie Pies

Ingredients:

for the cookies:

1 pound light brown sugar
1 cup vegetable oil (I use Canola)
2 eggs
1-3/4 to 2 cups pumpkin puree (freshly cooked and mashed, or a 15-ounce can)
1 teaspoon each cinnamon, cloves, and ginger
1 teaspoon baking soda
1 teaspoon baking powder
2 teaspoons vanilla
3 cups flour

for the filling:

1 cup confectioner’s sugar
1 cup marshmallow fluff
1/2 cup vegetable shortening
1/2 cup (1 stick) unsalted butter at room temperature
2 teaspoons vanilla

Instructions:

Preheat the oven to 350 degrees.

For the cookies: Combine the sugar, oil, eggs, pumpkin, and spices in a large bowl, mixing well. Add the baking soda, baking powder, and vanilla, mixing well. Stir in the flour 1 cup at a time, mixing well after each addition.

Lightly grease baking sheets or line them with parchment or silicone. Drop rounded 2-tablespoon portions of dough onto the sheets.

Bake for 10 to 12 minutes, or until the cookies are firm. (A slight indentation where your finger tests them is allowable.)

Cool the cookies completely; then get ready to fill.

Beat together the filling ingredients, and spread them between whoopie layers. If you’re NOT handing these out to children in bags, feel free to decorate the tops as well.

This recipe makes about 20 filled pies. If you wish, you may make your whoopie pies bigger or smaller than indicated. (Paula likes small ones.)

If you make them bigger, you may have to cook them a little longer; smaller, a little less time.

And now the videos:

Tinky Makes Pam’s Country Ham and Potato Soup on Mass Appeal

Tinky Makes Paula’s Pumpkin Whoopie Pies on Mass Appeal

Apples on My Mind

Monday, September 11th, 2017

I have apples on the brain these days. They’re omnipresent on my road, brightening the neighborhood like Christmas ornaments on their trees. They’re also abundant this year at orchards again; new flavors seem to ripen every week. I eat at least one a day. I should be doing this because apples are healthy. I’m actually doing it just because I love them. My dog Cocoa smells the juice of recently picked apples whenever I bite into one and patiently (well, almost patiently) waits for a bite or two.

Apples will be my theme when I teach my next class at the Baker’s Pin next week. On the evening of Thursday, September 21, I’ll return to Northampton, Massachusetts, to create a whole meal with apples, from appetizer to dessert.

In fact, I recently devised one of the recipes below for that very class—my Apple Gruyère Pizza. When I made it on Mass Appeal last week, the pizza was completely consumed before the end of the hour-long show.

The swamp cake that follows is an applesauce cake I made years ago for the birthday of one of my favorite people in the world, my former roommate Alice from Dallas. Alice dubbed it “swamp cake” because of its tendency to swamp down in the middle. The swamping didn’t bother either of us; we just applied a little extra cream-cheese frosting in the swampy area.

If you know anyone in western Massachusetts who would like to join me at the Baker’s Pin, please tell him/her/them to register here. Slots are still open.

Enjoy the crunch, taste, and versatility of apples as we approach fall!

Apple Gruyère Pizza

If you want a lighter pizza or are serving vegetarians, brown the onion in extra-virgin olive oil instead of bacon fat. (Add a small amount of salt and pepper when you add the apple and garlic.) For vegetarians, omit the bacon on top; for light lovers, cut down on the bacon on top.

Ingredients:

6 slices of bacon
1 large onion (preferably sweet), thinly sliced
1 medium clove garlic, slivered
1 large apple, cut into thin chunks
1 medium pizza crust (about 1 pound)
extra-virgin olive oil as needed
2 cups (generous) grated Gruyère
chives to taste

Instructions:

A couple of hours before you are ready to make the pizza, take your pizza crust out of the refrigerator (if you are using a commercial crust; if your crust is homemade it won’t need cooling), place it on a greased baking sheet, and let it rest. After an hour and a half or so, preheat the oven to 475 degrees, lightly grease the baking sheet, and stretch the crust out on top. If you are paranoid like me, you may want to line the baking sheet with parchment, foil, or silicone.

In a large skillet fry the bacon. Remove it from the pan and place it on paper towels to drain. Set aside. Leave enough of the bacon fat in the pan to cover the bottom of the pan lightly. (You won’t need the rest of the bacon fat.) Toss in the onion slices, and cook them over low heat until they begin to caramelize (probably 20 minutes to 1/2 hour).

Throw in the garlic and the apple chunks and cook the mixture for another 5 to 10 minutes. Remove the pan from the heat.

Sprinkle most of the cheese on top of the pizza crust. Sprinkle the onion mixture on top (it won’t make a heavy topping), and top with the rest of the cheese. Bake the pizza until it looks done, 10 to 14 minutes.

While the pizza is baking, crumble the bacon and chop the chives.

When the pizza comes out of the oven, sprinkle the chives and bacon pieces on top. Let the pizza rest for a minute or two; then slice it. Serves 4 as a main course or 8 as an appetizer.

Swamp Cake

Ingredients:

1/4 cup (1/2 stick) sweet butter at room temperature
1/2 brown sugar, firmly packed
1/4 cup white sugar
1/2 cup applesauce (preferably homemade)
1 egg
1 teaspoon baking soda
1/4 teaspoon salt
1 teaspoon cinnamon
1/2 teaspoon cloves
1/2 teaspoon ginger
1 cup flour
1 cup raisins

Instructions:

Preheat the oven to 350 degrees. Butter and flour an 8-inch-square pan.

Cream together the butter and the sugars. Add the applesauce. Beat well; then beat in the egg. Beat in the baking soda, salt, and spices. Stir in the flour, followed by the raisins.

Spoon the batter into the pan, and bake until the cake tests done, about 25 minutes. Cool and eat plain or frost. Serves 8.

And now, the videos:

Tinky Makes Apple Gruyère Pizza on Mass Appeal


Tinky Makes Swamp Cake on Mass Appeal

Measuring My Days in Peaches

Thursday, August 24th, 2017

Peaches Awaiting Purchase (and Consumption!) at Apex Orchards

Tuesday was National Eat a Peach Day, a day we were unable to celebrate last year in my neck of the woods. We had a very warm winter in 2016. The local peach trees got confused (as did the rest of us!) and started to blossom in February. A cold spell shut them down in a hurry and destroyed the year’s peach crop.

When August arrived, not a single local peach could be found at local stores and orchards. The dearth of peaches hit farms hard. It also made consumers like me realize how much we take for granted.

My summer is measured out by the arrival of different fruits—rhubarb, then strawberries, then raspberries, then blueberries, then peaches, and so forth. When one of these fails to appear in farm stands and in my kitchen, I’m thrown way off balance.

I missed those few weeks of peaches more than I can say last year. I know we’ll have other bad peach seasons, thanks to bad luck and climate change. So I am determined to make up for last year’s dearth by eating peaches pretty much constantly this year. Fortunately, we have a bumper crop of peaches in western Massachusetts in 2017 so I can feast on them to my heart’s content.

Of course, in addition to eating peaches, I cook with them! On Tuesday I appeared on Mass Appeal to show off a couple of simple recipes. My friends at Apex Orchards in Shelburne supplied glorious peaches for testing and cooking, and I thank them.

I tried peach chipotle sauce a few years ago. This recipe is simpler than the previous one. Really, if one has perfect peaches and a little chipotle (and, yes, sugar!), one doesn’t need to complicate the flavors.

And who doesn’t love a good shortcake? As I say in the video below, my family likes to eat only shortcake (either strawberry or peach) for supper once a year. This filling meal isn’t super healthy—but once a year, who the heck cares?

Whether you cook the fruit or not, don’t forget to EAT A PEACH!

Peach Chipotle Sauce

The combination of sweet and spicy in this recipe really pops. The sauce works well with pork or chicken—or over crackers with cream cheese.

Ingredients:

2 cups peach slices
1-1/2 cups sugar
1 teaspoon lemon juice
1 pinch salt
1 to 2 canned chipotles in adobo sauce (plus a little of the sauce)
1 dab butter

Instructions:

In a nonreactive pot combine the fruit, a cup of the sugar, and the lemon juice. Let the mixture sit for an hour or so to allow the peaches to juice up.

Cook the peaches over low heat until tender. Add the remaining sugar, the salt, the chipotle, and the butter, and cook rapidly until thick, stirring frequently. Remove any foam you see. (There shouldn’t be too much, thanks to the butter.)

If you want jamlike consistency, the sauce will be ready when it sheets off a cold, stainless-steel spoon. If you don’t cook it that long, your sauce will just be a bit more liquid. (I like it slightly more liquid so I measure the sauce with an instant-read thermometer and turn off the heat when the thermometer reads about 215 degrees.) Really, you can’t go wrong.

Let the sauce cool for a few minutes; then pulverize it with a blender or immersion blender.

Refrigerate the sauce after it cools. Makes about 2 cups.

Peach Shortcake

Ingredients:

for the self-rising biscuits:

2 cups self-rising flour
2 tablespoons sugar
1 cup heavy cream
1 teaspoon vanilla
1 to 2 tablespoons milk
a small amount of melted butter (optional)
coarse white sugar (optional)

for the filling:

4 cups peach slices (more if you can’t resist)
1/4 cup sugar (plus more to taste if your peaches are tart)
the juice of 1/2 lemon

for assembly:

sweetened whipped cream

Instructions:

Begin by making the biscuits. Preheat the oven to 425 degrees.

Whisk together the flour and sugar. In a separate bowl (or a measuring cup!) combine the cream and the vanilla.

Make a well in the middle of the dry ingredients. Pour the cream mixture into the well, and gently stir until the mixture is combined, adding a little milk as needed to incorporate all the ingredients into the liquid.

Turn the dough onto a floured work surface, and sprinkle a little more flour on top. Fold the dough over several times; then pat it into a circle or rectangle that is about 1/2 inch thick.

Using a sharp biscuit cutter cut the dough into rounds, about 2 to 2-1/4 inches wide (or however wide you want them!). Place them on an ungreased cookie sheet (you may line the sheet with parchment or silicone if you’re paranoid about sticking). If you like, brush the tops of your biscuits with melted butter and sprinkle a little coarse sugar on top.

Bake the biscuits until they are golden brown (12 to 16 minutes). While they are baking combine the peaches, sugar, and lemon juice.

When you are ready to assemble your shortcakes, cut the biscuits in half horizontally. Decorate the bottom halves with the cooked filling followed by the strawberries; then dollop on whipped cream. Top with the biscuit tops.

Serves 6 to 8, depending on the size of your biscuits and the hunger of your guests.

And now the videos:

Tinky Makes Peach Chipotle Sauce on Mass Appeal

Tinky Makes Peach Shortcake on Mass Appeal